
1
ArcGIS Field Maps App Instructional Manual
IC eDNA Monitoring Program
U.S. Fish and Wildlife Service, Region 3
Contact:
Jeena Koenig, jeena_koenig@fws.gov
Ross Ruehmann, ross_ruehmann@fws.gov
Document Information:
IC eDNA Monitoring Program
ArcGIS Field Maps App Manual
Manual Number 1
2023 QAPP
Disclaimer
Reference to any products, services, hypertext link to third parties or other information by
trade name, trademark, supplier or otherwise does not constitute or imply its
endorsement, sponsorship, or recommendation by the U.S. Fish and Wildlife Service or its
contributors/employees.
MAREN
TUTTLE-LAU
Digitally signed by
MAREN TUTTLE-LAU
Date: 2023.03.31
15:15:47 -05'00'
2
Contents
ArcGIS Field Maps App Instructional Manual .......................................................................................... 1
1.0 ArcGIS Field Map App Basics and Set Up ........................................................................................ 3
1.1 Connect I-Pad to GNSS Receiver ................................................................................................... 3
1.2 Field Maps App Login ........................................................................................................................ 3
1.3 Field Maps App Settings .................................................................................................................10
1.4 Main Interface of Online Web Map .............................................................................................14
1.5 Setting up Device for Offline Use ................................................................................................19
2.0 Using ArcGIS Field Map App in the field .......................................................................................24
2.1 Collecting eDNA Sample Points ...................................................................................................24
2.2 Editing eDNA Sample Points.........................................................................................................31
3.0 Troubleshooting ....................................................................................................................................36
3.1 Microsoft Form ..................................................................................................................................36
4.0 Post Processing of eDNA Data and I-Pad Device .......................................................................37
4.1 Switching from offline collection to online collection on I-Pad Device ........................37

3
Application/Purpose:
Procedures listed in this Manual allow IC eDNA Monitoring staff the ability to collect field
data.
Roles and Responsibilities:
All field staff collecting data should be trained on the procedures listed in this Manual.
Training files are located here (file path).
1.0 ArcGIS Field Map App Basics and Set Up
1.1 Connect I-Pad to GNSS Receiver
To connect the GNSS receiver to the I-Pad device, go to settings under the I-Pad device and
under Bluetooth select the GNSS receiver to connect to (see below). Make sure the GNSS
receiver is turned on.
1.2 Field Maps App Login
A U.S. Fish and Wildlife Service ArcGIS Online (AGOL) account is needed to utilize
the ArcGIS Field Maps app (field maps app) for eDNA sampling. If an account is
needed, use the following link for instructions for how to activate your ArcGIS
Online account (See Getting Started on ArcGIS Online Header):
(https://doimspp.sharepoint.com/sites/fws-gis/SitePages/ArcGIS-Online.aspx).
Next, contact Jeena Koenig to be added to the FWS Great Lakes Region 3 FAC Invasive Carp
eDNA Collection AGOL group.
1) To log in, open the field maps app on your device.
2) The field maps app menu will provide two options for logging in (see below). Select
the Sign In with ArcGIS Online option.

4
3) Select Continue to allow the Field Maps App to use arcgis.com to Sign in (see
image below).
4) Sign in with Your ArcGIS organization’s URL should be selected as the login
method and from there a sign in screen for ArcGIS organization’s URL will
appear; fws should be entered in the blank box and select continue (see
image below).

5
5) Next, sign in Using Your U.S. Fish and Wildlife Service Account by selecting the blue
U.S. Fish and Wildlife Service button (see image below).

6
6) The U.S. Department of the Interior (DOI) log in will appear and the U.S.
Fish and Wildlife Service (FWS) DOI account and password should be
entered to sign in (see image below).

7
7) Select the Sign in with Microsoft Authenticator at the bottom of the DOI
Additional security screen (see image below).


9
The main menu will appear after logging in and should include the FWS Great Lakes Region
3 FAC Invasive Carp eDNA Collection AGOL Group (see image below). The Fisheries eDNA
Two pop-up window boxes may appear on first accessing the field maps app 1) If cellular
data is not enabled it should be allowed and 2) the field maps app should be allowed to
access location while using the app. You can also set the apps to use your location by going
to I-Pad Settings >Privacy>Location Services>Set field maps app to either While Using or
Always for Location.

10
1.3 Field Maps App Settings
1) Select the Profile Icon (blue person icon in top left-hand corner of screen) (see image

11
below).
2) In the Profile window, select the Collection Settings option (see image below).
3) Make sure the Accuracy is set to 30 feet and snapping is enabled (toggle should be set to
blue under the Snapping setting) (see image below).

12
If the location accuracy doesn’t meet the requirements set in the collection settings
window, the GPS accuracy at the top of the collection map will report in red the
number of feet or meters of accuracy the unit is currently acquiring (see image
below).
If this accuracy error shows up on your map, when a point is collected it will state no
valid location. A point can be collected by selecting Add Point and selecting Use Poor
Location. This action is not recommended unless necessary. Make sure to check
your Bad Elf unit connection to your device first (refer to Section 1.1 and Section
1.3).
4) Go back to the profile menu, select the Provider option.

13
5) The default provider is set to Integrated, select Bad Elf to set Location provider to
your Bad Elf Pro+ Bluetooth device, make sure it states below Bad Elf, LLC device is
connected (see image below). If connecting to Bad Elf for first time in field maps,
select Add to add Bad Elf device as a location provider and leave the default
Antenna height. See Section 1.1 if Bad Elf is not connected.
6) Next, Go back to the Profile menu and enable Auto-Sync under the
General group (toggle should be blue) (see image below).
7) Select Cellular Data option under the Profile menu. Make sure Sync and
Update is enabled (toggle is blue) and Downloads is enabled (toggle is blue).
8) Go back to the Profile menu. Select the Troubleshooting option under the Profile
menu. Make sure Logging is enabled (toggle is blue).

14
9) Select the View Logs option under the Troubleshooting setting to bring up the
Field Maps App log list. Select the share option in the top right-hand corner of
the Log menu to export logs to attach when reporting an issue (see image
below). The invasive carp eDNA app Microsoft reporting/feedback form can be
found under the Microsoft forms app or under the ArcGIS Resources page on
the R3 eDNA Program SharePoint site.
1.4 Main Interface of Online Web Map
The Fisheries eDNA Sampling map can be opened by tapping on the map thumbnail
image. Two pop-up window boxes may appear on first accessing the online web
map. 1) If cellular data is not enabled it should be allowed and 2) the field map app
should be allowed to access location while using the app.

15
The main interface for the Fisheries eDNA Sampling map has an assortment of
tools in the top Overflow menu bar (see image below).
1.4.1 Measure Tool
1) Select the Measure tool from the Tool Overflow Menu (see image above).
2) Tap the Add Point option under the measure sub-menu to add points to the map to
measure distance. Use the more options menu under the measure sub-menu to undo
adding a point (see image below).

16
3) Connect the last add point to measure for area and select close area from the
measure sub-menu (see image below). When finished with the measure tool, select
Clear then Done (see image above).

17
1.4.2 Markup Tool
Use the Markup tool to draw point or line annotations on the map to share or keep on
device for future reference. Markup layers can be used in any map and are user specific.
Please note the points, lines, and areas are not feature layers and should not be used
to store data.
1) Select the Markup tool from the Tool Overflow Menu.
2) Add a Markup Layer or rename a Markup Layer under the Markup Layers option
(see below).
3) Use the Plus icon to add a point feature to the map. Scroll up on the pop-up screen
and select Add A Label to label the point and select under Notes to add a note about
the point. Use the top ribbon menu to delete the feature, add an arrow to the feature,
or change the point color. Select Done when finished (see image below).

18
4) Draw on the map screen instead of selecting the plus icon to add a line or polygon to
the map (see image below).

19
5) Select the Share icon in the top ribbon when finished adding Markup features to
take a Screenshot Image or share the Markup Layer externally (see image below).
1.5 Setting up Device for Offline Use
There will be sample sites where cellular service is not readily available, and data
will need to be collected offline. All data should be collected in offline mode. If the
device is outside of cellular or Wi-Fi range, it is not possible to switch between
online and offline data collection.

20
1) Download a basemap by selecting the three point (Overflow) menu icon on
the Fisheries eDNA Sampling Map. Select Add Offline Area (see below).
2) Choose your work area by zooming into the entire area where the samples
will be collected or use the bookmark tool to zoom to an area of interest.
Note: You will not be able to add a point outside of the work area.
Make sure work area defines the entire sampling area. The square box
on your map shows the extent of the offline map based on the level of detail
selected (see images below).

21
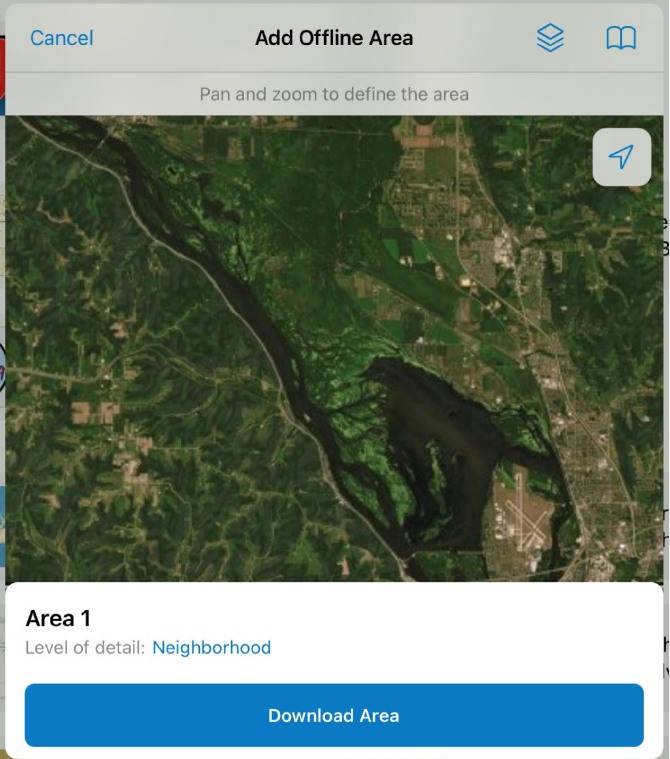
3) After the work area has been defined, select the level of detail by tapping on
the blue icon room (see image below) to set the display resolution of the
basemap. Don’t select beyond town level or else the basemap image will be
too grainy to use for collection (see image below). Check the estimated
download size to ensure that the device has enough storage space to save the
basemap.

22
4) Once defined, select download area to store the offline area on your I-Pad
device (see image below).
23
5) Once the offline area is downloaded, the collection method will be
automatically set to offline use.
6) Select the three-point (Overflow) menu icon next to the offline map area
to rename the area to the desired site name (see image below).

24
7) If needed, select the three-point (Overflow) menu icon in the top right-hand
corner of the on-device window to download more offline areas (see image
below).
8) Before going out in the field, tap and open the Offline Area needed for data
collection in the field.
Note: If an error pops up stating another offline area cannot be downloaded, try
logging out and logging back into the field map app. If the issue persists, try
restarting your I-Pad device. The restart should fix the issue, unless the offline areas
have surpassed the amount of storage the device can store.
2.0 Using ArcGIS Field Map App in the field
2.1 Collecting eDNA Sample Points
1) Use the collect new feature icon to record a sample point, which can be
opened by tapping on the plus symbol on the bottom right side of the
map screen (see image below).

25
2) Select the Basin being sampled. Note: If the wrong Basin is selected,
the point will need to be discarded and a new point created to select
the correct Basin. The waterbody list name does not automatically
re-populate when a different Basin is selected in the form view.
3) The fields for the point can then be edited by selecting each of the field
names (see image below). In some cases, if the comment field is opened
but nothing is entered, an error may appear when closing out of the
comment field box. If this is the case, entering a space in the comment
field box will allow for the field to be closed.

26

27
4) Once all the information has been filled out, the submit button in the top right
should be selected to upload the sample point to the web map (see above).
5) If the Estimated Accuracy window appears for the Bad Elf device, select
OK and continue collection (see below).

28
Important! Please make note of any environmental conditions that may affect the
quality of samples in the comments field. Also, please make note if not all samples
could be collected and identify the sample numbers. Comments field is limited to 500
characters so be concise.
6) If the coordinates for the sample point need to be updated, select the Update
Point icon before selecting submit. If your GPS has lost reception or you
clicked on the map at some point, you will need to update your location using
the GPS icon in the top right-hand corner (see image below).
7) The Update Point Icon will appear when you size down the data collection
window by holding and dragging your finger down on the gray bar (see
image below).

29
8) If the sample data is being collected offline, the sample point will only save
to the device. The sample data can be uploaded to the web map later when
the device is within cellular range.
9) To upload the data, the three point (Overflow) menu icon on the offline area
should be selected and then Sync should be selected under the menu options
to sync the points to the online web map (see image below).

30
Gray text below the offline area being used will report how many points have been
collected to the device and need to be uploaded to the web map (see image above).
10) Data may also be synced in the map by using the sync icon in the offline map
(see images below).
11) Auto sync may also be enabled using the sync icon within the offline map (see
above).

31
2.2 Editing eDNA Sample Points
Sample points can be edited or deleted after the sample point has been submitted in
the field maps app.
1) To edit the sample point, the point must be tapped on (selected) to
open the feature form (see image below).

32
2) Scroll down in the form to expand editing options. The copy option can be used to
copy attributes at your current location for a new point. The Collect Here option
creates a point at the same location as the current point but does not copy attribute
data.
3) For blanks, use the copy option to copy over sample data information and then
move the point using the map window buffer with cross to place point on top of
corresponding sample point (see image below). Once the cross in the buffer
window has been placed near the point, snap the point to the corresponding
sample point once the point turns orange with a white halo around it by releasing

33
the buffer window. Next, select update point to snap the blank to the
corresponding sample point.
Note: Ensure snapping is enabled under your profile in the field maps app
4) To unsnap the points, tap on the points to edit (see image below).

34
5) Next, tap on the point of interest to expand the point attribute window and select
edit at the bottom of the window and use the map window buffer and update point
tools to change the location of the point.
6) To batch edit points, select three-point (Overflow) menu icon in the top right-hand
corner (see below) and select Edit Multiple.
7) Next, Select the points on the map you would like to batch edit then select
Continue to batch edit or cancel to exit (see image below).

35
8) You can deselect any point by swiping to the left and selecting deselect (see image
above).
9) After selecting Continue, you can batch edit the points selected (see image
below). Multiple values under a field means there are different values
entered for this field. Values that appear as text under a field mean all
selected points have the same value. Blank values or entries without values
mean there has been no value entered for this field for the points selected.

36
3.0 Troubleshooting
3.1 Microsoft Form
1) If an issue occurs, try restarting the Field Maps application and/or restart the I-
Pad.
2) If the GPS becomes disconnected, you can select the GPS accuracy banner to try
and re-connect (see below).

37
3) If troubleshooting the issues does not work, please log the issue using the invasive
carp eDNA app Microsoft reporting/feedback form which can be found under the
Microsoft forms app or under the ArcGIS Resources page on the R3 eDNA Program
SharePoint site. Please make sure to attach your log files to the form.
4) An automated e-mail will be sent to the eDNA database coordinator and all eDNA
leads.
5) When the issue is resolved, please use the SharePoint list to change the issue status
to resolved and input the solution under the resolution field of the SharePoint list.
4.0 Post Processing of eDNA Data and I-Pad Device
4.1 Switching from offline collection to online collection on I-Pad Device
Sample data should always be synced to the online web map after data collection
before switching I-Pad device back to online collection mode (refer to Section 2.1).
Refer to Appendix A for QA/QC of eDNA data.
1) The Current should appear above the offline area if the data is being
collected in offline mode (see below).
2) To change back to the online mode, the three-point (Overflow) menu icon
next to the offline area should be selected (see above). Select the Remove
Area to switch back to online collection.
Note: Offline Areas can no longer be saved and stored to your device for future use
if switching from offline collection to online collection.
Note: If keeping device in offline mode, make sure to sync offline areas before going
out in the field if previously collected points need to be cleared from the map
(Coordinate with Jeena Koenig or Ross Ruehmann to have points cleared from the
map after QA/QC of the data (refer to ArcGIS Pro eDNA Editing Manual).
