
How to Make a Personal Facebook Account
on an iPhone
1. On your phone, you will have an application store from which you can
download social media apps, games, and more. It will look like the icon below.
Click to proceed.
2. In the search bar of the app store, type “Facebook”. Click the download button.

3. Return to your home screen and click on the Facebook icon. A screen
prompting you to “Join Facebook” will appear. Click the “Get Started” button.
4. Enter your name.
5. Next, enter your date of birth, your gender, and your mobile number or email.

6. Next, create a password. Be sure it is at least six numbers, letters, and
punctuation marks and is not a password that can be easily guessed.
7. Next, complete your sign up.

8. Facebook will ask if you would like to receive notifications on your phone from
when you receive a like, comment, share, event invite, or friend request. Click
“Allow” if you would like to receive notifications or “Don’t Allow” if you would not.

9. If you would like your phone to save your password to make logins simpler in the
future, click “Save Password.” If not, click “Don’t Allow.”
10. Next, you will be prompted to upload a profile photo. Your picture will make the
first impression to your friends, family, employers, and strangers on Facebook.
Create a profile that presents you well, avoiding any photos where your face is
not visible, photos with unfriendly facial expressions, or photos involving illegal
activities. To upload a profile picture, click “Choose a Photo” and select a
picture you have taken previously from your camera roll. If you do not have any
photos and would like to take a new one, select “Take a Photo” and you can
use your phone camera to take a photo to upload.

11. If you would like Facebook to have your location to best connect you to people
and places you may know or want to know, click “OK.” Then, click “Allow While
Using App.” If you would not like Facebook to have your location, select “Don’t
Allow.”
12. You can find friends to add on Facebook. Click the “Get Started” button. If you
would like to allow Facebook to access your contacts to add your friends and
family on Facebook more easily, click “OK” (in red boxes below). If not, click
“Not Now” and continue to Step 14.

13. Once Facebook has synced your contacts, it will identify which of your friends
and family members already have Facebook accounts and allow you to add
them. Click the “Add Friend” button next to anyone you wish to add.
14. Next, you will have to confirm the phone number or email you signed up with.
You should have received a text or email with the confirmation code. Enter it in
the box titled “Enter Confirmation Code”. If you did not receive a code, select
“Send Code Again,” “Change Phone Number,” or “Confirm by Email.”

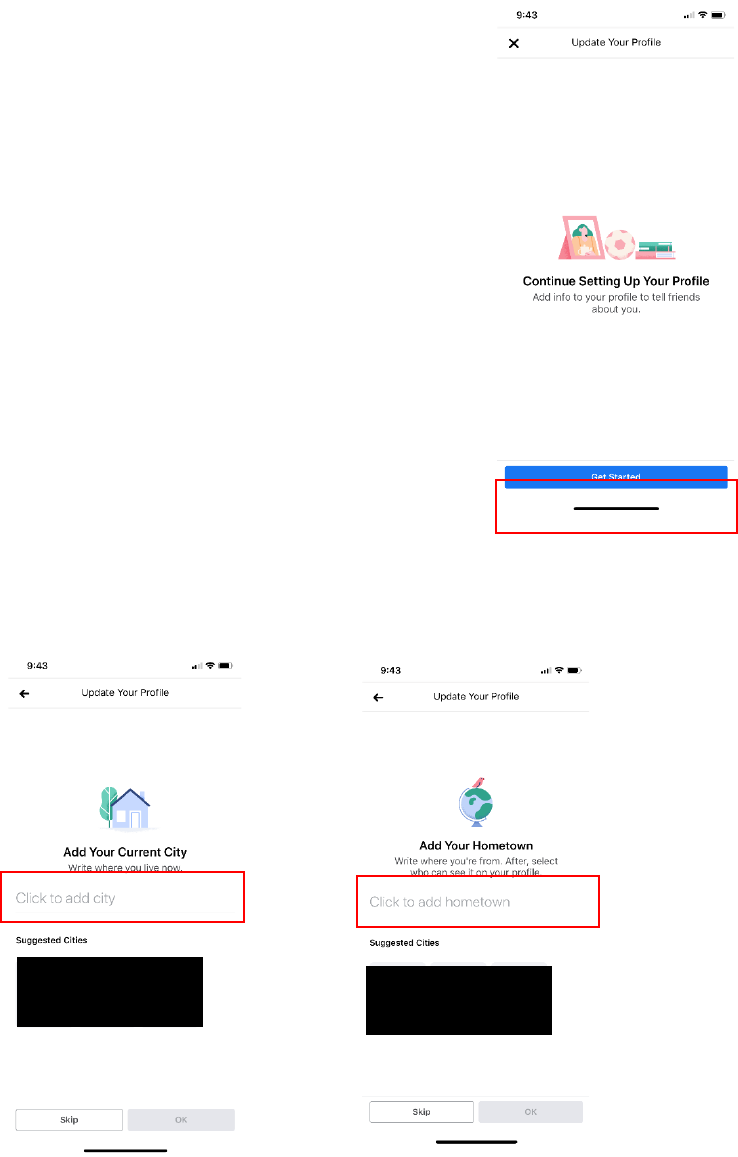
15. You have finished the initial setup of your account, but you can add additional
information if you wish. To do so, select the three-lined button in the bottom right
corner (in red box below). Then, click on your name right under the “Menu” button.
16. To complete your profile with more information about yourself and allow people
to get to know you more, you can:
a. Enter additional information
b. Create an introduction to yourself
c. Upload more photos
d. Share a Facebook status
e. View your timeline
f. Change privacy settings
g. Message friends and family
To add this additional information, click “Get Started”. Note:
Throughout this section, if you do not feel comfortable
sharing some information, you can always click the “Skip”
option.
Add Your Current City Add Your Hometown
Enter your current city and hometown in the boxes in red below.

Add Your School Add Your College Add Your Company
Enter your school, college, or and company in the respective boxes below.
Add Your Relationship Status
Enter your relationship status in the box below.

Add Your Cover Photo
If you would like to have a cover photo, click “Choose Pic”. You will have the option to
select a photo from Facebook stock photos, select artwork, create a collage, or
upload a photo from your camera roll on your phone.
Add More Information
If you would like to upload additional photos to be featured on your profile page, add
a bio, add your favorite hobbies, or add your favorite music, click the respective button
under each option.

Featured Photos Bio Hobbies Music
To add a short bio,
click in the area in
the box below. You
may tell people
more about
yourself, your
favorite quote,
what makes you
happy, or anything
represents you.
To add your
hobbies, you can
select some of the
popular hobbies in
the bubbles. If you
would like to add
more that you don't
see, click the
“Search for others”
button.
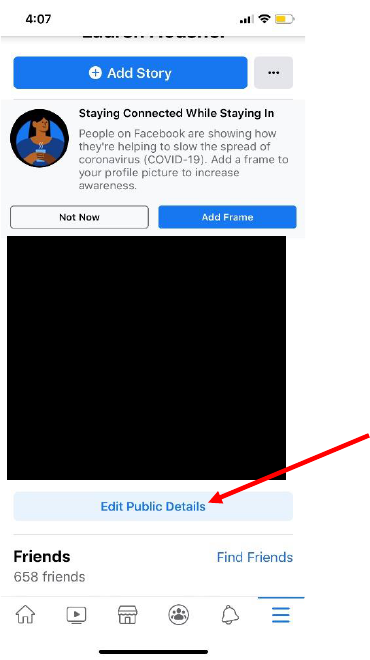
You can go back at any time to edit the information on your profile. To do so, click the
“Edit Public Details” button.

Share a Facebook Status
1. You can update your Facebook status by clicking the home button at the
bottom left hand corner of the screen (in red box below). Then, enter your status
update in the text box titled “What’s on your mind?”.
View your Timeline
1. To stay up to date on your friends’ and family’s status updates and shares,
you can check out your timeline. To view, click the home button at any time.
2. You can then like, comment, and share others’ statuses. Under every status,
you will see three options, shown below.
Change Profile Settings
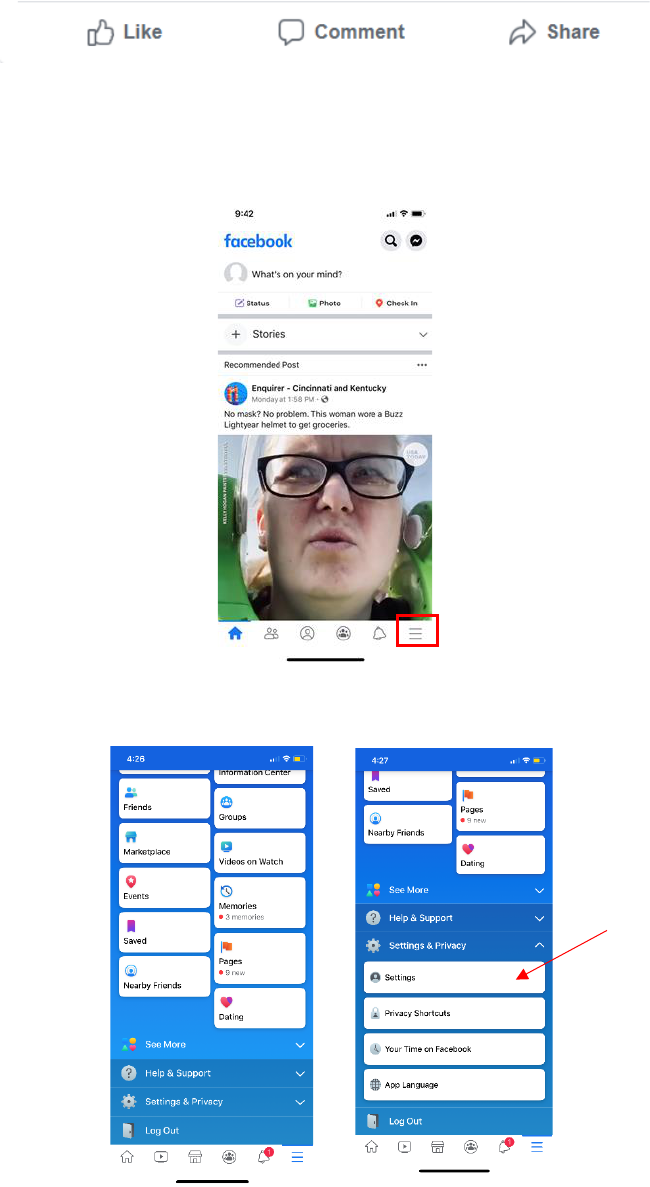
1. To change your profile settings, click the three-lined button in the bottom right-
hand corner of your screen.
2. Then, scroll down to “Settings.” You will then be in your account settings. There
are many possibilities here.

a. To change your security or login information
b. To create a private account, click the “Privacy” button. From here, you
can alter who can find your posts and who can contact you.
c. To customize who can post on your timeline and who can tag you in
posts, click the “Timeline and tagging” tab.
d. You may also change story, location, blocking, language, face
recognition, notification, mobile, and public post settings by clicking the
corresponding buttons on the screen.
Message Friends and Family
1. You can also privately message your friends and family. To do this, you will need
to download an additional app called “Messenger.” To do this, go to the app
store, type in “Messenger,” and select the button to the right of it to download it
(NOTE: This image says “open” because Messenger was already downloaded.
This may look different on your screen).

2. Once you click on the app and login with your Facebook login information, you
can start a chat with your friends and family. Type in the name of the friend you
would like to message and type a message in the box to send. For more detailed
information on using Facebook Messenger, please see the Facebook Messenger
Instructional Guide.
