Rideshare App Instructions
We recommend that rideshare users create a business profile for Uber and Lyft. This will help separate
SLCC transactions from personal transactions. This will also help prevent accidental use of a credit card,
such as using a p-card for personal ride.
In addition to these benefits, you can connect your business profile to Chrome River. This will allow the
receipts to automatically upload into your Chrome River profile for each ride.
Please follow the instructions on the following pages to create your business profile and connect it to
Chrome River.

Lyft
Chrome River offers expense integration with the Lyft for Business ride-sharing application to
automatically submit and process Lyft receipts within Chrome River. For users who have enabled this
feature via their Lyft Business Profile, any ride receipt will automatically be sent to their business email
address and CCed to Chrome River.
Creating Your Lyft Business Profile
Before you can begin using Lyft with Chrome River, you must create a Lyft for Business Profile and then
connect it to Chrome River (see Connecting Chrome River to Your Lyft for Business Profile, below).
1. Download and open the Lyft app, then tap on the menu button in the upper left-hand corner.
• If you do not already have a Lyft account, download the app and create a new account. You do
not need to use your SLCC email address to create the account. You can use a personal email
account. You will enter your SLCC email address when you create your Business Profile in the
steps below.

2. Select VIEW PROFILE.
3. Tap BUSINESS PROFILES.

4. On the introductory screen, tap GET STARTED.
5. Enter your SLCC email in the Work Email field. Then tap NEXT.
6. Select the default payment method for Lyft for Business rides. To add your p-card, if applicable, tap
ADD CREDIT CARD. Enter your credit card information, then tap SAVE. This will store your p-card only in
your business profile. It will not be listed in your personal profile.
7. Lyft will send a verification email to the account you entered.
8. In the email, tap CONFIRM WORK EMAIL.
9. This will open a browser window. Enter the phone number attached to your personal Lyft account. A
code will be sent by text. Enter the code and submit. When prompted, enter the email associated with
your personal Lyft account. This will link your business and personal Lyft profiles.

Connecting Chrome River to Your Lyft for Business Profile
Now that you have created a Lyft for Business profile, you must connect it to Chrome River.
1. Navigate back to Business Profiles in the Lyft app.
2. Tap RECEIPT FORWARDING.
3. Select CHROME RIVER from the list.

Using Lyft for Business
1. Open the app and enter a destination.
2. At the bottom change the switch to the Business Profile (suitcase icon). (Note when scheduling a
personal Lyft, ensure that you have selected your personal profile, person icon.)
Note: If you forget this step at the beginning, you will have another chance to change the ride to
Business on the Ride Payment screen that appears after the ride ends.
3. Your ride receipt will automatically be sent to your business email address and CCed to Chrome River.
Uber
Chrome River offers expense integration with the Uber for Business ride-sharing application to
automatically submit and process Uber receipts within Chrome River. For users who have enabled this
feature via their Uber Business Profile, any Uber receipt will automatically be sent to their business
Note that there is an 11-hour grace period between when Uber sends the user a receipt and when Uber
sends the receipt to Chrome River.
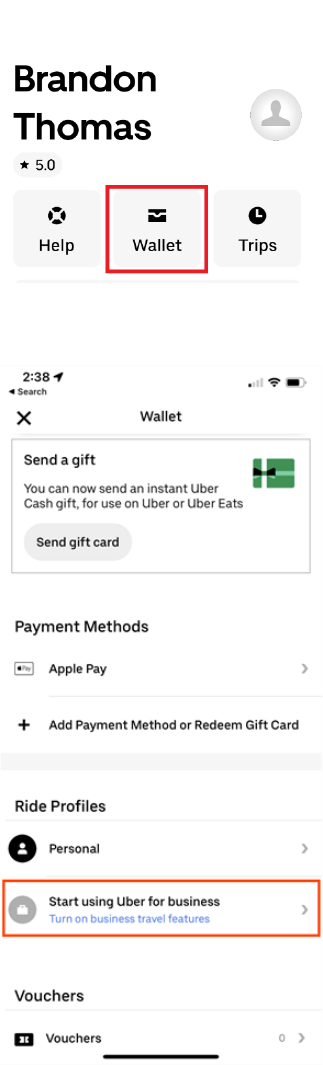
Create an Uber Business Profile and Connect Chrome River
If you do not already have an Uber account, create a new account.
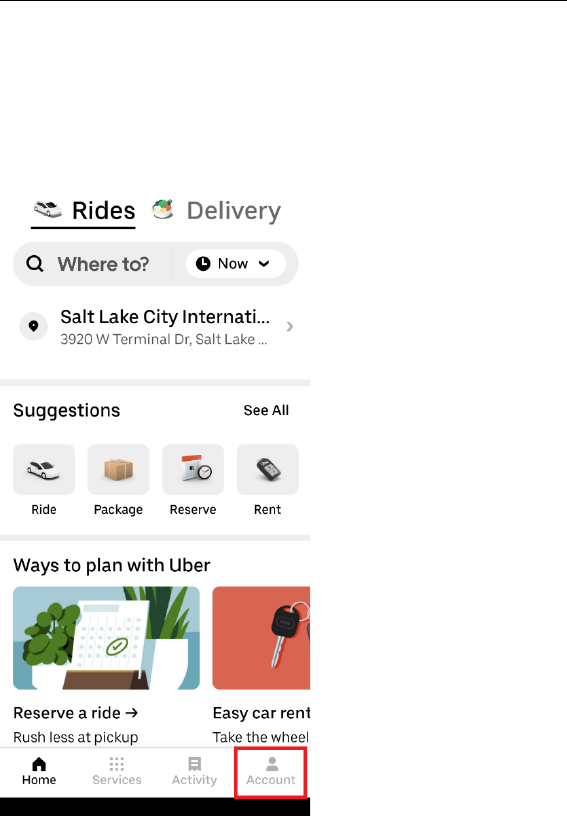
1. Open the Uber app and tap on the Account icon.

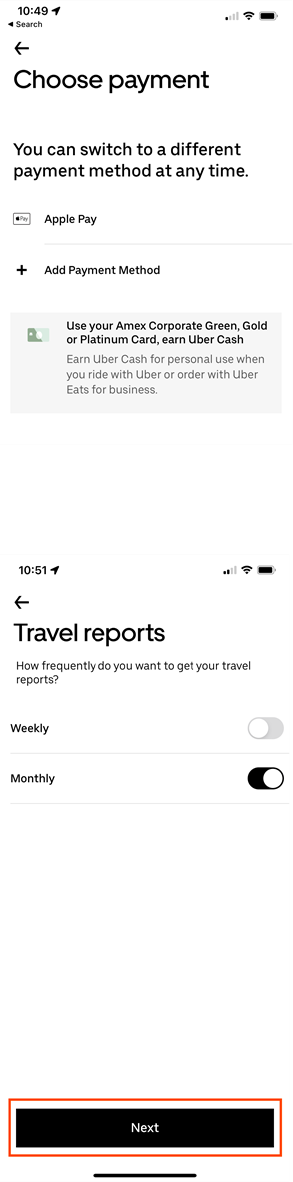
7. Select how you would like to pay for business trips on Uber. You can add your p-card to this profile.
8. Select your desired frequency for receiving Uber travel reports. You may change this later in the
Wallet > Ride Profiles > Business > Travel Reports settings. Tap NEXT.


3. Select the desired ride type. If PERSONAL is displayed above the Confirm button, tap it to switch to
Business.
4. Tap the gray BUSINESS button. It will turn blue to indicate the switch.
6. Tap the CONFIRM button.
7. Your ride receipt will automatically be sent to your business email address and CCed to Chrome River.
If you add a tip after completing the ride, you will receive a second email with "UBER Tip Charge" in the
description. You will see just the tip amount of this second transaction when it appears in Chrome River,
and it will be merged with the second credit card charge.
