
2015.7.24
D08955
Printed in China.
Head Office TOTO Europe GmbH
Zollhof 2, 40221 Düsseldorf Germany
Tel:+49 (0)700 8686 0700
You are advised to record the following information to allow quick service.
Date of purchase : Name of shop :
Tel :
Date : year month day
WASHLET
Instruction Manual
■
Thank you for your recent purchase of the product.
Please read the enclosed information to ensure the safe use of your product.
■
Be sure to read this Instruction Manual before using your product and keep it in a
safe place for future reference.
TCF6532G/GE/SW
TCF6530G/GE/SW
TCF6532C3GV1

2 3
Safety Precautions .................... 4
Operational Precautions .......... 11
Parts Names ........................... 12
Preparation .............................. 14
Changing Settings ................... 32
What to Do?............................. 38
●
If you cannot operate with the
remote control ...................... 38
●
Freeze Damage Prevention
... 38
●
Long Periods of Disuse ........ 40
Troubleshooting ....................... 41
Specifi cations .......................... 45
Warranty .................................. 46
Important User Guidance
Information............................... 46
Basic Operations ..................... 16
Automatic Functions ................ 20
DEODORIZER, PRE-MIST
Temperature Adjustment.......... 22
Energy Saver Feature ............. 24
Power Plug .............................. 26
Main unit .................................. 27
Gap between the Main Unit
and the Toilet Lid ..................... 28
Deodorizing Filter .................... 29
Wand ....................................... 29
Wand cleaning
Spray Nozzle ........................... 30
Water Filter Drain Valve,
Water Drain Plug ..................... 31
What functions are available on your model?
Table of Contents
Functions
WASHLET
Ref.Page
TCF6532
TCF6530
Basic
Functions
Cleansing
Rear cleansing
●
16Rear soft cleansing
Front cleansing
Changing the washing
method
Wand position adjustment
●
16, 17
Water pressure adjustment
Oscillating cleansing
Pulsating cleansing
Personal setting lock
Drying
Warm air drying
●
16
Changing the temperature
Temperature adjustment
●
22, 23
Sanitary
Functions
Removing odors
Deodorizer
●
20, 21
Bowl pre-cleaning
Pre-mist
●
Convenient
Functions
Heating the toilet seat
Heated seat
●
-
Saving energy
Energy Saver
●
24, 25
Maintenance
Removable toilet lid
●
28
Wand cleaning 29
Product name (Model)
Part No.
Product name,
Part No.
A mist is automatically sprayed
in the toilet bowl to create a water
cushion, which prevents dirt from
adhering to the surface.
A mist is sprayed inside the toilet bowl to
make it more diffi cult for dirt to adhere.
Removing odors inside the toilet bowl.
As you sit
Pre-mist
Deodorizer
The self-cleaning functions operate
automatically.
(See pages 20 for details.)
ReferenceMaintenanceOperation
Introduction

4 5
These precautions are important for safe usage. Be sure to follow them and use the product correctly.
Symbols and Meanings
WARNING
May result in death or serious injury.
CAUTION
May result in injury or property damage.
The following symbols are used to indicate important safety instructions for the use of the product.
Symbol Meaning
This symbol indicates a prohibited use of the product.
This symbol is used to indicate a required step in the use of this product.
This product is classifi ed as Class 1 Equipment and must be grounded.
Install this equipment where the electrical outlet is accessible.
This appliance is not intended for use by persons (including children) with reduced physical, sensory or
mental capabilities, or lack of experience and knowledge, unless they have been given supervision or
instruction concerning use of the appliance by a person responsible for their safety.
Children should be supervised to ensure that they do not play with the appliance.
Use the new hose set included with this equipment. Do not reuse an old hose set.
WARNING
Do not touch the power plug or connection of electrical box with wet hands.
Doing so may cause electrical shock.
Do not get any water or cleaning solution on the main unit or power plug or
electrical box.
Doing so may cause fi re, electrical shock, heat or short circuit.
Doing so may cause the product to crack resulting in injury or water damage.
Never disassemble, repair or alter.
Doing so may cause fi re, electrical shock, heat or short circuit.
Do not install the product on moving vehicles such as wheeled vehicles or
boats.
Doing so may cause fi re, electric shock, short circuit or malfunction.
The toilet seat, toilet lid, main unit or other parts may come loose and fall off, resulting in injury.
Safety Precautions
WARNING
Do not use the Washlet if a malfunction occurs.
Always unplug the plug from the outlet.
Always switch the breaker on the distribution board to OFF. (Electrical box type, Concealed power
connection type)
Close the water shutoff valve to stop water supply.
Possible malfunctions:
Water is leaking from a pipe or the main unit.
The product is cracked or broken.
The product makes a strange noise or emits a strange odor.
The product emits smoke.
The product is abnormally hot.
The toilet seat cushion is out of place.
Continued use after malfunction could cause a fi re, electric shock, heat, short circuit, injury or
water damage.
Only use tap water or potable well water (underground water).
Do not use seawater.
Doing so may cause irritation to the skin and malfunction.
Do not touch the power plug or electrical box during thunderstorms.
Doing so may cause electrical shock.
Do not allow the water supply hose to touch the power plug or outlet or
electrical box.
Doing so may cause condensation resulting in a fi re, electrical shock, heat or a short.
Do not do anything that may damage the power cord, power plug.
Do not strike, yank, twist, excessively bend, damage, alter, or heat the electrical cords. Also, do
not place anything heavy on, bind or pinch the electrical cords.
Using a damaged electrical cord may result in a fi re, electrical shock, heat or short.
Do not use a loose or faulty electrical outlet.
(Except electrical box type, Concealed power connection type)
Doing so may cause fi re or short circuit.
Do no use any outlet or wiring equipment beyond its specifi ed rating.
Plugging too many plugs into the same outlet, for example using outlet splitters, can cause fi re
due to heat.
Do not use any power supply other than the one specifi ed.
AC 220V - 240V, 50Hz
Doing so may cause fi re or excessive heat.
Introduction

6 7
WARNING
To reduce the danger of burns, death from electric shock, fi re or other
human injury:
Never operate this product if it has a damaged cord or plug, if it is not working properly, if it
has been dropped or damaged, or if it has been dropped in water. Return the product to TOTO
Europe GmbH for examination and repair.
Never block the air openings of the product or place it on a soft surface, such as a bed or a
couch, where the air openings could be blocked. Keep the air openings free of lint, hair or a
similar material.
Never use it while sleepy or drowsy.
Never drop or insert anything into any opening or hose.
Do not use it outdoors where aerosol (spray) products are being used or where oxygen is
being administered.
Do not stick a fi nger or anything else into the warm air outlet.
Do not place anything on the warm air outlet or drape clothes over it.
Doing so may cause burns, electrical shock or malfunction.
Keep cigarettes and other open fl ames away from the product.
Failure to do so may cause fi re.
Beware of irritation or burn
Improper use of the toilet seat may cause irritation or burn.
When sitting for a long time on the toilet seat, switch the toilet seat temperature adjustment to "OFF".
When any of the following persons use a heated seat or warm air drying, someone should switch
the toilet seat temperature adjustment to "OFF" and switch the drying air temperature to "Low".
Young children, the aged and other users unable to set the temperature appropriately themselves
The ill, physically disabled and others who do not have freedom of movement.
Those using any medicines that cause drowsiness (sleeping or cold medicine), those who have
been drinking heavily, anyone severely fatigued and anyone else liable to fall asleep.
To reduce the danger of burns, death from electric shock, fi re or other
human injury:
Close supervision is necessary when this product is used by or near children or invalids.
Use this product only for its intended use as described in this manual. Do not use accessories
not recommended by the manufacturer.
Keep the cord away from heated surfaces.
Connect this product to a properly grounded outlet only.
The tank should only be fi lled with water.
Safety Precautions (Continued)
WARNING
This is an electrical product. Do not install it anywhere water is likely to
get on the product or anywhere with humidity high enough that water is
likely to form on the surface of this product. When using the product in a
bathroom, install a fan or ventilation port and ensure good air fl ow through
the bathroom.
Failure to do so may cause fi re or electrical shock.
Always connect the Washlet to the cold water supply.
Connecting to hot water supply may result in burns and equipment damage.
Check that an appropriate ground is installed.
If the ground is not installed, if there is a breakdown or electrical current leak, the lack of a
ground could cause electrical shock.
For the ground, use copper wire with a ground resistance of 100 Ω max. and a diameter of 1.6 mm min.
* If there is no ground installed, ask the contractor who did the installation to install the ground.
Make sure that a properly grounded (3 prong) outlet has been installed.
Failure to install a grounded outlet could cause electrical shock in the event of a malfunction or
short circuit.
Check that the outlet for electrical power is as follows.
Failure to do so may cause fi re or electrical shock.
a. Apply a current to the outlet (or device) through a differential residual current device whose
release current does not exceed 30 mA.
b. Install the outlet (or device) and its wiring plug at least 0.60 m away from the outside of the
shower tub or bathtub.
* Check that the wiring in a. and b. above is complete. If the wiring has not been completed, ask
the contractor who did the installation to do it.
Insert the power plug securely into the outlet.
Check that the power cord is connected.
(Electrical box type, Concealed power connection type)
Failure to do so may cause fi re, heat or short circuit.
* When installing this product, observe the local laws and regulations regarding installation.
To unplug, hold the plug, not the cord.
(Except electrical box type, Concealed power connection type)
Do not unplug by pulling the cord.
Pulling on the cord may cause damage and result in fi re or heat.
If the electric cord is damaged, avoid danger by having the manufacturer’s
repair department or equivalent specialist replace it.
Introduction
8 9
Safety Precautions (Continued)
WARNING
Always disconnect the power plug from the outlet before cleaning,
maintenance or inspection.
Always switch the breaker on the distribution board to OFF.
(Electrical box type, Concealed power connection type)
Failure to do so may cause electrical shock or malfunction.
Periodically remove dust and dirt from the power plug and make sure it is
securely plugged into the wall outlet.
(Except electrical box type, Concealed power connection type)
Failure to do so may cause fi re, heat or short circuit.
Pull the plug out from the outlet and wipe clean with a dry cloth.
CAUTION
Do not use the product if the main unit is unstable.
Doing so may cause the main unit to come loose and fall, resulting in injury.
* If there is backlash in the main unit, consult the installer, seller or the contact listed on the back
cover of this manual.
If the product is damaged, do not touch the damaged section.
Doing so may cause electrical shock or injury.
Replace it immediately.
Do not apply strong force, mechanical shock, step on or stand on the toilet
seat, toilet lid or main unit. Also do not place any heavy object on the toilet
seat, toilet lid or main unit.
Doing so may cause cracking or cause the main unit to come loose and fall, resulting in injury.
Doing so may damage the product and cause injury or water damage.
Do not lift up this product by the toilet seat or lid.
Do not raise the toilet seat or lid while objects are resting on top of the toilet.
Doing so may cause the main unit to come loose and fall, resulting in injury.
To reduce the danger of death from electric shock:
Do not use while bathing.
Do not place or store the product where it could fall or be pulled into a tub or sink.
Do not put in or drop into water or other liquid.
Do not try to recover the product if it has fallen into water. Unplug it immediately.
Switch the breaker on the distribution board to OFF. (Electrical box type, Concealed power
connection type)
When cleaning or maintaining the plastic parts (main unit etc.) or the water
supply hose, use a kitchen cleaner diluted with water. Do not use any of the
following.
Toilet cleaner, household cleaner, benzene, paint thinner, powdered cleanser or nylon scrubbing pads.
These items may damage or crack the plastic and cause injury or malfunction.
These items could damage the water supply hose and cause a water leak.
To prevent a sudden water leak, do not remove the water fi lter drain valve
when the shutoff valve is open.
Doing so will cause water to spurt out.
(Refer to Page 31 for instructions on cleaning the water fi lter drain valve.)
Do not fold or crush the water supply hose; do not damage by cutting with a
sharp object.
Doing so may cause water leaks.
Introduction

10 11
Operational Precautions
■
For prevention of damage
●
Wipe plastic areas such as the
main unit and remote control with
a soft cloth tightly wrung out with
water.
Dry cloth or tissue
●
Do not lean against the toilet lid.
■
Problem Prevention
●
Disconnect the power plug if there is a risk of lightning.
Switch the breaker on the distribution board to OFF.
(Electrical box type, Concealed power connection type)
●
A toilet seat cover or a toilet lid cover cannot be used.
(The seat switch may not function properly.)
Covers
●
Do not urinate on the main unit, toilet seat or wand.
(Doing so may cause pink or brown stains or a malfunction.)
●
Do not apply strong forces to the control panel of the remote control.
●
When using a toilet cleaner to clean the toilet, wash it off
within 3 minutes and leave the toilet seat and toilet lid open.
Wipe off any cleaner that remains on the toilet bowl.
(If vapor from a toilet bowl cleaner enters the main unit, it
may cause a malfunction.)
●
Do not use the product with the toilet lid removed.
●
Do not expose to direct sunlight.
(Doing so may cause changes in color, irregular heated
seat temperature, remote control malfunction or Washlet
malfunction due to the change in temperature.)
●
Use radios, etc. away from the Washlet.
(The Washlet could cause interference with the radio signal.)
●
If you use a booster seat for infants or a soft highchair,
remove it after use. (Keeping it installed may prevent
some of the functions from being used.)
●
Do not apply force to the remote control. (May cause malfunction.)
To prevent the remote control from being dropped, set it in the hanger
when you are not using it. Be careful not to expose it to water.
●
Do not place anything on the toilet seat and lid, and do
not press them with hands.
Failure to do so may turn on the seat switch, causing the
fl oor to get wet if buttons on the remote control are touched
and warm water comes out from the wand. (The seat switch
may turn on if force is applied to the toilet seat or lid.)
About rear cleansing, rear soft cleansing and front cleansing
These functions wash away waste and dirt from
a localized area of your body.
Do not cleanse too much or for too long.
Doing so may wash away normal bacteria, upsetting
the balance of bacteria inside your body.
People who are receiving medical treatment or
therapy in this localized area should consult
their doctor before use.
■
For prevention of malfunctions
●
Do not block the remote control transmitter or receiver.
< About the seat switch >
●
When you sit on the toilet seat, the seat switch turns
ON, enabling you to use various features.
(A click sound is heard when the seat switch is ACTIVATED.)
Gap
The toilet seat lowers.
Switch
ON
Seat switch
(Built-in)
●
Sit back on the toilet seat.
The seat switch will not turn on unless you sit
on the seat properly.
Note
When a child uses the Washlet, the seat switch
may not be ACTIVATED by their light body weight.
Since the toilet seat is designed to move up
and down, a clearance is provided between the
toilet seat cushion and the toilet bowl.
Safety Precautions (Continued)
CAUTION
If a water leak should occur, always close the shutoff valve.
When the ambient temperature is likely to drop to 0°C or lower, prevent
damage to the pipes and hoses due to freezing.
Frozen water pipes could cause the main unit and the pipes to break, resulting in a water leak.
Regulate the room temperature to prevent the pipes and hoses from freezing during cold months.
Drain the water.
When not using the Washlet over an extended period of time, drain the
water out of the main unit and the water supply hose after closing the water
shutoff valve, and pull the electrical plug from the outlet.
Switch the breaker on the distribution board to OFF.
(Electrical box type, Concealed power
connection type)
When using the product again, allow the product to refi ll with water fi rst. Otherwise, the water in
the tank might become contaminated and cause skin infl ammation or other problems.
(Refer to Page 39 for instructions on replenishing the water.)
Leaving the power on may cause fi re or heat.
When installing the water fi lter drain valve, make sure that it is securely
tightened in its proper position.
Failure to securely tighten it may cause a water leaks.
Introduction

12 13
TCF6532
Parts Names
Left side of main unit
Right side of main unit
Main display
Descriptions in this manual are based on the illustrations of TCF6530.
Toilet seat
cushions
Cover Water drain plug (Page 40)
Water fi lter drain valve
(Page 31)
Remote control receiver
POWER LED
SEAT LED
ENERGY SAVER LED
WATER LED
The toilet seat and lid shape varies by model.
Deodorizer outlet
Deodorizing fi lter (Page29)
Toilet lid cushion
Wand cover
Wand
Spray nozzle
Toilet lid
Power cord
Water
supply hose
Seat switch
(Built-in)
Warm air outlet cover
Product name, part no., etc.
Heated seat
The cover shape varies by model.
Introduction
[Electrical box type]
[Power plug type]
[Shutoff valve]
Electrical box
Power plug
(Page15)
Shutoff
valve
(Page15)
[Shutoff valve (Concealed power connection type)]
[Power connection (Concealed power connection type)]

14 15
2. Turn on the power
1
Insert the power plug.
Switch the breaker on the
distribution board to ON.
(Electrical box type, Concealed power
connection type)
The wand extends and then retracts.
2
Check that the POWER LED
on the main display is lit up.
Lit
1
3. Open the shutoff valve
1
Fully open the shutoff valve.
Shutoff
valve
[For shutoff valve
(Concealed power connection type)]
Shutoff
valve
Note
●
If the tank is empty it will take some minutes until
water is discharged from the nozzle.
If the remote control is secured
(for anti theft)
1
Remove the screw from the
remote control fi xture.
Remote control
Hanger
Screw
Phillips screwdriver
Wall
(View from side)
2
Remove the remote control
from the hanger.
■ To secure the remote control again
Tighten the screw.
(Overtightening may cause damage to parts
such as the hanger)
1. Insert the battery
1
Remove the remote control
from the hanger.
Remote control
Hanger
2
Open the battery cover and
insert two AA batteries.
Close
Open
Battery cover
●
When batteries are properly inserted,
temperature levels appear on the display of
the remote control (back side).
●
The display goes out when no button on the
remote control is pressed for 5 minutes or
more.
3
Mount the remote control in
the hanger.
■
About the batteries
●
Use dry cell, alkaline batteries. Follow the instructions
below to prevent the batteries from rupturing or
leaking fl uid.
When replacing the batteries, use new batteries of
the same brand.
If you will not be using the remote control for a long
time, remove the batteries.
Do not use rechargeable batteries.
Preparation
Using the Product for the First Time
Introduction

16 17
Press a button on the remote control; a beep sounds when the main unit receives the signal.
Stopping
Cleansing
Drying
Personal Setting
[STOP]
Stops the operation.
[REAR]
Cleanses your rear.
*
The mode changes between [SOFT] (Flickering) and
[REAR] (Lit) each time the button is pressed.
[SOFT]
Washes your rear with mild water pressure.
[DRYER]
Dries your rear.
[FRONT]
Serves as a bidet for ladies.
[USER1] / [USER2]
You can store your preferred wand position, water pressure and water temperature a setting.
● To store a setting
While cleansing is in progress, set your preferred wand position, water pressure, and warm water
temperature, and then press and hold [USER 1] or [USER 2] for 2 seconds or longer.
● To use
Press [USER 1] or [USER 2], and then press the button for the cleansing you want to use.
*The wand position and water pressure lamps will light up for about 10 seconds in their set
positions, and the water temperature display switches.
● Functions that operate when a button is pressed during "REAR", "SOFT" or "FRONT" cleansing.
[OSCILLATING]
●The wand moves back and forth to
wash your rear thoroughly.
●
The setting changes between "ON" and
"OFF" each time the button is pressed.
[POSITION]
●The wand position can be adjusted to
the front or rear.
("▲": Moves to the front, "▼": Moves to
the rear)
[PULSATING]
●Washes with the water pressure
pulsating between soft and strong.
●
The setting changes between "ON" and
"OFF" each time the button is pressed.
[PRESSURE]
●The water pressure strength can be
adjusted for cleansing functions such
as REAR.("-": Softer, "+": Stronger)
●
Sitting back on the toilet seat makes it easier to adjust the
wand position and to reduce splashing.
Note
Basic Operations
For your information
●
Water may sometimes come out from around the wand while water
is warmed up or when it expands in the warm water tank.
●
As warm water tank is used as hot water system, the temperature
of warm water may become lower if it is continuously consumed.
Operation

18 19
1
Press .
The display screen
changes.
1. CLE ANING
2. ENERGY
SAVER
3. AUTO
FUNCTIONS
4. OTHER
SETTINGS
MENU 1/4
PUSH ENTER
SELECT
2
Set the item from the display screen.
When you move
the
buttons (Up/Down),
the frame of the item
moves.
When you move
the
buttons (Right/Left),
you can select “Setting”.
When you press
the
button,
the item is entered.
Press [MENU] to display the menu
screen.
Remote control back side
Level 1 Level 2 Level 3
1. CLEANING
2. ENERGY
SAVER
3. AUTO
FUNCTIONS
4. OTHER
SETTINGS
MENU 1/4
PUSH ENTER
SELECT
WAND
CLEANING
MODE ON/OFF
CLEANING
1/1
CLEANING
1/2
1. PRE-MIST
ON
2. DEODORIZER
ON
1. AUTO ENERGY
SAVER
OFF
ENERGY
SAVER
1/1
1. CLEANING
AUTO
FUNCTIONS
1/1
1. BEEP
2. SETTING
LOCK
OTHER
SETTINGS
1/3
OFF
ON
3. PERSONAL
SETTING
LOCK
ON
WATER
TEMPERATURE
SETTING
SEAT
DRYER
DIRECTIONAL
[ENTER]
[MENU]
[TEMP]
Adjust temperatures (Page 22)
Remote controller
display
Select keys
:Select an item
:Select a setting
SETTING LOCK
You can lock the settings so that you
do not mistakenly operate the rear
buttons while using the remote control.
How to Set (Page 36)
Display screen during setting lock
SETTING LOCK
PRESS ENTER
FOR 2 SEC
TO RESET
Menu Screen
Number of items
on display
PUSH ENTER
SELECT
The next step is shown at the bottom
of the display screen.
Basic Operations
About the Menu Screen
This section is an overview of the settings that can be confi gured with the remote control.
See the corresponding pages for the detailed descriptions.
You can set as desired
If you want to return to the previous item, press the button.
Operation

20 21
As you approach
As you sit* As you stand up*
Changing
settings
Note
DEODORIZER ON/OFF
(Page 34)
Removing odors inside
the toilet bowl
DEODORIZER
Deodorizer stops
➝
It stops after about 2 minutes
Starts the deodorizer
PRE-MIST ON/OFF
(Page 34)
A mist is sprayed inside the
toilet bowl to make it more
diffi cult for dirt to adhere
PRE-MIST
• The pre-mist will not spray for about
90 seconds after you stand up from
the toilet seat.
A mist is sprayed inside
the toilet bowl
* Water comes out from around the wand.
Automatic Functions
Cleaning Features
Operation
22 23
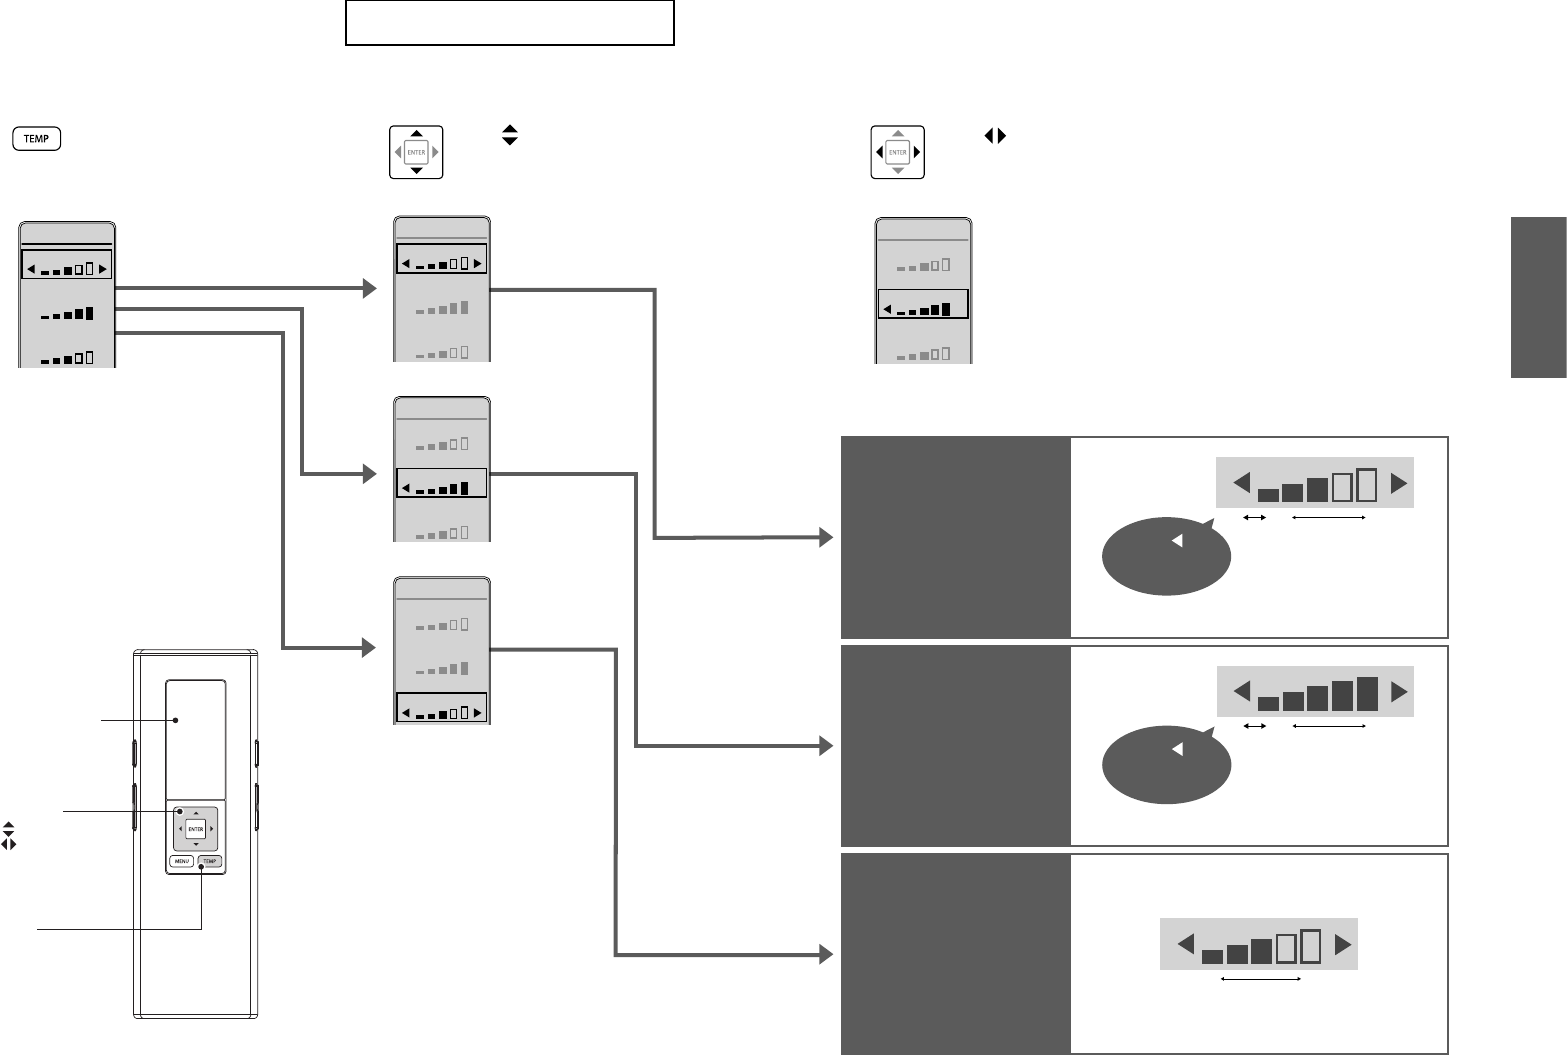
Temperature Adjustment
Warm Water / Toilet Seat / Drying
You can adjust the temperature levels or turn the settings to "OFF".
Warm water
temperature
OFF Low High
Press
until "OFF"
appears.
Toilet seat
temperature
OFF Low High
Press
until "OFF"
appears.
Drying air
temperature
Low High
1
Press [TEMP].
WATER
TEMPERATURE
SETTING
SEAT
DRYER
2
Use to select the
item you want to set.
WATER
SEAT
DRYER
TEMPERATURE
SETTING
WATER
SEAT
DRYER
TEMPERATURE
SETTING
WATER
SEAT
DRYER
TEMPERATURE
SETTING
3
Use to select the
temperature level.
<Settings complete>
WATER
SEAT
DRYER
TEMPERATURE
SETTING
When "OFF" is set, the SEAT LED will go off.
When "OFF" is set, the WATER LED will go off.
:Select an item
:Select a setting
Remote controller
display
[TEMP]
Select keys
Operation

24 25
Energy Saver Feature
You can save energy by turning the toilet seat heater to a low temperature (or turning
the heater "OFF") during periods when the toilet will be used infrequently.
When the energy saver feature is "OFF", the temperature is kept at the same level.
It takes about 10 days for the product to determine the periods when it is used relatively less frequently.
Note
●
Even if the ENERGY SAVER is being activated (with the toilet seat heater set to "Low" or "OFF," or with the warm water
heater set to "OFF"), the toilet seat will be temporarily heated when you sit on it.
(To reach the setting temperature, the toilet seat takes about 15 minutes and the warm water about 10 minutes, respectively.)
ENERGY
SAVER
Situation
When energy saver is set When energy saver is in operation
AM PM
Main Display
Toilet seat
heater
Warm water
heater
068 590
You want the Washlet
to save energy
automatically
The Washlet detects time
periods with infrequent use
and lowers the toilet seat
temperature automatically.
Furthermore, it automatically
turns off the toilet seat and warm
water heater during time periods
when the toilet is never used.
Lit
(Green)
OFF
When energy saver is not set
LitOFF
Lit
(Orange)
Time period with
infrequent use
Low
Set
temperature
*1
Example)
Time period with infrequent use (from 9:00PM to 6:00AM): Low
Time period the toilet is never used (8:00AM to 5:00PM): OFF
Set
temperature
*1
Set
temperature
*1
Low
temperature
*2
Low
temperature
*2
Time period the toilet
is never used
OFF
Lit
(Orange)
OFF
OFF
OFF
*3
*1 The temperature set on Page 22.
*2
The time period when the toilet seat heater is set to a "low temperature" by the energy saver. The warm water heater is "Set temperature".
*3 The time period when the toilet seat heater and warm water heater are "OFF".
Remote controller
display
[ENTER]
:Select an item
:Select a setting
Select keys
[MENU]
How to set
1
Press [MENU].
3
Use to select
"AUTO ENERGY
SAVER".
1. AUTO ENERGY
SAVER
OFF
ENERGY
SAVER
1/1
4
Use to select
"ON" or "OFF" and
then press [ENTER].
1. AUTO ENERGY
SAVER
ON
ENERGY
SAVER
1/1
AUTO
ENERGY
SAVER
ON
(To return
➝
)
2
Use to select
"ENERGY
SAVER" and then
press [ENTER].
1. CLE ANING
2. ENERGY
SAVER
3. AUTO
MENU 2/4
Operation

26 27
Maintenance
Power plug
(Approximately once a month)
<Except electrical box type, Concealed power connection type>
Dry cloth Wet cloth
1
Disconnect the power plug
and wipe it with a dry cloth.
2
Insert the power plug.
The POWER LED lights up.
WARNING
●
Periodically remove dust from
the blades and other parts of the
power plug.
Disconnect the plug and wipe it
with a dry cloth.
●
Fully insert the power plug.
●
When disconnecting, hold the
main body of the power plug.
Pulling the cord may damage the
plug or cord.
WARNING
Always disconnect the power plug from
the outlet before cleaning, maintenance
or inspection. (see left)
Always switch the breaker on the distribution
board to OFF.
(Electrical box type, Concealed
power connection type)
(Failure to do so may cause electric shock
or malfunction, resulting in a breakdown.)
*Except when using "Wand cleaning".
Do not use a dry cloth
or toilet paper on plastic
parts.
(May cause damage.)
Electrical box
[Electrical box type]
Main unit
Power plug
For safety, disconnect
the power plug before
cleaning or maintenance.*
Switch the breaker on the
distribution board to OFF.
*
(Electrical box type, Concealed power connection type)
2
Main Unit (Approximately daily)
Soft cloth soaked in water
•
Toilet paper
•
Dry cloth
•
Nylon scrubbing pads (May cause damage.)
1
Unplug the power plug.
Switch the breaker on the distribution board to OFF.
(Electrical box type, Concealed power connection type)
2
Wipe with a soft cloth that has been soaked in water and wrung-out
thoroughly.
■
For heavy dirt
Wipe with a soft cloth soaked in diluted, neutral kitchen detergent, and then wipe with a soft cloth soaked in water.
•
Neutral kitchen detergent
•
Paint thinner
•
Benzene
•
Powdered cleanser
3
Insert the power plug.
Switch the breaker on the distribution board to ON.
(Electrical box type, Concealed power connection type)
The POWER LED lights up.
Attention!
●
The Washlet is an electric appliance.
Be careful not to let water seep inside or leave detergent in the gap between the main unit and toilet bowl.
(May damage plastic parts or cause a malfunction.)
●
When using a toilet cleaner to clean the toilet, wash it off within 3 minutes and leave the toilet seat
and toilet lid open.
Wipe off any cleaner that remains on the toilet bowl. (If vapor from a toilet bowl cleaner enters the main unit,
it may cause a malfunction.)
●
Do not push or pull the covers around the wand with undue force.
(May cause damage or malfunction.)
●
Wipe the back surface of the toilet seat and the toilet seat cushions with a soft cloth tightly wrung
out with water.
(Otherwise adhesion of dirt may result in discoloration.)
Maintenance

28 29
Maintenance
29
Wand (Approximately once a month)
Wand cleaning <If you notice dirt>
Soft cloth soaked in water Toilet paper, etc.
(May cause damage.)
1
Extend the wand.
Operate with the buttons on the back side
of the remote control.
(1) Press [MENU].
(2)
Use
to select "CLEANING".
Press [ENTER].
(3)
Use to select "WAND
CLEANING MODE ON/OFF".
Press [ENTER].
The wand extends.
2
Wipe with a soft cloth that
has been soaked in water.
Do not pull, push or press the wand with
excessive force.
(May cause damage or malfunction.)
3
Press [STOP] on the front
side of the remote control.
The wand retracts.
Water comes out from around the wand.
Gap between the Main Unit and the Toilet Lid (Approximately once a month)
The toilet lid can be removed for thorough
cleaning.
Soft cloth soaked in water Toilet paper, etc.
(May cause damage.)
1
Unplug the power
plug.
Switch the breaker on
the distribution board to
OFF.
(Electrical box type, Concealed
power connection type)
Removing and Reinstalling
D
E
A
B
C
Hold with both
hands
Recess
Hinge
Hinge
Pin
2
Remove the toilet lid.
:Pull the left side outward.
: Disconnect the hinge from the recess
and pull up.
:Disconnect the right side.
3
Wipe with a soft cloth that
has been soaked in water
and wrung-out thoroughly.
4
Reinstall the toilet lid.
:
Join the pin and the hinge on the right side.
Slightly tilt the toilet lid to the front.
:While pulling out the left side,
:
Mount by joining the hinge with the recess.
* Be careful not to pinch your fi ngers.
5
Open and close the toilet lid to check the mounting, and then mount
the main unit.
6
Insert the power plug.
Switch the breaker on the distribution board to ON.
(Electrical box type, Concealed power connection type)
The POWER LED lights up.
Deodorizing fi lter
(Approximately once a month)
1
Unplug the power plug.
Switch the breaker on the
distribution board to OFF.
(Electrical box type, Concealed power
connection type)
2
Remove the deodorizing fi lter.
Hold the knob and pull outward.
Do not pull with undue force.
(May cause damage or malfunctions)
Knob
Deodorizing fi lter
3
Clean with a tool such as a
toothbrush.
When washing with water, dry off all water
before mounting.
Toothbrush
4
Mount the deodorizing fi lter.
Push fi rmly until a click sound is heard.
5
Insert the power plug.
Switch the breaker on the
distribution board to ON.
(Electrical box type, Concealed power
connection type)
The POWER LED lights up.
Maintenance

30 31
1. Spray Nozzle (Approximately once every 6 months)
General lime scale remover
(liquid)
Other detergents
1
Remove the spray nozzle from the wand.
(1) Extend the wand.
(Step
in "Wand" on page 29)
(2) While holding the wand with a
hand, press on both sides of
the spray nozzle and slide it.
Do not pull with undue force.
(May cause damage or malfunction.)
Spray nozzle
Wand
2
Install a spray nozzle (for replacement).
Gasket
Check that the gasket (black) is
attached.
(1) Hold the wand by hand and slide the replacement spray nozzle along the guide
and push it in.
Install correctly until a click sound is heard.
Do not push with undue force. (May cause damage or malfunction.)
Guide
(2) Press [STOP] on the front side of
the remote control.
The wand retracts.
Water comes out from around the wand.
Maintenance
If you think the water pressure has weakened
Cleaning the blocked Nozzle
Remove the spray nozzle and immerse it in general lime scale remover (liquid).
Do not disassemble the spray nozzle. (May cause malfunctions.)
3
2. Water Filter Drain Valve, Water Drain Plug
(Approximately once every 6 months)
<The water pressure is still weak even after cleaning the spray nozzle>
Neutral kitchen
detergent
1
Close the shutoff valve. (P.41)
The water supply stops.
CAUTION
Do not remove the water fi lter drain
valve while the shutoff valve is open.
(Otherwise, water may leak out)
2
Extend the wand (Step
in "Wand" on page 29) and
press [ENTER] again to
retract the wand.
(Release the pressure from the water supply pipe.)
Water comes out from around the wand.
3
Unplug the power plug.
Switch the breaker on the
distribution board to OFF.
(Electrical
box type, Concealed power connection type)
4
Remove the cover and water
fi lter drain valve.
Loosen with a fl at-head screwdriver and then pull.
Water fi lter drain
valve
Cover
5
Loosen the water drain plug
until its threads lose the grip.
Water comes out from around the wand
(it takes about 3 minutes to complete draining).
CAUTION
●
Do not disconnect the water drain plug
until draining is completed.
(Otherwise, water may leak out)
Loosen
Water drain
plug
6
Remove the water drain plug.
7
Clean the fi lter with a tool
such as a toothbrush.
Also, remove any dust from inside the hole.
Filter Filter
8
Push in the water drain plug
and water fi lter drain valve,
tighten them securely with
a fl at-head screwdriver and
install the cover.
9
Insert the power plug.
Switch the breaker on the
distribution board to ON.
(Electrical
box type, Concealed power connection type)
The POWER LED lights up.
10
Open the shutoff valve. (P.15)
11
Discharge water from the wand.
(Step
3
in "Resupplying the
Water" on page 39)
Maintenance

32 33
Changing Settings
Setting List
Setting Types
Available Settings
Bold: Initial settings
Setting Ref.
Page
AUTO
FUNCTIONS
CLEANING
PRE-MIST
Set whether or not to spray mist in the toilet
bowl automatically
ON/OFF
Page 34
DEODORIZER
Set whether or not to deodorize automatically
ON/OFF
OTHER
SETTINGS
BEEP
Set whether or not to make a beep sound
ON/OFF
Page 36
SETTING LOCK
Set whether or not to use the setting lock
ON/OFF
PERSONAL SETTING LOCK
Set whether or not to use the personal setting
lock
ON/OFF
Reference

34 35
Changing Settings
CLEANING
1
Press [MENU].
2
Use to
select "AUTO
FUNCTIONS"
and then press
[ENTER].
1. CLE ANING
2. ENERGY
SAVER
3. AUTO
FUNCTIONS
4. OTHER
SETTING
MENU 3/4
3
Use to select
"CLEANING"
and then press
[ENTER].
1. CLE ANING
AUTO
FUNCTIONS
1/1
[ENTER]
[MENU]
:Select an item
:Select a setting
Remote controller
display
Select keys
Items set on this display
1.PRE-MIST
2.DEODORIZER
Set whether or not to spray
mist in the toilet bowl
automatically
PRE-MIST
4
Use to select
"PRE-MIST".
CLEANING 1/2
1. PRE-MIST
ON
2. DEODORIZER
ON
5
Use to select
"ON/OFF" and then
press [ENTER].
CLEANING 1/2
1. PRE-MIST
OFF
2. DEODORIZER
ON
PRE-MIST
OFF
(To return
➝
)
Set whether or not to
deodorize automatically
DEODORIZER
4
Use to select
"DEODORIZER".
CLEANING 2/2
1. PRE-MIST
ON
2. DEODORIZER
ON
5
Use to select
"ON/OFF" and then
press [ENTER].
CLEANING 2/2
1. PRE-MIST
ON
2. DEODORIZER
OFF
DEODORIZER
OFF
(To return
➝
)
Reference

36 37
Changing Settings
OTHER SETTINGS
1
Press [MENU].
2
Use to
select
"OTHER
SETTINGS"
and then
press
[ENTER].
1. CLE ANING
2. ENERGY
SAVER
3. AUTO
FUNCTIONS
4. OTHER
SETTINGS
MENU 4/4
Set whether or not to
make a beep sound
BEEP
3
Use to select
"BEEP".
1. BEEP
OTHER
SETTINGS
1/3
ON
4
Use to select
"ON/OFF" and then
press [ENTER].
1. BEEP
OTHER
SETTINGS
1/3
OFF
BEEP
OFF
(To return
➝
)
Set whether or not to use
the setting lock
SETTING
LOCK
3
Use
to select
"SETTING LOCK".
1. BEEP
2. SETTING
LOCK
OTHER
SETTINGS
2/3
OFF
ON
4
Use to select
"ON/OFF" and then
press [ENTER].
1. BEEP
2. SETTING
LOCK
OTHER
SETTINGS
2/3
ON
ON
SETTING LOCK
PRESS ENTER
FOR 2 SEC
TO RESET
5
Check the displayed screen.
Display screen during setting lock
SETTING LOCK
PRESS ENTER
FOR 2 SEC
TO RESET
Cancellation method:
Press [ENTER] for 2 seconds
or longer.
* If you want to relock after cancellation,
reconfi gure the setting.
Set whether or not to use
the personal setting lock
PERSONAL
SETTING
LOCK
3
Use to select
"PERSONAL
SETTING LOCK".
2. SETTING
LOCK
3. PERSONAL
SETTING
LOCK
OTHER
SETTINGS
3/3
ON
OFF
4
Use to select
"ON/OFF" and then
press [ENTER].
2. SETTING
LOCK
3. PERSONAL
SETTING
LOCK
OTHER
SETTINGS
3/3
OFF
OFF
PERSONAL
SETTING LOCK
OFF
(To return
➝
)
Items set on this display
1.BEEP
2.SETTING LOCK
3.PERSONAL SETTING LOCK
[ENTER]
[MENU]
:Select an item
:Select a setting
Remote controller
display
Select keys
Reference

38 39
What to Do?
If you cannot operate with the remote control
The batteries may have worn out.
Replace the batteries.
■
Replacing the batteries
1
Unplug the power plug.
Switch the breaker on the distribution board to OFF.
(Electrical box type, Concealed power connection type)
The POWER LED goes off.
2
Remove the remote control from the hanger.
(Page14)
3
Open the battery cover and replace the
AA batteries.
(Page14)
Lit
4
Mount the remote control in the hanger.
5
Insert the power plug.
Switch the breaker on the distribution board
to ON.
(Electrical box type, Concealed power connection type)
The POWER LED lights up.
Freeze damage prevention (continued)
2
Drain the pipe.
(1) Extend the wand.
Operate with the buttons on the back
side of the remote control.
1. Press [MENU].
2. Use
to select "CLEANING".
Press [ENTER].
3.
Use
to select "WAND
CLEANING MODE ON/OFF".
Press [ENTER] to extend the wand
and then press [ENTER] again
to retract the wand. (Release the
pressure from the water supply pipe.)
Water comes out from around the wand.
(2) Unplug the power plug.
Switch the breaker on the distribution
board to OFF. (Electrical box type,
Concealed power connection type)
(3)
Remove the cover and water fi lter drain valve.
Cover
Flat-head screwdriver
Water fi lter drain
valve
(4)
Drain the water from the water supply hose.
(Expect Concealed power connection type)
Water supply hose
Horizontally
(5) After draining the water, install the
water fi lter drain valve and cover.
Insert the water fi lter drain valve and use a
fl at-head screwdriver to tighten it securely.
(6) Insert the power plug.
Switch the breaker on the distribution
board to ON. (Electrical box type,
Concealed power connection type)
3
Check that the POWER LED on
the main display is lit up.
(Page 15)
4
Set the water and toilet seat
temperature to "High".
(Page 22)
(To maintain the temperature.)
When fi nished, close the toilet seat and toilet lid.
■
To use the Washlet again
The water needs to be resupplied. (See below)
When the ambient temperature is likely to drop to 0°C or lower, take measures to prevent
freezing.
Attention!
●
When the ambient temperature is likely to drop to 0°C or lower, do not use the energy saver feature.
(May damage the product.)
●
Warm the bathroom or take measures against freezing so that the ambient temperature does not drop below 0°C.
Freeze damage prevention
Freeze Damage Prevention
Resupplying the Water (After draining)
1
Open the shutoff valve.
• Check that water is not leaking from a pipe or the main unit.
2
If the power is not turned ON
Insert the power plug.
Switch the breaker on the distribution board to ON.
(Electrical box type, Concealed power connection type)
3
Discharge water from the wand.
(1) Pressing down the right side of the toilet seat,
(2) Press [REAR] on the remote control to discharge water from the wand for about two minutes.
(It takes about one minute maximum before water comes out. Catch the water in a paper cup or other receptacle.)
■
If the remaining water has frozen and no water comes out
• Heat the inside of the bathroom, and warm the water supply hose and shutoff valve using a cloth soaked in warm water.
Soft cloth soaked in water
(to prevent scratching)
Paper cup
■
How to drain the water
1
Close the shutoff valve.
The water supply stops.
Do not remove the water fi lter drain
valve while the shutoff valve is open.
(Otherwise, water may leak out)
CAUTION
Reference

40 41
What to Do?
Long Periods of Disuse
Troubleshooting
First, try the actions described on pages
41 to 44.
If the problem persists, consult the installer,
seller or the contact listed on the back
cover of this manual.
CAUTION
If a water leak occurs, close the shutoff valve.
[For shutoff valve (Concealed
power connection type)]
Please check fi rst
Is the
POWER LED lit?
■
Is the breaker on the
distribution board turned
on?
➞
Check whether there is a power
outage or the breaker has turned
"OFF".
Lit
Is the ENERGY
SAVER LED lit?
■
While the LED is lit, energy saver
(Page 24)
is in operation,
so the toilet seat temperature may be reduced or the
warm water heater and toilet seat heater may be turned
off.
Is the remote
control working?
■
Are the remote control
batteries dead?
➞
Replace the batteries. (Page 38)
■
Is the remote control
transmitter or the remote
control receiver blocked?
➞
Remove obstructions, dirt, water
droplets or any other blockages.
Close
Open
Battery cover
The remote
control uses
batteries
to operate.
Remote control
transmitter
Remote control receiver
If the toilet is in a location you will not visit for a long time, drain the water.
(The water in the tank may become contaminated and cause skin irritation or other problems.)
How to drain the water
1
Close the shutoff valve.
2
Drain the pipe.
(Step
2
(1) to (5) on Page 39)
* After draining water, keep the cover removed.
3
Loosen the water drain plug until its
threads lose the grip.
Water comes out from around the wand
(it takes about 3 minutes to complete draining).
CAUTION
●
Do not disconnect the water drain plug until
draining is completed.
(Otherwise, water may leak out)
Loosen
Water drain plug
4
Tighten the water drain plug securely
with a fl at-head screwdriver and
install the cover.
■
If water may get frozen
• Add antifreeze solution in the water in the bowl to prevent freezing.
(The antifreeze solution should not be fl ushed out. Collect it before using the toilet and dispose of it.)
■
To use the Washlet again
• The water needs to be resupplied. (Page 39)
Reference

42 43
Rear and Rear soft, front cleansing, wand
Trouble Please check
Ref.
Page
The wand
(or cleansing water)
does not come out
●
When the temperature is low, it takes time for the wand to come out after the
remote control button is pressed because the water must be warmed up fi rst.
-
●
Did you sit on the toilet continuously for 2 hours or longer?
(If so, operation is stopped for safety purposes.)
➞
Stand up from the seat and then use again.
-
●
The seat switch will not turn on unless you sit on the seat properly.
➞
Sit back on the toilet seat.
11
●
Are you using a toilet seat cover, a toilet lid cover or
a seat for infants?
➞
Remove any covers. When using a seat for infants
or a soft highchair, remove after each use.
Covers
11
The wand extends but
the cleansing water
does not come out /
The cleansing water
pressure is weak
●
Has a water failure occurred?
➞
Press the "STOP" button and wait until water service is restored.
-
●
Is the shutoff valve closed?
➞
Fully open the shutoff valve.
15
●
Is the wand or fi lter clogged with foreign matter?
➞
Clean the spray nozzle, water filter drain valve and water drain plug.
30
31
●
Is the water pressure set to a low level?
17
●
Is the water drain plug loosened?
➞
Tighten the water drain plug securely.
40
The cleansing water
is cold
●
Is the water temperature set to "OFF" or a low level?
●
When the temperature of the water supply or the bathroom is low, the water
temperature may be low when first sprayed.
●
Is energy saver in operation?
➞
Wait 10 minutes after having sat on the toilet seat.
You can turn it "OFF" if the energy saver feature is "ON".
22
-
24
Stops in the middle
of use
●
Rear, rear soft and front cleansing stop automatically after 5 minutes of
continuous use.
Then the POWER LED (Green) and the ENERGY SAVER LED (Green) on the
display of the main unit fl ash about 60 seconds while hot water is prepared.
➞
Wait until the LEDs on the display of the main unit light up solidly and then
press the button again.
●
Does the seat switch have diffi culty detecting?
➞
Sit back on the toilet seat. If you get up slightly from the seat, or sit forward on
the seat, the seating switch may temporarily stop detecting your presence.
-
11
Water comes out
unexpectedly
from the wand
●
Water comes out from the area around the wand for several seconds after you
sit on and stand up from the toilet seat.
-
Warm air drying
Trouble Please check
Ref.
Page
The dryer
temperature is low
●
Is the dryer temperature set to low level?
22
Stops in the middle
of use
●
The feature stops automatically after 10 minutes of continuous use.
●
Does the seat switch have diffi culty detecting?
➞
Sit back on the toilet seat. If you get up slightly from the seat, or sit forward on
the seat, the seating switch may temporarily stop detecting your presence.
-
11
Toilet Seat and Toilet Lid
Trouble Please check
Ref.
Page
The toilet seat is
cold
●
Is the toilet seat temperature set to "OFF" or a low level?
22
●
Is the ENERGY SAVER LED (orange) lit?
When the SEAT LED (green) is also lit.
➞
The toilet seat temperature has been lowered to save energy. When you sit,
the toilet seat is temporarily heated.
When the SEAT LED is OFF.
➞
Energy saver is operating and has turned off the toilet seat heater. When
you sit on the seat, the toilet seat heater is turned on temporarily and the
seat is warmed in about 15 minutes.
You can turn it "OFF" if the energy saver feature is "ON".
24
●
Have you been seated for a long time?
After about 20 minutes of sitting, the temperature starts going down, and
after about 1 hour, the toilet seat heater is turned "OFF".
➞
Stand up from the seat and then use again.
-
●
Did you put anything on the toilet seat or the toilet lid?
➞
Remove the object from the toilet seat or the toilet lid.
-
●
The seat switch will not turn on unless you sit on the seat properly.
➞
Sit back on the toilet seat.
11
●
Is a toilet lid or seat cover installed?
➞
Remove any covers.
11
Energy Saver
Trouble Please check
Ref.
Page
The energy saver
feature is not
working
●
Because the function takes several days learning the usage conditions before
starting energy saver, the amount of energy saving may be low, depending
on the frequency of use.
➞
Check the energy saver feature.
24
Troubleshooting
Reference

44 45
Troubleshooting Specifi cations
Deodorizer
Trouble Please check
Ref.
Page
The deodorizer
seems to be not
working
●
Is "DEODORIZER" set to "OFF"?
➞
Set to "ON".
●
Even after sitting down, you do not hear operation sounds.
➞
Sit back on the toilet seat.
●
If you hear an operation sound when you sit on the toilet seat.
➞
Clean the deodorizing filter.
34
11
29
A strange odor is
emitted
●
Are you using an air freshener or deodorizer that you purchased separately?
Doing so may reduce the effectiveness of the Washlet deodorizer or cause
strange odors.
➞
Remove the air freshener or deodorizer.
-
Others
Trouble Please check
Ref.
Page
Water is leaking
from the plumbing
connections
●
If any nuts in a connection are loose, fi rmly tighten them with a tool such as a
monkey wrench.
➞
If the water leak does not stop, close the shutoff valve and seek repair.
-
The display on
the remote control
goes out
●
The display goes out when no button on the remote control is pressed for 5
minutes or more.
14
The main unit is
unstable
●
There is clearance between the toilet seat cushion and the toilet bowl for
activating the seat switch. When you sit on the toilet seat, the toilet seat
subsides slightly to activate the seat switch.
11
The main unit makes
a sound
When the toilet is occupied
●
You hear an operation sound at intervals of a few seconds when the cleaning
feature is working properly.
-
When sitting on the toilet seat
●
You hear operation sounds for preparing the pre-mist or spraying mist in the
toilet bowl.
➞
You can turn it "OFF".
20
34
When moving away from the toilet bowl after use
●
You may hear the sound of water being warmed up or the remaining water
being drained.
-
You feel air in the toilet
bowl when sitting on
the toilet seat
●
A mist is sprayed inside the toilet bowl to make it more diffi cult for dirt to
adhere when sitting on the toilet seat. You may feel air when a mist is sprayed.
➞
You can turn it "OFF".
20
34
Item TCF6532 TCF6530
Rated power supply AC 220 - 240 V, 50 Hz
Rated power consumption 249 - 294 W
Maximum power consumption 276 - 321 W
Type of water heater Tank type
Power cord length About 1 m
Water protection level IPX4
Functions
Cleansing
Spray
volume
Rear cleansing Approx. 0.29 - 0.60 L/min <at 0.20 MPa water pressure>
Rear soft cleansing
Approx. 0.29 - 0.55 L/min <at 0.20 MPa water pressure>
Front cleansing Approx. 0.27 - 0.55 L/min <at 0.20 MPa water pressure>
Water temperature Adjustable temperature range: OFF, about 30°C to 40°C
Toilet tank capacity 0.7 L
Heater capacity 195 - 232 W
Safety device
Temperature fuse, overheat shutoff switch
(bimetal automatic return type), anti-idling fl oat switch
Backfl ow prevention device Vacuum breaker, Air gap according to EN1717
Warm
air
dryer
Warm air temperature
*
Adjustable temperature range : about 37°C to 55°C
Airfl ow volume Approx. 0.27 m
3
/min
Heater capacity 185 - 220 W
Safety device Temperature fuse
Heated
seat
Surface temperature
Adjustable temperature range: OFF, about 28°C to 36°C
<About 26°C when energy saver is in operation>
Heater capacity 45 - 54 W
Safety device Temperature fuse
Deodorizer
Method O
2
deodorization
Airfl ow volume Approx. 0.16 m
3
/min
Power consumption Approx. 5.3 W
Water supply pressure
Minimum required water pressure: 0.1 MPa <dynamic>,
Maximum required water pressure: 1.0 MPa <static>
Water supply temperature 0°C to 35°C
Working ambient temperature 0°C to 40°C
Dimensions
W 391 mm × D 523 mm × H 188 mm W 391 mm × D 480 mm × H 188 mm
Weight Approx. 5.6 kg Approx. 5.4 kg
* Temperature around the warm air outlet measured by TOTO.
Reference

46 47
Warranty
Important User Guidance Information
LIMITED TWO YEARS WARRANTY
1.
TOTO warrants its products to be free from manufacturing defects under normal use and service for a period of two (2) years
from the date of purchase. This warranty is extended only to the ORIGINAL PURCHASER.
2.
TOTO’s obligations under this warranty are limited to repair or replacement, at TOTO’s option, of products or parts found
to be defective, provided that such products were properly installed and used in accordance with this OWNER’S MANUAL.
TOTO reserves the right to make such inspections as may be necessary to determine the cause of the defect. TOTO will not
charge for labour or parts in connection with warranty repairs or replacements.
TOTO is not responsible for the cost of removal, return and/or reinstallation of products.
3.
This warranty does not apply to the following items:
a)
Damage or loss sustained in a natural calamity such as fi re, earthquake, fl ood, thunder, electrical storm, etc.
b)
Damage or loss resulting from any unreasonable use, misuse, abuse, negligence, or improper maintenance of the
product.
c)
Damage or loss resulting from removal, improper repair, or modifi cation of the product.
d)
Damage or loss resulting from sediments or foreign matter contained in a water system.
e)
Damage or loss resulting from the quality of water in the region where the product is used.
f ) Damage or loss resulting from improper installation or from installation of a unit in a harsh and/or hazardous environment.
4.
This warranty gives you specifi c legal rights. You may have other rights which vary from country to country.
5.
To obtain warranty repair service under this warranty, you must take the product or deliver it prepaid to a TOTO service
facility, together with a letter stating the problem, or contact a TOTO distributor or product service contractor, or directly to
a TOTO sales offi ce. If, because of the size of the product or nature of the defect, the product cannot be returned to TOTO,
receipt by TOTO of a written notice of the defect shall constitute delivery. In such case, TOTO may choose to repair the
product at the purchaser’s location or pay to transport the product to a service facility.
This written warranty is the only warranty made by TOTO. Repair or replacement as provided under this warranty shall be the
exclusive remedy available to the purchaser. TOTO shall not be responsible for loss of use of the product or for other incidental,
special, or consequential damage or expenses incurred by the purchaser, or for labour or other costs due to installation or
removal, or costs of repairs by others, or for any other expense not specifi cally stated above. Except to the extent prohibited by
applicable law, any implied warranties, including that of merchantability or fi tness for use, are expressly limited to the duration
of this warranty. Some nations do not allow limitations on how long an implied warranty lasts, or the exclusion or limitation of
incidental or consequential damage, so the above limitation and exclusion may not apply to you.
If you want to dispose this product, do not mix it with general household waste. There is a separate collection system
for used electronic products in accordance with legislation that requires proper treatment, recovery and recycling.
Private households in the member states of the EU, Switzerland and Norway may return their used electronic products free of
charge to designated collection facilities or to a retailer (if you purchase a similar new one).
For countries not mentioned above, please contact your local authorities for the correct method of disposal.
By doing so you will ensure that your disposed product undergoes the necessary treatment, recovery and recycling, which
prevent potential negative effects on the environment and human health.
Only discard discharged batteries. They should not be disposed of with household waste, but rather at appropriate collection
sites or at the product retailer.
Reference
