
INSTRUCTION BOOKLET
(CONTAINS IMPORTANT HEALTH AND SAFETY INFORMATION)

Any manuals provided with this software are digital reproductions of the original printed manuals.
Please note that references may be made to features that can’t be used in this version of the game.
There may also be references to outdated consumer information, e.g. warranties and support hotlines.
For product information, please visit the Nintendo website at:
www.nintendo.com
For technical support and troubleshooting,
please refer to the Operations Manual for your Wii U console or visit:
support.nintendo.com
For age rating information for this and other software,
please consult the relevant website for the age rating system in your region.
PEGI (Europe): www.pegi.info
USK (Germany): www.usk.de
Classification Operations Branch (Australia): www.classification.gov.au
OFLC (New Zealand): www.classificationoffice.govt.nz
Russia: minsvyaz.ru/ru/doc/index.php?id_4=883

3
3
Thank you for selecting the DONKEY KONG™ COUNTRY RETURNS Disc for your
Wii™ system.
[0610/UKV/RVL]
WARNING: Please carefully read the important health and safety information included in this booklet
before using your Nintendo
®
Hardware system, Disc or Accessory.
Please read this Instruction Booklet thoroughly to ensure maximum enjoyment of your new game.
Important warranty and hotline information can be found in the separate Age Rating, Software
Warranty and Contact Information Leaflet. Always save these documents for future reference.
This seal is your assurance that Nintendo has
reviewed this product and that it has met our
standards for excellence in work man ship, reliability
and entertain ment value. Always look for this
seal when buying games and accessories to ensure
complete compa tibility with your Nintendo Product.
© 2010 NINTENDO.
TM, ® AND THE Wii LOGO ARE TRADEMARKS OF NINTENDO.
© 2010 NINTENDO.
THIS GAME SUPPORTS 50Hz (576i)
AND 60Hz (480i) MODE.
IMPORTANT LEGAL INFORMATION
THIS NINTENDO GAME IS NOT DESIGNED FOR USE WITH ANY UNAUTHORISED DEVICE. USE OF
ANY SUCH DEVICE WILL INVALIDATE YOUR NINTENDO PRODUCT WARRANTY. COPYING OF ANY
NINTENDO GAME IS ILLEGAL AND IS STRICTLY PROHIBITED BY DOMESTIC AND INTERNATIONAL
INTELLECTUAL PROPERTY LAWS.
The in-game language depends on the one that is set on your Wii console. This game includes five different
language versions: English, German, French, Spanish and Italian. If your Wii console is already set to one
of them, the same language will be displayed in the game. If your Wii console is set to a different language
than those available in the game, the in-game default language will be English. You can change the in-game
language by changing the language setting of your Wii console. For further instructions about how to change
language settings please refer to the Wii Operations Manual – Channels & Settings.
60 Hz (480i) Mode
Many people don’t know what the difference between 50 Hz and 60 Hz is, but since most
modern TV models suppor
t 60 Hz it’s definitely worth finding out if your TV is compatible.
In basic terms, Hz (hertz) is related to the number of frames per second (fps) appearing on
your screen.
50 Hz produces 25 fps and 60 Hz produces close to 30 fps, which may not sound like a big
difference, but the increase in quality from 25 to around 30 fps is quite noticeable on-screen. With 60 Hz you
get a smoother game screen with less flicker and the game running at optimal speed, all of which produces a
great gaming experience.
The default setting of the Wii console is 50 Hz (576i) Mode. To change this, activate 60 Hz (480i) Mode by
selecting this TV TYPE in the Wii Settings. However, certain (mainly older) TV sets are unable to display
games in 60 Hz (480i) Mode, and therefore a small number of players could experience difficulties using this
display mode on their TVs. To find out if your TV set features 60 Hz (480i) Mode, consult your TV instruc-
tion manual or contact the manufacturer.
If, after changing the setting to 60 Hz (480i) Mode, the screen appears blank or distorted, it will likely be the
case that your TV does not support 60 Hz (480i) Mode. To revert to the default setting, press RESET on the
Wii console while holding the down direction on the
- Control Pad, and the Wii system will restart in 50 Hz
(576i) Mode. For additional information on how to set the TV TYPE, please refer to the Wii Operations
Manual – Channels & Settings.
Also, when you connect the Wii RGB cable (RVL-013) (sold separately) to a TV which has an RGB terminal
and PAL60 compatibility, or you connect the Wii Component AV cable (RVL-011) (sold separately) to a TV
which has component video inputs, you can enjoy an intensely sharp picture on-screen.
EDTV / HDTV (480p) Mode – Progressive Scan
EDTV / HDTV (480p) is a progressive display mode that allows players to view and enjoy their
game in the best possible quality
. This means an intensely sharp picture, the game running
at optimal speed with minimised flicker, all of which produces a great gaming experience. We
at Nintendo want players to enjoy our games under the best possible play conditions.
However, it may be the case that this mode cannot be displayed, depending on the combination
of TV and cable that you use. To find out if your TV supports the Progressive Scan display needed for the
EDTV / HDTV (480p) Mode, consult your TV instruction manual or contact the respective manu facturer for
details. Please make sure to use the Wii Component AV cable (RVL-011) (sold separately) and to enable
Progressive Scan on your display device when selecting this mode.
The default setting of the Wii is 50 Hz (576i) Mode. To activate EDTV / HDTV (480p) Mode, please select
this TV TYPE in the Wii Settings. For additional information on how to set the TV TYPE, please refer to the
Wii Operations Manual – Channels & Settings.
Optimising Your Settings
To enhance your game play experience you can make use of the following features:
Volume/
Rumble – This game uses the Wii Remote Speaker and the Rumble function. To adjust the volume
of the speaker or turn Rumble ON or OFF,
do so on the Wii Remote Settings Option Screen accessible from the HOME Menu.

5
5
4
4
Synchronising your Wii Remote with the Wii console
Synchronising the Wii Remote is necessary to use it with the Wii console. The Wii Remo
te included with your
Wii console has already been syn chro nised with the console. The Standard Mode procedure is used when
adding additional Wii Remotes to your system or if you want to re-synchronise your original Wii Remote. This
procedure allows the Wii Remote to communicate with the console.
Standard Mode – Once synchronised, the Wii Remote will stay synched to the console unless you overwrite
this setting by synching the Wii Remote to a different console.
One Time Mode – This mode allows you to temporarily use your Wii Remote on a console other than your
own or to use a friend’s Wii Remote on your console. It does not delete the Standard Mode setting
stored in the Wii Remote. In this mode, the Wii Remote will only communicate with the console while
the power is on. When the power is turned off, the Wii Remote will lose its synch with the console.
• A Wii console can have up to 16 Wii Remotes synched to it –10 in Standard Mode and 6 in One Time
Mode.
• Only a Wii Remote in Standard Mode can turn the console power on or off.
One Time Mode Synchronisation
NOTE: This mode tem
porar
ily removes Standard Mode synchro-
nisation setup for all Wii Remotes until the power of the Wii console
is turned off. When the power is turned back on again, the Stan-
dard Mode settings will return.
1. Press the HOME Button on a Wii Remote that is synchronised
with the console.
2. Select the Wii REMOTE SETTINGS option from the Home Menu
Screen, then select the RECONNECT option.
3. Press the 1 and 2 Buttons simultaneously on the Wii Remote that
you want to synchronise with the console. The order in which
you synchronise Wii Remotes will set the player order for
multiplayer games.
4. The Player LED will blink during the synching process. Hold the
buttons down until the blinking stops which indicates that the
connection is complete.
For more information please refer to the Wii Operations Manual – System Setup.
Caution – Use the Wii Remote Wrist Strap
Feed the cord on the Wii Remote Wrist Strap through the connector hook. Insert the Nunc
huk plug into the
external extension connector on the bottom of the Wii Remote. Place your hand through the Wii Remote
Wrist Strap and hold the Wii Remote firmly in your hand. Slide the strap lock up so that the wrist strap will
not fall off your wrist. Do not over-tighten the strap lock so that it’s uncomfortable. It should just be tight
enough to hold the Wii Remote Wrist Strap in place.
CAUTION: Always keep a firm grip on the Wii Remote and Nunchuk. Use the Wii Remote Jacket (RVL-022)
and the Wii Remote Wrist Strap at all times to prevent losing your grip on the Wii Remote and possibly
causing damage to the Wii Remote and surrounding objects, or injury to other people. The Wii Remote Jacket
will provide protection if the Wii Remote is accidentally thrown or dropped during game play. Please ensure
there is sufficient distance from other people and objects when playing Wii games. Stop playing and dry your
hands if they become sweaty or wet. The Wii Remote responds to minor movements so do not use excessive,
rapid or wide swinging motions.
Be sure to install the Nunchuk as described. Use the connector hook on the Nunchuk plug with the
Wii Remote Wrist Strap cord to prevent the Nunchuk plug from becoming separated from the external
extension connector on the Wii Remote and striking objects or people.
WARNING: Not suitable for children under 36 months of age. The Wii Remote Wrist Strap and the cord of
the Nunchuk can coil around the neck.
Nunchuk Neutral Position Reset
NOTE: If the Control Stick is moved out of neutral position when the
power is turned on, or when connecting to the Wii Remote, that posi-
tion will be set as neutral position, causing incorrect game control during
game play. To reset the Control Stick, allow it to return to the normal
neutral position, then simultaneously hold down the A, B, Plus (+) and
Minus (–) Buttons on the Wii Remote for three seconds.
To prevent this from occurring, do not move the Control Stick when:
• Turning on the Wii console
• Plugging the Nunchuk into the Wii Remote
• Starting Channels from the Wii Menu
• Returning to the Wii Menu from
games or Channels.
Control Stick

Prologue
Prologue
7
7
6
6
Contents
Contents
Wii Menu Update
Please note that when first loading the disc into the Wii™ console,
the console will check if y
ou have the latest version of the Wii Menu,
and if necessary a Wii System Update Confirmation Screen will
appear. Select OK to proceed with the update. Updates can take
several minutes and may add Channels to the Wii Menu. Please note
that the Wii console must have the latest version of the Wii Menu in
order to play the disc.
NOTE: If, after performing an update, the Disc Channel still does not display the title of the inserted disc,
a second update is required. Please repeat the above procedure.
Channels added by a Wii Menu update will be saved to the Wii System Memory if there is enough free
space. These additional Channels can be deleted from the Data Management Screen in Wii Options, and
can sub sequently be re-downloaded from the Wii Shop Channel at no extra cost.
When the Wii Menu is updated, unauthorised hardware and /or software modifications may be detected
and unauthorised content may be removed causing the immediate or delayed inoperability of your console.
Failure to accept the update may render this game, and future games, unplayable. Please note that Nintendo
cannot guarantee that unauthorised software or accessories will continue to function with the Wii console
after this or future updates of the Wii Menu.
C
an’t a tired old ape take a nap around here? A bunch of shifty-eyed musical
miscreants just kicked our volcano into overdrive and took over Donkey
Kong Island! Enough with the noise, already!
These rhythmic rabble rousers are up to no good. They’ve been putting some
kind of musical mojo on all our animal buddies and toting off every banana in
sight. And get this: They’ve even gone after Donkey Kong’s secret hoard! No-
thing burns that boy’s biscuits like someone messing with his precious bananas!
Just what do they want with all these stolen bananas? Back in my
day, I’d take care of this mysterious predicament without
breaking a sweat, but Donkey Kong and his little pal Diddy
Kong are all worked up and ready for action. If anybody
can run, jump, cling and swing to the bottom of all this
banana burglary, it’s those two!
Prologue . . . . . . . . . . . . . . . . . . . . . . . . . . . . . . . . . . . . . . . . . . . 7
Controls . . . . . . . . . . . . . . . . . . . . . . . . . . . . . . . . . . . . . . . . . . . 8
Getting Started . . . . . . . . . . . . . . . . . . . . . . . . . . . . . . . . . . . . . 10
Game Screens . . . . . . . . . . . . . . . . . . . . . . . . . . . . . . . . . . . . . . 13
Actions . . . . . . . . . . . . . . . . . . . . . . . . . . . . . . . . . . . . . . . . . . . 18
Collectibles and Items . . . . . . . . . . . . . . . . . . . . . . . . . . . . . . . . 24
Cranky Kong’s Shop . . . . . . . . . . . . . . . . . . . . . . . . . . . . . . . . . . 25
Two-Player Cooperative Mode . . . . . . . . . . . . . . . . . . . . . . . . . 26
Cranky’s Tips . . . . . . . . . . . . . . . . . . . . . . . . . . . . . . . . . . . . . . . 26
Super Guide . . . . . . . . . . . . . . . . . . . . . . . . . . . . . . . . . . . . . . . . 27

B Button
• Press and hold to grab barrels,
vines and cling patches. Release
to throw barrels and let go of
vines and cling patches.
• Back / Cancel
• Carry Diddy Kong
• Ride/Dismount Donkey Kong
9
9
8
8
Controls
Controls
or a single Wii Remote held horizontally. This manual will explain in-game controls, assuming you
are using the Wii Remote and Nunchuk controller configuration.
Nunchuk Style (Wii Remote and Nunchuk)
Nunchuk Style (Wii Remote and Nunchuk)
Horizontal Style (Wii Remote)
Horizontal Style (Wii Remote)
• Standard Controls • Donkey Kong Controls (Two-Player Cooperative Mode)
• Menu Controls • Diddy Kong Controls (Two-Player Cooperative Mode)
For advanced Donkey Kong moves, please see p.18–19.
For advanced Diddy Kong moves, please see p. 20–21.
Shake the Wii Remote:
• Ground Pound
• Blow (Hold down on the
- Control Pad)
• Roll (Hold left or right on the
- Control Pad)
Shake the Wii Remote and Nunchuk:
• Ground Pound
• Blow (Tilt the Control Stick down)
• Roll (Tilt the Control Stick left or right)
A Button
• Jump
• Press and hold to use
Diddy Kong’s Barrel Jet
• Confirm
HOME Button
• Display HOME Menu
– Button
• Display Pause Menu
+ Button
• Display Pause Menu
J
Control Stick
• Walk/ Run (Tilt left or right)
• Crouch (Tilt down)
• Select option
Z Button
• Press and hold to grab barrels,
vines and cling patches. Release
to throw barrels and let go of
vines and cling patches.
• Carry Diddy Kong
• Ride/Dismount Donkey Kong
- Control Pad
• Walk
• Run (Hold 1 Button)
• Crouch (Hold down on
- Control Pad)
• Select option
2 Button
• Jump
• Press and hold to use
Diddy Kong’s Barrel Jet
• Confirm
A Button
• Revive player
(Return in a floating DK Barrel
(p. 26) )
+/ – Button
• Display Pause Menu
HOME Button
• Display HOME Menu
1 Button
• Revive player
(Return in a floating DK Barrel
(p. 26) )
1 Button
• Press and hold to grab barrels,
vines and cling patches. Re-
lease to throw barrels and let
go of vines and cling patches.
• Back/ Cancel
• Carry Diddy Kong
(Hold up on
-Control Pad)
• Ride Donkey Kong
(Hold up on
-Control Pad)/
Dismount Donkey Kong
(Hold down on
-Control Pad)

11
11
10
10
Getting Started
Getting Started
Insert the DONKEY KONG COUNTRY RETURNS Disc
into the Disc Slot. The Wii console will switch on.
The Health and Safety Screen, as shown here,
will be displayed. After reading the details press
the A Button. The Health and Safety Screen
will be displayed even if the Disc is inserted after
turning the Wii console’s power on.
Point at the Disc Channel from the Wii Menu
Screen and press the A Button.
The Channel Preview Screen will be displayed.
Point at START and press the A Button.
The Wii Remote Wrist Strap Information
Screen will be displayed. Tighten the strap
around your wrist, then press the A Button.
The Title Screen will be displayed.
1
1
2
2
3
3
4
4
Creating a Game File
Creating a Game File
1
On the Title Screen, press the A Button
and B Button simultaneously to proceed to
the Select Game Screen.
Copying and Erasing Files
Copying and Erasing Files
If you would like to copy an existing file, press the + Button and select the file you would
like to copy, then select a destination file. To erase a file, press the – Button and select the
file you would like to erase.
Note: Once a file has been erased, it can’t be restored. Please be careful.
1
2
2
3
3
When playing for the first time, highlight a new
game file using the Control Stick and press the
A Button. This will take you to the Start Game
Screen.
If you would like to continue a previously saved
game, select the appropriate file and press the
A Button to continue.

13
13
12
12
Start Game
Start Game
After selecting your file, you will be taken to the Start Game Screen. You will have the option
to start a one- or two-player game or enter the Options Menu or Extras Menu.
Options Menu
Options Menu
AUDIO
Adjust the music volume or sound FX volume.
Extras Menu
Extras Menu
As you progress through the game and meet certain criteria, you will unlock art and music.
These items can be found in this section.
Saving
Your game progress and items you collect will automatically save to the file you chose on
the Select Game Screen. If you quit a level by selecting RESET from the HOME Menu or
by pressing the POWER Button or RESET on the Wii console, your recent game data will
not be saved.
• Do not touch the POWER Button or RESET while the game is saving.
• Please see y
our Wii Operations Manual – Channels & Settings for information about
how to delete files from the Wii System Memory.
• You will need 2 blocks of free space in the Wii System Memory to create save data.
Game Screens
Game Screens
World Selection Screen
World Selection Screen
On this screen you can travel around Donkey Kong Island by tilting the Control Stick in the
direction you want to move. Select the world you want to visit, then press the A Button to
enter the world’s Level Selection Screen.
Note: You must defeat the boss in the current
world to discover more worlds on
Donkey Kong Island.
Press the Z Button to activate the FreeLook
Camera. Once activated, use the Control Stick
to freely look around Donkey Kong Island.
Press the Z Button to exit FreeLook Mode.
Level Selection Screen
Level Selection Screen
The Level Selection Screen shows you which levels you need to complete before you can
move to the next world. When you first arrive in a new world, only one level will be available.
Once you complete the level, a new path will open. Defeat the boss at the end of the current
world to proceed to the next world. You can return to the World Selection Screen at any
time by pressing the B Button.
KONG Letter Icon
Puzzle Piece Icon
Indicates this level’s Puzzle
Pieces have been found
(p. 24)
Indicates this level’s KONG
Letters have been found
(p. 24)
Time Attack Medal (p. 17)
Cranky Kong’s Shop (p. 25)
Banana Coins (p. 24)
Balloons (p. 24)
HOW TO CONTROL
Confirm Nunchuk Style (Wii Remote and
Nunchuk) or Horizontal Style (Wii Remote)
controls (p. 8–9). Highlight the control confi-
guration you would like to review and press
the A Button. You can change your control configuration anytime by connecting or removing
the Nunchuk accessory to or from the Wii Remote.

15
15
14
14
Map Pause Menu
Map Pause Menu
ADD / DROP PLAYER
Add or remove a player. If Diddy Kong is not
present, you must spend one balloon (p. 24)
to let Player Two join.
• You can add or remove a player anytime
on the Level Selection Screen or World
Selection Screen.
• To play with another player, you will need
a Wii Remote and Nunchuk or Wii Remote
per player. (Additional accessories are each
sold separately.)
LEVEL SUMMARY
The Level Summary Screen displays the levels
you have unlocked and items you have acquired:
KONG Letters, Puzzle Pieces and your best
Time Attack medal.
Tilt the Control Stick left or right to view
information for other worlds.
QUIT GAME
Select to return to the Title Screen.
OPTIONS
For more information, see p.12.
While viewing the map, press the + Button or – Button to bring up the Pause Menu.
Start a Level
Start a Level
PLAY
Begin the level.
TIME ATTACK
This will appear after you complete the level
and play it again. For more information, see
p. 17.
INVENTORY
This option allows you to use items purchased from Cranky Kong’s
Shop (p. 25). Use the Control Stick to highlight the item you want
to use and press the A Button to select it. Press the B Button to return
to the previous screen and begin the level.
If you select an item and want to remove it, select and press the A Button.
Use the Control Stick to move the Donkey
Kong icon to the level you wish to play, and
press the A Button to bring up the following
menu:

17
17
16
16
ln-Game Pause Screen
ln-Game Pause Screen
Press the + Button or – Button to pause the game and bring up the in-game Pause Screen.
This screen shows your current status on the left side of the screen and menu options on the
right. Select the menu options using the Control Stick and confirm by pressing the A Button.
Checkpoints
Checkpoints
When you reach a checkpoint, the tutorial pig will save your progress. If you
make a mistake later in the level you will start from the last checkpoint you
passed.
If you complete the level, lose all your lives or quit to the Level Selection
Screen, you will start from the beginning of the level your next time through.
Time Attack Mode
Time Attack Mode
Once a level has been completed, you can
replay it in Time Attack Mode to acquire a
gold, silver or bronze medal. On the Level
Selection Screen (p.13), move the Donkey
Kong icon to the level you want to play and
select TIME ATTACK from the menu (p.15).
When the level starts, a timer will appear in
the lower-left corner of the screen. This timer
indicates the required time for the displayed
medal. Below this timer is your current time.
If your time exceeds the displayed time for the current medal, the timer will adjust for the next
medal. The best medal you have acquired will be displayed on the Level Selection Screen
(p.13) and Level Summary Screen (p.14). If you want to retry the level for a better time,
press the + Button on the Level Clear Screen or press the + Button or – Button during play to
pause the level and select RETRY from the Pause Menu.
Note: The RETRY option will be available from the Pause Menu during Time Attack Mode.
In Time Attack Mode, you will start the level without Diddy Kong.
Hearts
Remaining hearts for Donkey Kong
and Diddy Kong. This indicator is
visible at all times.
Bananas
Number of bananas collected.
Number of lives remaining.
OPTIONS
Enter Options Menu (p.12).
Name of Current Level
RESUME
Continue your game.
QUIT LEVEL
Return to Level Selection Screen.
Balloons
Number of Banana Coins collected.
Banana Coins
Number of Puzzle Pieces you have
found in the current level.
Puzzle Pieces
Shows which KONG Letters you
have acquired in the current level.
For more information on these items, see p. 24.
KONG Letters

19
19
18
18
Donkey Kong’s Moves
Donkey Kong’s Moves
Walk/Run
Walk/Run
Tilt the Control Stick left or right to walk. As you tilt the Control Stick farther in one direction,
Donkey Kong will begin to run.
Actions
Actions
Crouch
Crouch
Tilt the Control Stick down to crouch.
Jump
Jump
Press the A Button to jump. Press and release for short jumps, or press and
hold for longer jumps.
Here’s a tip from my days as a beloved hero: Try rolling off a ledge and jumping in
midair. That’ll get your blood movin’!
Blow
Blow
Tilt the Control Stick down and shake the Wii Remote or Nunchuk.
Grab
Grab
Press and hold either the Z Button or B Button to pick up barrels and other
objects or grab vines. Release the button to throw the barrel or let go of the
object or vine.
Cling
Cling
Press and hold either the Z Button or B Button to cling to certain surfaces
like grass, sails and chains. Tilt the Control Stick in a direction to move along
the surface. Shake the Wii Remote or Nunchuk to pound. Release to let go.
Barrel Jet
Barrel Jet
With Diddy Kong on Donkey Kong’s back, hold the A Button after jumping
to hover in midair for a short period of time.
Kong Roll
Kong Roll
With Diddy Kong on Donkey Kong’s back, shake the Wii Remote or
Nunchuk while tilting the Control Stick left or right to perform a Kong
Roll. Donkey Kong will continuously roll until you stop shaking the
Wii Remote or Nunchuk.
Barrel Roll
Barrel Roll
Shake the Wii Remote or Nunchuk while tilting the Control Stick left or
right to roll.
Ground Pound
Ground Pound
While not moving, shake the Wii Remote and Nunchuk
to ground pound. This will stun nearby enemies and
allow Donkey Kong to interact with certain objects in
the environment, such as special DK Plates.
These are Donkey Kong’s standard moves. When you find a DK Barrel
and release Diddy Kong, he will automatically jump on Donkey Kong’s
back and provide additional abilities.
In Two-Player Cooperative Mode (p. 26), Diddy Kong will not automatically jump on
Donkey Kong’s back. Press the Z Button or B Button when close to Diddy Kong to carry
him on Donkey Kong’s back.

21
21
20
20
Diddy Kong’s Moves
Diddy Kong’s Moves
Walk/Run
Walk/Run
Tilt the Control Stick left or right to walk. As you tilt the Control Stick farther in one direction,
Diddy Kong will begin to run.
Crouch
Crouch
Tilt the Control Stick down to crouch.
Jump
Jump
Press the A Button to jump. Press and release for short jumps or press and
hold for longer jumps.
Barrel Jet
Barrel Jet
After jumping and while in the air, hold the A Button to activate Diddy
Kong’s Barrel Jet. When Diddy Kong is on Donkey Kong’s back, Donkey
Kong will have control of the Barrel Jet.
Cartwheel Attack
Cartwheel Attack
Shake the Wii Remote or Nunchuk while tilting the Control Stick left or
right to perform a Cartwheel Attack.
Blow
Blow
Tilt the Control Stick down and shake the Wii Remote or Nunchuk.
Grab
Grab
Press and hold either the Z Button or B Button to pick up barrels and other
objects or grab vines. Release the button to throw the barrel or let go of the
object or vine.
Cling
Cling
Press and hold either the Z Button or B Button to cling to certain surfaces
like grass, sails, and chains. Tilt the Control Stick in a direction to move
along the surface. Shake the Wii Remote or Nunchuk to pound. Release to
let go.
Peanut Popgun
Peanut Popgun
After jumping and while in the air, shake the Wii Remote
and Nunchuk to shoot Diddy Kong’s Peanut Popgun.
When Diddy Kong is on Donkey Kong’s back, Diddy
Kong can still shoot his Peanut Popgun.
Popgun Pound
Popgun Pound
While not moving, shake the Wii Remote and Nunchuk
to shoot Diddy Kong’s Peanut Popgun at the ground
to create small tremors. These tremors will stun nearby
enemies and allow Diddy Kong to interact with environ-
mental objects such as DK Plates.
Diddy Kong is only playable during Two-Player Cooperative Mode
(p. 26) and will be controlled by Player Two.
Diddy Kong can jump on and off Donkey Kong’s back by pressing either the Z Button
or B Button.
When using Horizontal Style (Wii Remote) controls, hold up on the
-Control Pad and
press the 1 Button to jump on Donkey Kong’s back. To dismount, hold down on the
- Control Pad and press the 1 Button.
23
23
22
22
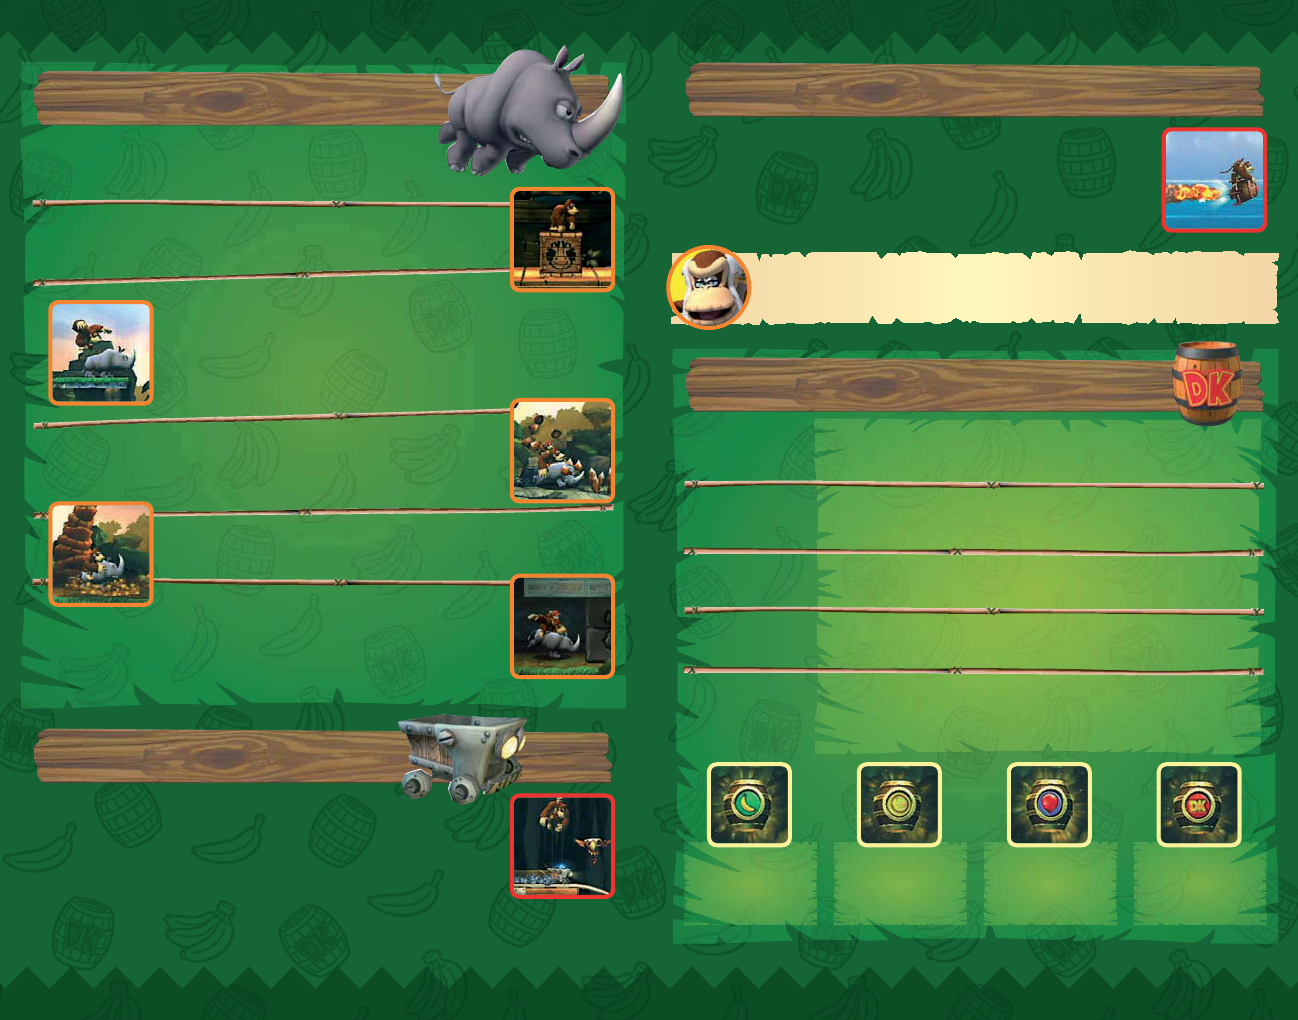
Rambi’s Moves
Rambi’s Moves
To use Rambi, locate a crate with the Rambi logo on its side. Jump on the
crate and ground pound to release Rambi.
To jump on Rambi’s back, press the A Button while standing next to
Rambi. To dismount Rambi, press either the Z Button or B Button.
When using Horizontal Style (Wii Remote) controls, press the 2 Button
while standing next to Rambi to jump on his back, and hold down on
the
- Control Pad and press the 1 Button to dismount him.
Shaking the Wii Remote and Nunchuk will cause Rambi to ground pound.
Shake the Wii Remote or Nunchuk while tilting the Control Stick left or
right to charge Rambi forwards.
While riding Rambi, Donkey Kong will be invulnerable to most enemies
and environmental dangers, as Rambi will knock them out of the way.
In some stages, you will find Rambi the rhinoceros waiting to help
in your quest. Moving and jumping with Rambi is the same as with
Donkey Kong, but Rambi has some unique moves of his own.
Mine Carts
Mine Carts
While riding a mine cart, you can jump or crouch (p.18)
to avoid obstacles.
In some mine cart levels, Donkey Kong jumps separately from
the mine cart. In these stages you must time your jumps so that
you land back on the mine cart.
Note: Some Barrel Cannons are marked with a skull and crossbones. These barrels will disappear after use.
Rocket Barrel
Rocket Barrel
Rocket Barrels control their own direction of travel. After jumping in a
Rocket Barrel, rapidly press the A Button to start the rocket. Once in the
air, press or hold the A Button to increase the rocket’s thrust. Release
the A Button to decrease the thrust.
Barrels
Barrels
Banana Bunch
Worth five bananas
Banana Coin
One Banana Coin
Balloon
One extra life
DK Icon
Receive a random item
(Shake controllers to
receive more of that item)
Slot
Machine
Barrel
Slot
Machine
Barr
el
This barrel is found at the end of the level. You must time when to
break this barrel to gain one of the following rewards:
Blast
Barrel
Blast
Barrel
Barrels marked with a white explosion will automatically blast you
out once you jump into them.
Barrel
Cannon
Barrel
Cannon
These barrels are marked with a white arrow. Jump into them and
press the A Button to blast across gaps and long distances.
DK Barrel
DK Barrel
Barrels marked with “DK” have your friend inside. Break this barrel
to release him. Breaking this barrel will also replenish any lost hearts.
Regular
Barrel
Regular
Barr
el
These regular-looking barrels are perfect to throw at enemies and
objects in the environment.
Rocket what? In my day, we had to walk uphill both ways to get around the island!

25
25
24
24
Collectibles and Items
Collectibles and Items
Cranky Kong’s Shop
Cranky Kong’s Shop
Banana
Banana
This yellow fruit is the object of Donkey Kong’s
quest. Collecting 100 bananas will earn you one
balloon.
Banana
Coin
Banana
Coin
Collect these coins to use at Cranky Kong’s Shop.
KONG
Letter
KONG
Letter
Complete a level collecting all four letters to receive
the KONG Letter icon (p.13).
Puzzle
Piece
Puzzle
Piece
Each level contains hidden Puzzle Pieces. Use all of
Donkey Kong’s and Diddy Kong’s moves to locate
them.
Balloon
Balloon
Balloons provide extra lives.
Heart
Heart
A heart will refill one of Donkey Kong’s or Diddy
Kong’s hearts.
One
Balloon
One
Balloon
Provides one extra life.
Three
Balloons
Three
Balloons
Provides three extra lives.
Seven
Balloons
Seven
Balloons
Provides seven extra lives.
Squawks
Squawks
Squawks will help you locate Puzzle Pieces.
Heart
Boost
Heart
Boost
Adds one extra heart to your heart count. The effect
will be available until finishing or quitting the level.
Map Key
Map Key
Use this key to open the locked path on the Level
Selection Screen.
Banana
Juice
Banana
Juice
Use this item to become invulnerable. Be careful not
to take too many hits, as it will wear off.
Donkey Kong’s white-bearded, grouchy grandfather, Cranky Kong, has set up shop in each
world to sell items to aid Donkey Kong. Cranky Kong can ramble on about anything, but don’t
ignore what he has to say, as his ramblings provide advice for those who pay careful attention.
I heard through the apevine that something nifty happens if you find all the
KONG Letters and Puzzle Pieces. Get a move on!

27
27
26
26
Super Guide
Super Guide
Two-Player
Cooperative Mode
Two-Player
Cooperative Mode
If your character loses a life, press the 1 Button to use
a balloon and you will return floating in a DK Barrel.
When the barrel touches the other character, it will break and
you will be back in the game. To float towards the other player,
shake the Wii Remote and Nunchuk. You can also bring a character back by breaking a
DK Barrel found in the level.
Note: One balloon will be consumed per revived character.
When playing a two-player game, please keep in mind the
following gameplay differences from a one-player game.
Once Super Guide has been activated, press the + Button or – Button at
any time to control Super Kong. When this character is used to complete
a level, you will only unlock the path to the next level. You will not be
rewarded with any collectibles (p. 24) and the level icon on the Level
Selection Screen will remain red instead of changing to blue. Once you complete the level
on your own, the level icon will turn blue.
To activate Super Guide, stand in front of the tutorial pig, then press the
+ Button or – Button and follow the on-screen instructions.
If you are having trouble on a particularly tough stage and lose enough lives, the tutorial
pig will appear and offer Super Kong’s assistance to complete the stage.
If Donkey Kong and Diddy Kong are separated and one character is off-screen, the off-screen
character will warp to the on-screen character after a few seconds.
Both Donkey Kong and Diddy Kong must jump in Rocket Barrels, Mine Carts and Barrel
Cannons to activate them.
When Diddy Kong is on Donkey Kong’s back, all movement is controlled by Donkey Kong.
This includes riding Rambi, Rocket Barrels, Mine Carts and Diddy Kong’s Barrel Jet (p.19).
When Diddy Kong is not on Donkey Kong’s back, either character can control Rambi, Rocket
Barrels and Mine Carts.
Cranky’s Tips
Cranky’s Tips
Always explore each level thoroughly to
find all the secrets. That pesky Tiki Tak
tribe haven’t found everything hidden on
this island.
1
1
If you get lost, try going right… or was
it left? Maybe up? Sorry – senior moment.
2
2
Some enemies are too tough to beat with a simple jump. Try different
moves when you encounter a new enemy. Like ground pound. Or better
yet, buy stuff from my shop!
3
3
Leave no banana behind. If you collect enough of them, you’ll get an extra
balloon. I’m not sure exactly how many bananas you need, because I’m so
tough that I only need one balloon!
4
4
That Donkey Kong may be strong, but he’s not the only monkey in the
barrel. He’ll need Diddy Kong’s help to get to those hard-to-reach places.
5
5
Super Kong? Bah, fiddlesticks! I could do a better job with my eyes tied behind my
back! Now, where’d my cane get off to?

29
29
28
28
Credits
Credits
Retro Studios
Staff Credits
Executive Producer
Michael Kelbaugh
Senior Development Director
Bryan Walker
Production Manager
Ryan Harris
Production Coordination
Shane Lewis
Design
Senior Design
Kynan Pearson
Mike Wikan
Tom Ivey
Design
Andy Schwalenberg
Bill Vandervoort
Brandon Salinas
Jay Fuller
Russell O'Henly
Contract Design
Jonathan DeLange
Stephen Dupree
Art & Animation
Art Director
Vince Joly
Art Lead
Ryan Powell
Principal Art
Elben Schafers
Technical Art
Chris Voellmann
Senior Art
Chuck Crist
Luis Ramirez
Art
Amanda Rotella
Jay Epperson
Matt Manchester
Quinn Smith
Sean Horton
Ted Anderson
Teague Schultz
Thomas Robins
Russell Lingo
Contract Art
Mark Brady
Reed Ketcham
Mike Witt
Senior Animation
Dax Pallotta
Derek Bonikowski
Will Bate
Animation
Carlos Mendieta
Raphael Perkins
Stephen Zafros
Contract Animation
Chris Torres
Nick McBride
Additional Thanks
Danny Richardson
Sammy Hall
Engineering
Engineering Director
Tim Little
Senior Engineering
Aaron Walker
Alex Quinones
Jim Gage
Mike Miller
Engineering
Akintunde Omitowoju
Andy Hanson
Dan Higdon
Eric Rehmeyer
Frank Maddin
Jesse Spears
John Sheblak
Jose Guerra
Rhys Lewis
Ryan Cornelius
Audio
Audio Supervisor
Scott Petersen
Contract Sound Design
Bobby Arlauskas
Frank Bry
Gl33k, LLC
Contract Sound Scripting
Monty Goulet
Operations
Al Artus
Ethan McDonald
Faith Casper
George Thomas
Kellie Prinz Johnson
Translation & Administration
Akiko Furukawa-Laban
Nintendo Staff Credits
General Producer
Shinya Takahashi
Producer
Kensuke Tanabe
Supervisor
Shigeru Miyamoto
Assistant Producer
Risa Tabata
Coordination
Yuji Ichijo
Kaori Miyachi
Coordination Support
Kiyohiko Ando
Atsuto Yagi
Music Supervisor
Kenji Yamamoto
Music
Minako Hamano
Masaru Tajima
Shinji Ushiroda
Daisuke Matsuoka
Storyboards
Naoki Mori
Tomoe Aratani
Illustration/
Conceptual Art Support
Shigehisa Nakaue
Character Supervisors
Tsuyoshi Watanabe
Yusuke Nakano
Artwork
Yoshitomo Kitamura
Yasuo Inoue
Technical Support
Yoshito Yasuda
Shingo Okamoto
Tomohiro Umeda
Special Thanks
Keisuke Terasaki
Akiya Sakamoto
Toshihiko Okamoto
Takumi Kawagoe
Shintaro Kashiwagi
Hiroki Hirano
Kanae Dohta
Takashi Tezuka
Hiroyuki Kimura
Shigeyuki Asuke
Tsutomu Kaneshige
Yoshiaki Koizumi
Mahito Yokota
PolyAssets United Inc
Mario Club Co., Ltd.
Nintendo of America
Staff Credits
Business Development
Mike Fukuda
Project Development
Tom Prata
Tim Bechtel
Project Development/
NOA Coordination
Todd Buechele
NOA Localization
Nate Bihldorff
Eric M. Smith
Anne-Marie Laperriere
Cesar Perez
NOA Design
Ross Hirai
Hitomi Ross
NOA Product Testing
Sean Egan
Robert Jahn
Kathy Huguenard
Teresa Lillygren
Nicko Gonzalez De Santiago
Sara Hoad
Stephane Arlot
Jeffrey Storbo
Special Thanks
Reggie Fils-Aime
Jacqualee Story
Jill Whitney
Nicola Wright
Mindy Bannan
Jason Mahaffa
Gregg Brown
Peter Nielsen
Ryan Pikarski
Seyla Keo
Nintendo of Europe
Staff Credits
Localization Management
Andy Fey
Martin Weers
Localization Coordination
Palma Sánchez
de Moya Rodríguez
Quality Assurance
Coordination
Wolfgang Weber
Translation
Eren Baykal
Arielle Walter
Gurvan Le Guen
Giovanna Canta
Adriano Antonini
Jessica Ferlmann
Janine Wetherell
Alesánder Luis Valero Fernández
Ariel del Rio de Angelis
Quality Assurance
Roisin McCorkell
Sean Keoghan
Marc Fisher
Guillaume Deschamps
Adrien Rispal
Jérôme Petit
Marcello Tridenti
Luca Keller
Andrea Bellezza
Andreas Langer
Isabelle Stein
Victoria Bützler
David Martín Navarro
Mario Maldonado Rodríguez
Pablo Jesús Sánchez Morcillo
Manual Localisation
Artwork Producers
Andrea Dopico
Britta Henrich
Proof Reading and Layout
Pieter Van Nueten
André Hahn
Julia Jarocki
Ana Luz
Marion Magat
Cornelia Bilz
Sascha Nickel
Verena Lischka
Uschi Lipinski
Oleg Sdarskij
Martin Heyne
Moni Händschke
Jasmina Libonati
Wojtek Sitarski
George Kamaroudis
Dutch Manual Text
Translation
Robert de Boer
Carsten Harmans
Executive Producer
Satoru Iwata
All Rights, including the
copyrights of Game, Scenario,
Music and Program, reserved
by NINTENDO.

RVL-SF8P-UKV
