
Purpose
Tournament Operations Manager (TOM) is provided to official Pokémon Professors to operate
tournaments on behalf of Pokémon Organized Play. Users must apply for Professor status on
Pokemon.com and must abide by the Core Values of the Professor Program.
Installation
Location
• TOM can be downloaded from www.pokemon.com under the OP Tools
Dashboard by selecting the Tournament Software tab on the left side of the
screen.
• After selecting the Tournament Software tab, you will then be given the option to
download either the Windows version or the MacOS version of the software. For
more information on how to download each version, please make sure to follow
the directions given under each version.
TOM_Data Folder
• Why is this folder important?
o The TOM_Data folder will contain not only tournament files as they are
saved, but also user and player profiles. This folder is crucial when fixing
particular rounds within the tournament, or when you are seeking to
transfer profiles from one computer to another with Tournament
Operations Manager loaded.
• Player Profile File
o The player.xml file is a file that will constantly update when you add new
players to the software. This file will contain all the information gathered
from the player when they are added to a tournament for the first time.
This file is what you would export when transferring from one computer to
the next in order to avoid losing all the information collected previously
from players.
• Event Folders
o Each sanctioned event will have one main file that will update periodically
throughout the event and will be the file you will upload to the Play! Tools
platform at the conclusion of the event. In addition, an individual folder for
each event will be created after the start of Round 1 of that particular
event. This folder will contain file information for each start and end of
round. This will be used when problem-solving a particular round within
an event.

Creating/Starting a New Tournament
Log In / Create a New Profile
• How to Log In
o To log in to the TOM software, you will first need to open the application
on your device. Upon launch, you will see a small window pop up in the
center of the application. To log in to the application, all you will need to
do is enter your Play! Pokémon Player ID. If this is your first time logging
in to the application, you will need to either import your profile from
another TOM application you have used (this will be discussed in another
section) or create a new profile.
• First Time Logging In / Creating a Profile
o Log-In Screen
Language: This is where you will choose the language the
program will be translated into.
Profile: This is what you would select if you were creating a profile
for the first time.
Import Profile: This is what you will choose if you are importing a
profile from another TOM application.
Player ID: This is where you will enter your Play! Pokémon Player
ID after you have created your profile. Please Note: Only Player
IDs that have created a profile will be able to log in.
o Creating a New Profile: If this is your first time logging in to this software,
you will need to create a profile. To create a profile, you will choose the
“Profile” option from the log-in screen and fill in the required information.

o
Language: The preferred language you choose to use on the
software.
First Name: Enter your first name.
Last Name: Enter your last name.
Player ID: Enter your Play! Pokémon Player ID.
Country: Select the country you live in.
Time Zone: Select the time zone you live in.
Auto Save (min): Determine when the software will automatically
save files while using them.
Round Time (min): The default time the software will use when
starting the round timer.
Final Round Time (min): The default time the software will use
when starting the single-elimination top cut bracket.
Base Font Size: The font size used on the software.
Paper Size: Choose what size of paper you plan on using to print.
Date Format: The format in which the date will be displayed on
printed documents.
Time Format: The format in which the time will be displayed on
printed documents.
How to create a new tournament (Step 0 / Step1)
1. How to create the tournament.
1. Before you start: Create a tournament via the Play! Tools website [link to
play-tools.pokemon.com ] Detailed instructions for using Play! Tools are
located in the Play! Tools Guide [link to play-
tools.pokemon.com/guide].
2. Next, after you have created your tournament via Play! Tools, open the
TOM software on your device. Once logged in, press the New

Tournament option under the “File” menu or press the “New Tournament”
icon. Both can be found in the top left-hand corner of the screen.
3. After pressing the “New Tournament” option, a new window will pop up.
This will be the first step of creating a tournament on the TOM software
(shown below). You will need to accurately fill in each area of this box in
order to move on to Step 2.
1. Tournament Mode: This is where you will choose what type of
tournament you will be running. Other than the Custom mode,
these selections will ensure that you use the correct settings for
the chosen Premier Event series.
1. Custom: This option will be used primarily for local
grassroots events. You can structure the tournament as
you see fit under this option.
2. TCG Prerelease/Draft: This option is designed for TCG
Prereleases/Drafts only. It will structure the tournament to
give you the option to end after 3 rounds.
3. TCG League Challenge: This option is designed for TCG
League Challenge events only. It will automatically
structure the tournament for a number of Swiss rounds
based on attendance, but will not create a single-
elimination top cut. The tournament will conclude after
Swiss rounds.
4. TCG One Day Championship and TCG League Cup
options: These options will create Swiss rounds based on
the number of players registered, then run a single-
elimination top cut if the number of registered players in a
division meets the requirements based on the Tournament
Rule Handbook.
5. TCG Two Day Championship: This option is designed for
larger events (i.e. Regional Championships, International
Championships, and World Championships). This will
structure the tournament similar to the One Day
Championship option but will also take into consideration
whether it meets the number of required registered players
to have additional Swiss rounds for those individuals that
qualified for Day 2.
6. VGC Premier Event: This option will structure the event for
VGC Premier events (i.e. Premier Challenge and Mid-
Season Showdown).
2. Game Type: This option is only available for the “Custom”
tournament mode. This is where you will choose whether you are
hosting a Trading Card Game, Video Game, or Pokémon GO
tournament.
tournament mode. This is where you will choose either the “Swiss”
or “Single-Elimination” structures.
4. Name: This is where you will enter the name of the tournament
you created on via Play! Tools.
5. Sanctioned ID: This is the Tournament ID number you received
when creating an event via Play! Tools. Note that you may leave
this field blank during tournament creation but would then need to
use the File menu to enter it before uploading your results.
6. City: The city where the tournament is being hosted.
7. State: The state abbreviation where the tournament is being
hosted.
8. Country: The country where the tournament is being hosted.
Please note that Professors are only permitted to run tournaments
in the country that matches their country of residence in their
Pokémon Trainer Club account.
d. After everything has been entered into the first screen and
matches the details created via Play! Tools, you may press the “Next”
button. At this time, you will be asked to save the tournament in the
TOM_Data folder. Please make sure you name the saved file in a way
that is easiest for you to find.

Player Registration / Start of Tournament (Step 2)
Player Registration: Player registration is the next step to complete before the start of your
event. This portion should be completed at the end of registration on the day of the event. In this
section we will discuss how to add new players to an event, how to search for players who have
entered previous tournaments, and how to add or remove from the event.
• Add New Player: This section of the entry form is designed for players who have
not participated in a tournament you have hosted while using TOM.
o Player ID: The registered player’s Player ID. Please note: The Player ID
used should match the player’s ID on Pokemon.com. This must be
accurate as Championship Points are awarded to that Player ID.
o First Name: First name of the registered player.
o Last Name: Last name of the registered player.
o Date of Birth: Date of birth for the registered player. Please note: This
must also be accurate as the date of birth determines what division the
player will be placed in for the tournament.
o Add: After all previous fields have been filled, you will click this button to
enter the player into both the saved player profiles and the tournament.
• Filter My Players: This section of the entry form is designed to search for players
who have registered for the tournament and have played an event at your
location previously. After finding the registered player via the filter, enter them
into the event by double clicking on that player in the “My Players” list. You may
also add the player by having the filtered player highlighted and then press the
“Add To Tournament” button.
o Apply Filter to My Players: Apply the filter to the “My Players” portion of
the Player List.
o Apply Filter to Players in This Tournament: Apply the filter to the “Players
in This Tournament” portion of the Player List.
o Player ID Starts With: Enter the registered player’s Player ID here to
perform a search.
o First Name Starts With: Enter the registered player’s first name here to
perform a search.
o Last Name Starts With: Enter the registered player’s last name here to
perform a search.
o Birth Date Equals: Enter the registered player’s date of birth here to
perform a search.
o Show Players in Age Division: This option will allow you to search
specifically by age division, using the drop-down menu to change your
filter option.
o Filter: This will filter the “My Players” or “Players in This Tournament” list
based on the criteria entered into the search fields.
o Clear: This button will clear any information in the search fields.
• My Players: This section contains the complete list of player profiles that were
created during previous events you have hosted, or that were added recently for
an event you may already be adding players for. You may add players manually
from this section by highlighting the player you wish to enter into the event, then
pressing the “Add to Tournament” button or double clicking on the player, but it is
highly recommended to use the “Filter My Players” section for better efficiency.
You will primarily use this section to remove players from the saved roster or to
edit a player’s profile.
o Edit: This option allows you to edit the highlighted player’s profile. This is
primarily used to edit names, date of birth, and/or their Player ID.
o Delete: This option allows you to remove a saved player profile. Clicking
on this option will remove the highlighted player from the saved “My
Players” roster.
• Print Roster to Verify Players: After entering all registered players into the event.
It is highly recommended that the Tournament Organizer print the Roster and
post it for players before moving to the final step. This will help prevent any
has been registered has been entered into the event.
• After the Roster has been verified by all registered players, you may click the
“next” button to move onto the final step before starting the event. Please Note:
Pressing the “Back” button will return you to the previous step and should be
used if there was an error in the tournament structure.

Tournament Detail Verification (Step 3)
• Tournament Detail Verification: This last step in the tournament creation process
is designed to review all the tournament details before starting your event. This is
a very important step to review, because once you verify these details, they will
be permanent, and you will be unable to edit.
o Mode Notes: This portion of the tournament detail verification is designed
to remind the tournament organizer what “Tournament Mode” they chose
during Step 1 of the tournament creation process. This portion is
important to review to ensure that the tournament structure is accurate.
Please Note: Failure to choose the correct tournament mode may result
in tournaments not being reported correctly and players not receiving
Championship Points.
o Settings:
Round Time (min): This will be how you will set up the Swiss
round timer. The time you set here will only be used during the
scheduled Swiss rounds.
Draft Pods: This option is available if you would like to host a draft
and need draft pods.
Use Day 2 Swiss options, if eligible: This option is available if you
would like to host a large two-day event that isn’t a “TCG Two-Day
Championship.”
o Options: This portion of the tournament verification is designed to provide
options for an event that would like to host a single-elimination top cut.
Please Note: This portion of the tournament verification process may not
be available based on what Tournament Mode you choose as they may
have pre-set options.
Single Elimination Cut: Allows you to choose whether or not you
would like to host a single-elimination top cut.
Single Elimination Round Time: This is where you will set the
timer for the single-elimination top cut.
3rd and 4th Play Off:
Play One Less Swiss Round: This option is available if you feel
that you may need to play one less Swiss round.
o Podding Type: This will tell you what type of tournament podding you will
use for the event.
Age Separated: Players in each age division will play with other
players within the same age division.
Age Modified: This is used when there are not enough players in a
particular age division to have their own pod.
o Table Options
• Verify Tournament Setup: This step occurs as a final check before the start of the
tournament. It will go over all the options that were selected to make sure that the
tournament is structured correctly. This is the final check before the start of the
tournament. There is an option to “Print Details” so you are able to post the same
details publicly for players. It is highly recommended that you post these details
to help players avoid any confusion with the tournament structure.

During the Tournament
Main Tournament Screen
Top Menu Bar
• New Tournament
o Clicking this button will start the process of creating a new tournament.
• Open File
o Clicking this button will give you the option to open an already created
tournament stored in the TOM_Data folder.
• Edit Tournament
o Clicking this button will give you the option to edit certain tournament
details. Please Note: This will not give you the option to change the
tournament structure. It only allows you to edit the tournament name, city,
state, country, and Tournament ID.
• Save Tournament
o This will save the tournament’s current progress under the file that was
originally created after creating your tournament.
• Save Tournament as a New File
o This will save the tournament’s current progress under a new file that you
name and create.
• Save All Open Tournaments
o If you are running or have opened more than one tournament on this
software, this button will allow you to save all open tournaments at once
under the file that was originally created after creating your tournament.
• Close Tournament
o This will close the current tournament window you have open.
• Export Profile
o This will give you the option to create a copy of your profile .xml file so
that it may be exported to another device that has the TOM software
loaded on it.
• Edit Profile
o This will allow you to edit the profile settings you chose when creating
your profile for the first time.
• Barcode Scanner
o This will allow you to enter player results through the use of match slips
and a barcode scanner. The functionality of this option will be discussed
further in the “Running the Event” section of this document.
• Use the Speed Drop Form
• All Reports
o Clicking this button will produce a drop-down menu and will provide you
options for a variety of documents you are able to print for that particular
tournament.
• Get Help
o Clicking on this button will create a cursor with the “?” symbol. When you
click the screen with this cursor, it will open up the “Help” menu so that
you may be able to review what certain functions do.

Side Menu Bar
• Timers
o This box will provide a timer for each separate division in the tournament,
using the time that was set up when creating the tournament. Please
Note: It is highly recommended to have a separate timer outside of TOM
in case the software closes in the middle of the round. The timer will not
continue to count down after the software closes.
• Players
o Add Players: This button allows you to access all saved players in the
software or create a new player so that they may be added to the event.
Please Note: If you use this option before the round starts, it will ask you
to “Re-Pair” so the newly added player may be matched with another
player. If you use this option after the round has started, it will give the
player a “Forced Loss” for the round.
o Standings: This button allows you to review the standings for each round
and each division. This will also give you the option to print the standings.
o List /Search: This button will open a window that will allow you to search
for a player that has been entered into the current tournament or any
other open tournaments.
• Match
o Player 1 Wins: By clicking this button, the “First Player” at the highlighted
table will be marked as the winner for that round.
o Player 2 Wins: By clicking this button, the “Second Player” at the
highlighted table will be marked as the winner for that round.
o Tie: By clicking this button, the highlighted table will be marked with a Tie
for the round.
o Set As Playing: By clicking this button, the highlighted table will have all
reported results removed and will show their match as in progress.
Please Note: This button should be used when a result has been
accidentally entered.
o Double Loss: By clicking this button, both players at the highlighted table
will be marked with a loss. Please Note: This button should only be used
if both players received a penalty that requires them both to receive a
Game Loss.
• Player
o Edit: This will provide an “Edit” menu so that you may edit the highlighted
player’s information.
o History: This will display the highlighted player’s match history throughout
the entire tournament.
o Drop: This will remove the highlighted player from the tournament, but not
from the overall standings. They will no longer be paired for the remainder
of the event.
o Disqualify: This will remove the highlighted player not only from the
tournament, but from the event standings as well. This should only be
used when a Disqualification penalty has been delivered.
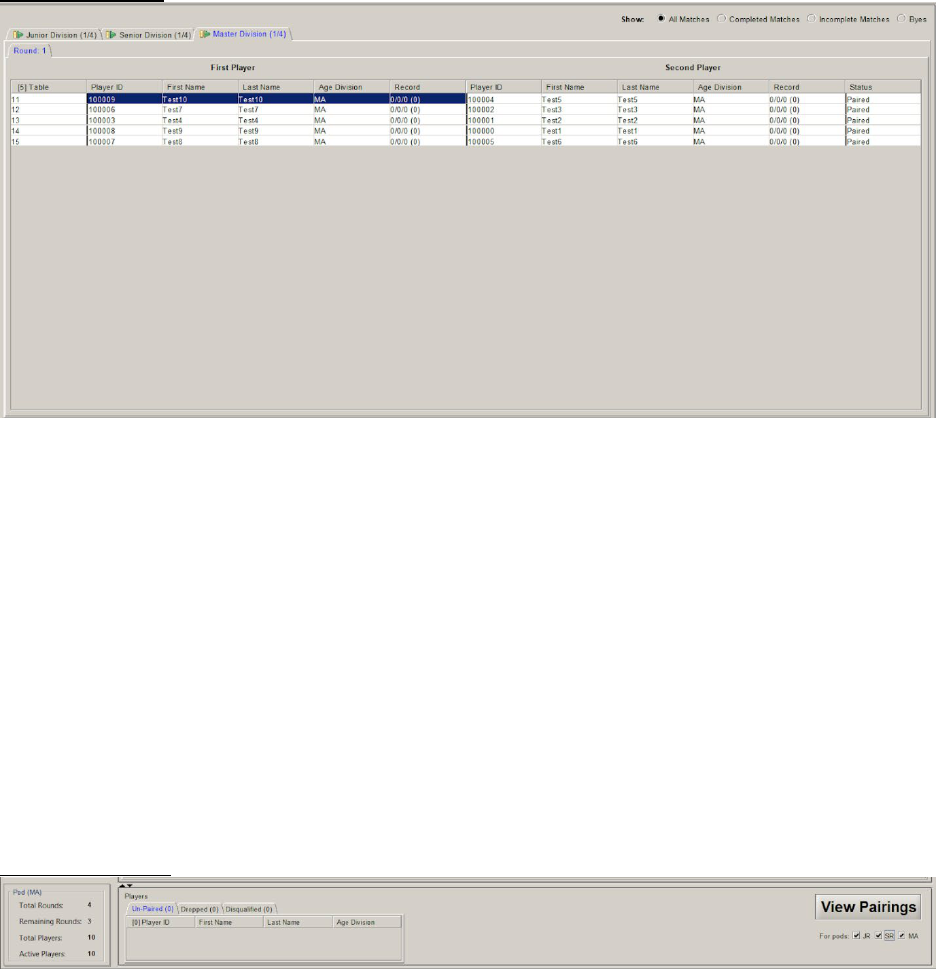
Pairings Window
• Pairings View (Show): This will give you the option to change the view in the
round tabs to show either “All Matches,” “Completed Matches,” Incomplete
Matches,” or “Byes.”
• Division Tabs: If your event has separate division pods, these tabs will change
the pod you are viewing.
• Round Tabs: These tabs are designed for you to view current and previous
rounds throughout the tournament.
• First Player/Second Player: These two columns are designed to designate
players into Player One or Player Two for the purpose of reporting matches.
• Tables: The table location the match was assigned to.
• Player ID: The Player ID of the player.
• First/Last Name
• Age Division: The age division the player was assigned to based on their date of
birth.
• Record: The match record of the player.
• Status: This is an indicator to show if the match is Paired, Playing, or Completed.
Bottom Menu Bar
• Pod Information Box: This box gives basic information for the current pod you are
viewing, including, the number of players in the pod, the number of active players
in the pod, the number of rounds remaining for the pod, and the total number of
rounds for the pod.
• Player Information Box: This box contains players that are unpaired, have been
dropped from the event, or have been disqualified. These individuals will not be
in the pairings.
• Progress Button: This button is designed to change based on what particular
step you are on within the tournament. The button will be labeled based on what
will happen after you click it.
• Report View Options: Under the Progress Button, there are checkboxes available
for each age division. This is designed to change the view of reports printed for
that round to only show the age divisions that are checked.
Running the Event
As you run your tournament, there are some important tasks to consider as you progress
through.
• Pre-Round Tasks: These are tasks that should be completed before the start of
each round.
o View/Post Pairings: Before the beginning of each round, it is highly
recommended to print and post pairings for players so that they may
quickly reach their assigned table.
o Printing Match Slips: When you click on the View Pairings button on the
Bottom Menu of your screen, it will produce not only your pairings, but
your match slips as well. It is highly recommended that you print, cut, and
pass these slips out every round so that players have a physical way to
report their matches. In addition, this is a great tool to use if you or a
player comes across a reporting error and need a document to reference.
• Reporting Players: There are several approaches when wanting to report a
match. Below are several options that may be used in the match reporting
process.
o Clicking on Name: The first and easiest option is double-clicking on the
name of the winning player in the Pairings Window. Even though this may
be one of the easiest ways to report, this particular method has a high
margin of error due to clicking on the wrong name or clicking additional
times. When using this method, it is highly recommended to double-check
the results at the conclusion of the round.
o Highlight Match, click Player Button: The next method that may be used is
highlighting the match in the Pairings Window, then pressing the results
buttons found on the Side Menu Bar under the “Match” category. If you do
not know what each of the buttons mean, please make sure to review the
software navigation section of this document.
o Barcode Scan: One of the fastest options to report matches is through the
use of a barcode scanner. You will need a compatible barcode scanner
and match slips. To start the reporting process using the barcode
scanner, you will need to click on the Barcode Scanner button found in
the Top Menu Bar (if you are not familiar with this button, please review
the software navigation section). A new window will pop up on the screen
with several options for you to set up.

Before scanning in results, there are a few options to set up.
• Under “Process options,” if you are using a traditional
barcode scanner, you will choose “Scanner.” If you are
using 10-key, you will select “10-key.”
• To enter results automatically as they are scanned, select
the “Automatically save valid scans” option under “Process
options.”
• To have a bell sound play whenever a scan is successfully
entered, select the “Play Sounds” option under “Process
options.”
• Finally, before you scan results, make sure to click inside
the “Result Code” box under “Match Slip” so that the cursor
is blinking. Failure to click inside this box will result in your
scans not being entered.

When scanning results, the barcode determines who is the winner
of the match.
• Left Barcode: Player 1 is the winner of the match.
• Right Barcode: Player 2 is the winner of the match.
• Center Barcode: The match result is a Tie.
• Please note that any special results (i.e. Double Loss or
Disqualification) will need to be entered manually.
o Right Click Options / Special Reporting Condition: The last option
available to report results is to right-click on a player. When doing this, a
menu will pop up giving you options for that specific player’s match result.
Please note that these are the same options that are found in the Side
Menu Bar, but they are specific to the highlighted player. Read below for
a more detailed description of these options
Won Match: The highlighted player WON the match.
Lost Match: The highlighted player LOST the match.
Tie: The match was declared a tie by both players.
Set As Playing: If a result has been accidentally entered, this
button will reset the results and mark the match as “In Progress.”
Edit: This will provide an “Edit” menu so that you may edit the
highlighted player’s information.

History: This will display the highlighted player’s match history
throughout the entire tournament.
Drop: This will remove the highlighted player from the tournament,
but not the overall standings. They will no longer be paired for the
remainder of the event.
Disqualify: This will not only remove the highlighted player but will
also remove them from the event standing. This should only be
used when a Disqualification penalty has been delivered.
o Dropping/Re-Entering Players: If a player has changed their mind soon
after dropping, or if they were accidentally dropped or disqualified, there
is a way to re-enter a player in the tournament. To re-enter a player in the
tournament, you will first go to the Bottom Menu Bar under “Players” and
click on either the “Dropped” or “Disqualified” tabs, depending on where
the removed player had been placed. Next, highlight the player you wish
to re-enter. Finally, right-click on the highlighted player, then select the
“Re-enter” option. This will re-enter the player in the tournament and it will
continue to pair them. Please note: Both the “Edit” and “History” options
function the same as previously discussed in this document.
• Round Progression
o Best practice tips
o Editing a round after pairing next round
• Top cut
• Adding players after the tournament starts
After the Tournament
• Reporting the Event: After you have concluded the event and saved the tournament file
to the TOM_Data folder, you will need to return to Play! Tools to upload your TDF file
and enter your staff. Detailed instructions on this can be found in the Play! Tools Guide.
• Upload Errors: Whenever you receive an upload error, refer to the Troubleshooting TDF
Upload Errors section of the Play! Tools Guide. Failure to resolve upload errors may
result in the tournament not reporting and players not receiving Championship Points if
the event was a Premier Event.

Appendix
TOM Operator Event Checklist
Before the Event
• Confirm with the League Owner that you have permissions that allow you to sanction
events for that particular League, as the event can only be sanctioned by a Tournament
Organizer with those permissions. This is especially important for Premier Events.
• Create the event at least 14 days in advance on the Play! Tools platform so players have
enough time to plan for your event and so there is enough time to properly promote your
event on Pokemon.com under the Event Locator. For more information about how to
sanction your event on Pokemon.com, review the instructions for Play! Tools (Insert Link
to Training Video/Instructions)
• Once your event has been sanctioned and you have received your Tournament ID
number, you may start to create your tournament on TOM. Please that this can be done
in advance, before the event, in order to be prepared for the registration process.
During the Event
• Log in to TOM, then either open the tournament file you created in advance by choosing
the correct tournament file after selecting the “Open Tournament” option from the top
menu bar, or create a tournament by selecting “New Tournament” from the top menu
bar. If you are creating a new tournament, make sure to have the correct Tournament ID
number from your sanctioned tournament on Play! Tools.
• Complete “How to create a new tournament (Step 0 / Step1)” (Create Hyperlink to this
section of the manual)
• Complete “Player Registration / Start of Tournament (Step 2)” (Create Hyperlink to this
section of the manual)
• Complete “Tournament Detail Verification (Step 3)” (Create Hyperlink to this section of
the manual)
• Before the start of each round:
o Print round pairings
o Print and cut match slips
o Post pairings for players
o Verify players are seated and ready to start
o Click “Start Round” to begin entering results for the round and to start the round
timer within the software.
• During each round:
o Collect and verify the results of each match slip as players report
o Enter each match slip’s results manually or by scanning the barcode on the
match slip. (See Running the Event [Add Hyperlink to Section])
o Enter any “Special Results” as designated by the event’s Head Judge.
• At the conclusion of each round:
o Review match slips to verify all results have been entered correctly.
o Maintain match slips, pairings, and standings documents for the round, as
documentation must be retained until after the conclusion of the event.
o Post standings after results have been verified. (Optional but highly
recommended after the final round of Swiss, before the single-elimination top
cut.)

At the Conclusion of the Event
• After final results have been verified and finalized, you will need to click “Finalize
Results,” then click the “Save File As” button that will appear immediately after. You may
keep the tournament’s current file name and replace the old file, or you may change the
name so that it is easily identifiable when you go to upload the tournament in Play!
Tools.
• Return to Play! Tools and select your tournament from the My Tournaments page. There
will be an option to upload the event file. Click on the upload option and select the
finalized tournament file that you wish to upload. Please note that this process can only
be done by the individual who sanctioned the event on Play! Tools.
• After uploading the event, verify if there were any upload errors, if so, review the errors
and after a fix is found, upload the file again. If you continue to have difficulties with the
uploading process, please submit a customer support ticket at support.pokemon.com.
• After the file has successfully uploaded, you will be given an additional option on Play!
Tools to enter your staff for the event. Make sure to collect Player ID numbers from each
member of your event staff so they can receive credit for working the event.
• Destroy all event documentation (match slips, pairings, and standings) after file upload is
complete.
Other Features/Advance Features (For future revisions)
• How to open a tournament in progress after TOM is closed.
• Reports
• How to move the players.xml file to a new computer when reinstalling in a new location.
• Table Options
• FAQ
