Example logbook report for Apsc 1299:
The Morse Decoder
This following pages contain an example logbook that a student might have written while
performing an experiment, called the “Morse Decoder”, where they created code to translate
Morse code digits into regular Arabic digits. This example logbook is particularly useful for
seeing how to record your work while coding and while troubleshooting code that is not
behaving correctly.
Note that you do not need to write your logbook exactly like this one in order to get full marks—
there is quite a bit of flexibility in how an engineer can organize and record data in their logbook.
However, this example should give you an idea of what level of detail you need to aim for, and
what kinds of data are important to record.
An engineer’s logbook can be used as a legal document to, for example, establish who owns an
idea or innovation in the case of a patent dispute. For this reason, your logbook must be written
in ink, and have each page signed (or initialed) and dated. Graphs may be done in pencil.
Computer code should be permanently pasted or stapled into the book.
Your logbook also needs to be a complete record of everything you did in the lab, so even your
mistakes and unwanted results should be documented fully. Never remove pages, and never
obscure information from the logbook. If you make a mistake, cross out the error with a single
line (so it can still be read), and write the correction nearby.
When you join the work force, you’ll often be called upon to make an estimate on how long a job
will take, or to bill your clients accurately for the time you spent on their project. For this reason,
you’re required to record the current time in your logbook regularly. By getting into this habit
now, you’ll develop a good “feel” for how long certain tasks take, and will always have a record
of exactly how long you worked on a particular project.
The annotations in this logbook will point out things an instructor would think the student did
well and things they would feel were lacking. Overall, however, this logbook displays good note-
taking skills and would likely receive a very good grade.

Sign and date
every page
Record the time
often.
Start a new experiment’s
write-up by recording the
experiment title and all the
programs you’ll use.
If you don’t record
the time at least
once per page,
you’ll lose marks.
The student takes
notes as she reads
through the
manual’s theory,
recording all the
important infor-
mation in her
logbook.
When she gets to
the tasks, she jots
them down in point
form. This is a
clear way to state
her experimental
objectives.

Record your
plans, rough
work, and thought
processes as you
prepare for a
task.
Consider putting
the steps for
often-performed
tasks in an
appendix of your
logbook. That
way, you can
refer to it rather
than re-writing the
steps.

Think of the
logbook as a real-
time diary of your
work. Record
what you do, as
you’re doing it.
Notice how the
student jots down
notes on every-
thing she does,
step by step.
Here, the student
pseudo-code as
planning process
for the project.

Again, this is a
step-by-step, real-
time diary of what
she’s doing, as
she does it.
Someone could
take the same
code she started
with and
reproduce her
work using only
the notes in this
logbook, with no
lab manual. This
is the level of
detail you should
be aiming for.

More diary of her
work, interrupted
twice when she
pauses to figure
out something.

A common error
is to not record
enough notes
when things start
to go wrong.
Notice how this
student handles
coding problems:
She notes every
error message,
including its code
and warning.
Then, as she
figures out what
went wrong, she
notes what the
problem was and
how to fix it.
It’s implied, here,
that she made the
fixes she noted.
This is okay for
simple problems.
If a more complex
solution was
required, she
would have
needed to add
more details
about what she
did.
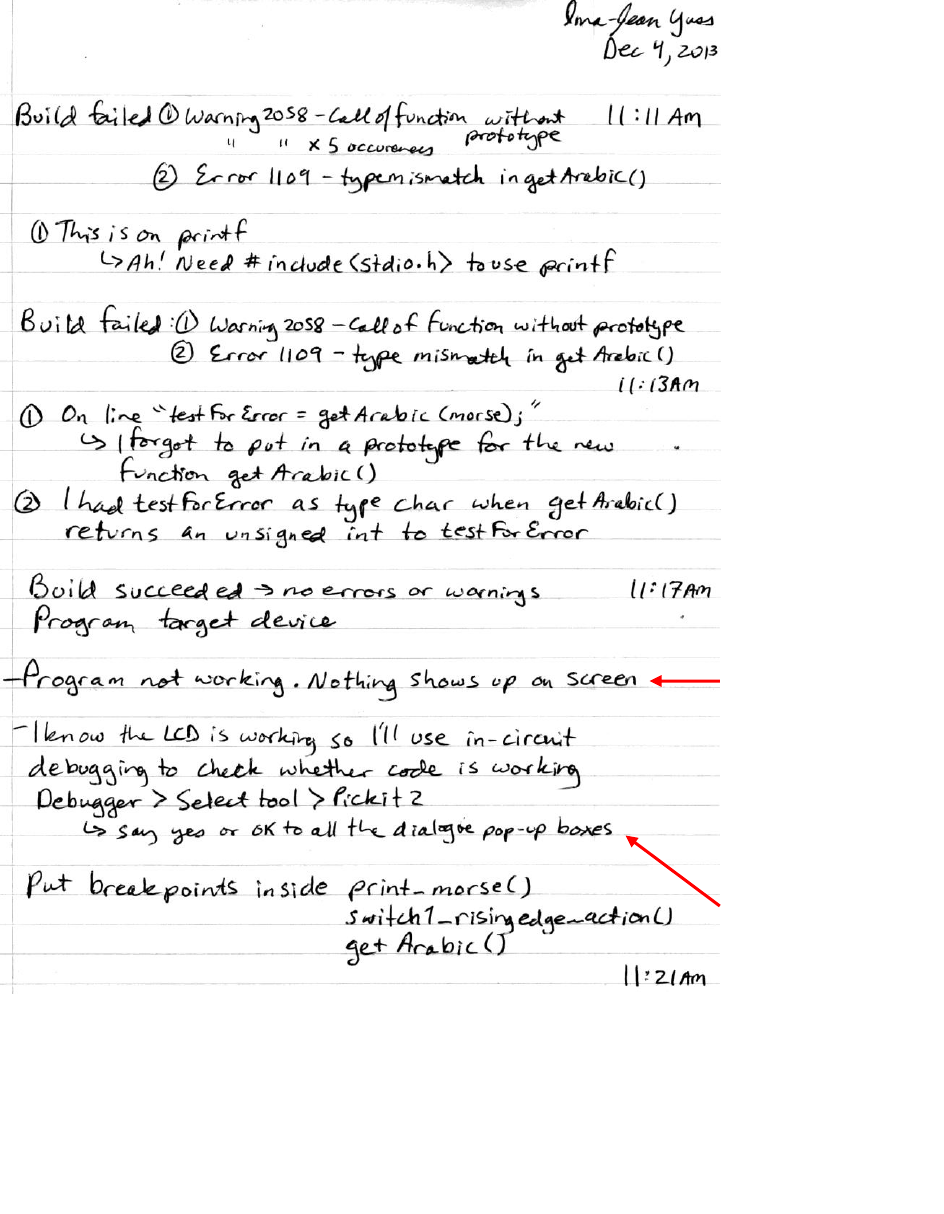
Here she
encounters a
different kind of
problem: Her
project built
successfully, but
the circuit is not
behaving as
intended.
She jots down
notes on
everything she
does to fix the
problem, step by
step. This is the
same level of
detail she used
when she
documented
creating her code.

When you’re
testing or
measuring
something, record
all your
observations fully.
It’s not enough to
say something
worked or didn’t
work. Record
what you
observed that led
you to that
conclusion.

Again, when
testing or
measuring
something, record
all your
observations.

Again, record the
observations that
led you to believe
the circuit or code
is working (or not
working) as
intended.
Always attach your code to your logbook. The level of
detail you should aim for is that someone could
reproduce the experiment based only on your notes.
They would need a copy of your code to do that.
Before you print out, however, double-check whether you
included enough commenting. Comments are one of the
easiest things to forget!

Code should have
enough
commenting that
someone could
understand how
the program
works based only
on the comments.
In your opinion,
does this code
have enough
comments?

These were the
comments in the
original, supplied
code.
The student
probably should
have changed
them, but she
included her own
comments after
her added code,
so all the
necessary
information is
here.

