
VX3 COVER LIFTER
THE VX3 COVER LIFTER IS AN ADD-ON ACCESSORY, SOLD SEPARATELY AND NOT INCLUDED WITH A
SPA POOL. INSTRUCTIONS VARY PER SPA POOL MODEL, SEE COMPATIBILITY LIST BEFORE INSTALLING.
Easy Installation Guide
1
1
1
2
2
2
2
3
5
7
11
Contents
Before Getting Started
Operation Overview
Model Compatibility
List of Parts
Tools Required
Obstructions
Warnings
Alpine Spas Instructions
Master Spas Instructions
Pure Spas Instructions
Artesian Spas Instructions

Operation Overview
The cover lifter is attached with two mounting brackets, screwed into
the cabinet, on two opposite sides of the spa pool.
Start Position
Finish Position
Front Side of Spa Pool
SPA POOL BIRDS EYE VIEW
Model Compatibility
• The VX3 Cover Lifter will not t circular models, or square spas with a large corner radius. Enquire about the ‘Cradle Cover Lifter’ instead.
• In most cases, the VX3 Cover Lifter will not t spa pools with width/length greater than 2300mm.
• For rectanglular shaped spa pools, the cover will only fold one way, stacking parallel with the short end.
• Rectangular shaped spa pools usually have a smaller depth/width and may require the support arms to be trimmed down to t.
*
Table is a guide only. See specic model instructions for requirements and cautions.
Not all compatible or incompatible models are listed. If unsure, see your sales consultant.
BEFORE GETTING STARTED:
Range Compatible Models
*
Incompatible
Models
*
Notes
*
Alpine Spas
(Pages 3-4)
Lux3, Fuji, Whistler, Nova, Nepal, Utah, Mont
Blanc, Makalu, Vermont, Montana, Colorado,
Aspen, Blackburn, Sierra, Matterhorn, Summit,
McKinley, Vancouver, Munro, Elbrus, Everest,
K2, Cub, Frontier, Arctic, Glacier.
Lucania, Yukon, Oasis
Smaller rectangular spas may require support arms to be cut down with a
hack-saw. Logo plates may obstruct mounting brackets on certain sides.
Master Spas
(Pages 5-6)
Honolulu, Boston, Seattle, Grand Canyon San Miguel, Bar Harbor,
Miami, Santa Barbara.
Cabinet vents may need to be removed to install mounting brackets.
Pure Spas
(Pages 7-10)
Lux3, Fiesta4, Splash6, Revive5, Grand6
Zurich, Monaco, Santorini, San Marino
Modication Required - Vertical slats require cutting.
Smaller rectangular spas may require support arms to be cut down with a
hack-saw.
Artesian Spas
(Pages 11-14)
Maui, Nevis, Hawaii, Antigua, Captiva, Isla
Margarita, Barbados, Grand Bahama
Dove Canyon
Eagle Crest
Modication Required - Vertical slats require cutting.
Grand Bahama - Support arm will nish up shorter across
middle seam. Smaller rectangular spas may require support arms to be cut
down with a hack-saw.
The spa pool cover is folded backwards over the support bar, and then assisted
by the brackets to sit the cover upright, parallel with the back of the spa pool.
1
3
4
2
1

Tools Required
Obstructions
Warnings
List of Parts
• Your spa pool may have obstructions on the cabinet that get in the way when trying to install the cover lifter’s mounting brackets such
as logo plates, vents or docking stations etc. Take these into consideration when planning your mounting bracket positioning as you
may need to choose another side to install on. Not every side can be used.
• It is likely that some of the spa pool cover straps and clips will be obstructed by the mounting brackets. You will potentially need to
attach these clips on angle or refrain from using these clips.
• The VX3 Cover Lifter requires approx 500mm of clearance space behind the side it is mounted on so that the cover can swing out.
• The mounting brackets require 150mm of clearance on the sides they are mounted to.
• The resting position involves the cover sitting roughly halfway above the acrylic (see previous page ‘nish position’ image) - keep this in
mind as it may block a particular view.
• If your spa pool is not listed in the compatibility section, please contact Alpine Spas before proceeding.
• Unclip the spa cover clips before beginning installation.
• The VX3 Cover Lifter is not compatible with circular spa pool models.
• The VX3 Cover Lifter is not suitable for spa pools with dimensions wider/longer than 2300mm
• Do not use the VX3 Cover Lifter in high wind conditions. Injury can occur from the spa cover being blown over and onto the user.
• The VX3 Cover Lifter is designed to assist the removal of the cover from the spa pool. Always fully complete the removal motion by
taking weight from the cover and NEVER let it slam down by itself.
• Keep the VX3 Cover Lifter free of dirt and cobwebs.
• Chlorinated spa pool water can cause corrosion of parts. Clean your cover lifter regularly with fresh water and towel dry.
• Do not use water logged covers with the VX3 Cover Lifter, the excessive weight can place extra stress on the device and/or spa pool
cabinet.
PRE-INSTALLED
Covermate I Plastic
Installation Instructions - Updated as of 08/30/12
Step #1
Position the spa cover (in closed position) on the spa, making sure that all four corners
are properly positioned and square on the spa.
CMI-PLAST 120830
Step #2
Using the #10 x 1” mounting screws, attach the left and right Mounting Brackets to the
appropriate sides of the spa. Caution: to prevent splitting of wood cabinet, pre-drill
holes with a 1/16” drill bit. Mounting height is optional (see Fig. 1). By positioning the
Brackets 8” down from the top of the spa shell, approx. 9” of clearance behind the spa
will be needed. Mounted at this position approximately 75% of the spa cover will be
standing above the spa surface in the o position. By positioning the Brackets 12”
down from the top of the spa shell, approx. 15” clearance behind the spa will be
needed. Mounted at this position, approximately 50% of the spa cover will be standing
above the spa surface in the o position.
Step #3
Connect the Pivot Arms to the Mounting Brackets (see Fig. 2). After the Pivot Arms are
connected, tilt them back into the upright position.
Step #4
Insert the long end of the Support Arms into the Center Coupler piece. Then slide the
Support Arms into the Pivot Arms (see Fig. 3).
Step #5
Lay the Covermate on the spa cover. Adjust the Center Coupler piece and Support
Arms so that the Center Coupler is laying parallel to the spa cover’s hinge about 1/2”
away (see Fig. 4). Using the #10 self tapping screws, fasten the Support Arms to the
Pivot Arms and the Center Coupler piece. Note: Be sure to rotate the Center Coupler
so that the inserted screws are at a horizontal angle with the heads facing the back
Step #6
Slip the black hand grips to the edge of the spa cover and snap the Small Black Dome
Caps on the heads of all exposed #10 screw heads. Push the 7/16” plug into the
unused bracket (H) hole.
CAUTION!
Do not use the Covermate in high wind condition. Injury from the spa cover being
blown over and impacting the spa user can occur.
ITEM PART# DESCRIPTION QTY
A 100001 SUPPORT ARM 2
B 100002 FOAM GRIP 2
C 100003 CENTER COUPLER 1
D 100004 PIVOT ARM 2
E 100007 PIVOT ARM CAP 2
F 100344 BUSHING 4
H 100021 MOUNTING BRACKET 2
I 100008 TOWELMATE 1
K 100010 3/8 X 3" HEX CAP BOLT 2
L 100011 3/8 NYLON LOCKNUT 2
M 100012 3/8 FLAT WASHER 4
N 100013 #10 X 5/8" SELF TAPPING SCREWS 12
O 100014 #10 X 1" MOUNTING SCREWS 24
P 100015 LARGE BLACK DOME CAP 2
Q 100016 SMALL BLACK DOME CAP 36
R 100347 7/16" PLUG 2
Step #7
Attach the provided 3 hook TowelMate on the preferred side of your Covermate by
simply snapping it into place and inserting the middle self tapping screw (see Fig. 5).
Pivot Arm
Support Arm
Center Coupler
Cover Hinge
Figure 4 Figure 5
Figure 3
A
C
D
I
TowelMate
Figure 1
Figure 2
D
K
H
Figure 1
Mounting Bracket
H
M
M
L
N
Self-
Tapping
Screw
Mounting Bracket
Pivot Arm
Washer
Washer
Locknut
4
2
Tape Measure Flat Head Screwdriver Wrench
Power Drill & Drill
Bit Set
Hack-Saw
(Artesian & PureSpas)
x2
Before you begin to put together your cover lifter, make sure to double
check that all the parts are supplied. If you are in need of any extra parts for
whatever reason, give us a call on 0800 99 33 88.
2

Step #2 - Attach the Pivot Arms to the
Mounting Brackets
Two opposite ‘bracket assemblies’ (a mounting bracket & pivot arm piece
connected) should rst be made up as per ‘Figure 1b’
To make up each bracket assembly, use ‘Figure 1a’ as a reference. Place a
washer (M) on the hex cap bolt (K) and insert through the pivot arm (D)
surrounded by both bushings (F). Continue to feed the hex cap bolt (K)
through the mounting bracket (H), using the lower hole as per ‘Figure 1a’.
Thread a washer (M) and locknut (L) onto the hex cap bolt and tighten
gently, enough so that the pivot arm (D) moves freely on the mounting
bracket and is secure, but not too sti. Rotate the pivot arm into the upright
position as seen in ‘Figure 2’ if it is not already.
Step #1 - Position the Spa Cover
Position the spa cover in the closed position on the spa. Make sure that the
four corners are evenly positioned and sitting correctly.
Note the positions of the hanging cover locking straps. It is likely that the
mounting brackets of the cover lifter will restrict the installation of two of
your spa cover clips, so you will need to nd a way to secure these to the
cabinet, either by attaching them an angle or by shortening/lengthening
the cover straps.
ALPINE SPAS INSTRUCTIONS:
D
K
H
F
F
M
M
L
Mounting Bracket
Acrylic Shell
Cabinet
Mounting Bracket
300mm
Vertical Slat
Bushing
Pivot Arm
Washer
Washer
Locknut
Assemble each mounting bracket (H) as per ‘gure 1’.
Place a washer (M) on the hex cap bolt (K) and insert through the
pivot arm (D) surrounded by both support clips (A & B).
Continue to feed the hex cap bolt (K) through the mounting bracket (H),
using the lower hole as per ‘gure 1’. Thread a washer (M) and locknut (L)
onto the hex cap bolt end and tighten gently. Adjust locknut so pivot
arm (D) moves freely on the mounting bracket and is not too sti.
The bracket (and pivot arm) assembly needs to be screwed into each opposite
side of the cabinet in the right position for the lifter to work correctly.
To Find the Horizontal Positioning:
Take a bracket assembly and press it against the spa cabinet.
Gently slide the bracket assembly to the left as far as possible until the locknut
rests up against the vertical slat (see vertical slat marked in gure 2).
To Find the Vertical Positioning:
While keeping the horizontal position (pressed up against vertical slat)
gently slide the bracket up or down to your desired position while staying
between the marked red line in gure 2). The height in which you choose to
install is optional, as long as you match on resting position on both sides.
Choose a vertical position between the indicated
red space shown in gure 2 (between the top of the acrylic and the
second cabinet indentation down)
Step #1
Step #2
Pivot Arm
D
Pivot Arm
D
Pivot Arm
H
Mounting Bracket
Figure 1a
D
K
H
F
F
M
M
L
Mounting Bracket
Acrylic Shell
Cabinet
Mounting Bracket
300mm
Vertical Slat
Bushing
Pivot Arm
Washer
Washer
Locknut
Assemble each mounting bracket (H) as per ‘gure 1’.
Place a washer (M) on the hex cap bolt (K) and insert through the
pivot arm (D) surrounded by both support clips (A & B).
Continue to feed the hex cap bolt (K) through the mounting bracket (H),
using the lower hole as per ‘gure 1’. Thread a washer (M) and locknut (L)
onto the hex cap bolt end and tighten gently. Adjust locknut so pivot
arm (D) moves freely on the mounting bracket and is not too sti.
The bracket (and pivot arm) assembly needs to be screwed into each opposite
side of the cabinet in the right position for the lifter to work correctly.
To Find the Horizontal Positioning:
Take a bracket assembly and press it against the spa cabinet.
Gently slide the bracket assembly to the left as far as possible until the locknut
rests up against the vertical slat (see vertical slat marked in gure 2).
To Find the Vertical Positioning:
While keeping the horizontal position (pressed up against vertical slat)
gently slide the bracket up or down to your desired position while staying
between the marked red line in gure 2). The height in which you choose to
install is optional, as long as you match on resting position on both sides.
Choose a vertical position between the indicated
red space shown in gure 2 (between the top of the acrylic and the
second cabinet indentation down)
Step #1
Step #2
Pivot Arm
D
Pivot Arm
D
Pivot Arm
H
Mounting Bracket
Figure 1b
TO ENSURE CORRECT INSTALLATION, READ THE ‘BEFORE GETTING STARTED’
SECTION ON PAGE 1 BEFORE PROCEEDING.
INSTRUCTIONS FOR ALPINE SPAS MODELS - 1/2
3

Step #3 - Find the Correct Positioning for the
Bracket Assemblies
The bracket assembly needs to be screwed into the spa cabinet on
opposite sides of the spa pool for the mechanism to work correctly.
Remember to check for obstructions (see page 1) before
installing into the cabinet.
To Find the Horizontal Positioning:
Take a bracket assembly and press it against the spa cabinet. Gently slide
the bracket assembly to the left/right (depending on side of spa and
bracket arrangement you are using) as far as possible until the locknut
(on the back face of mounting bracket) rests up against the edge of the
vertical slat but does not sit on top of it. The curve of the plastic bracket
may overlap the vertical slat, but ensure the locknut stays butted up
against the edge of the vertical slat. (See vertical slat marked in ‘Figure 2’).
To Find the Vertical Positioning:
While keeping the horizontal position (pressed up against vertical slat)
gently slide the bracket up or down to your desired position* while
staying between the green safe zone shown in ‘Figure 2’ (300mm from
under the acrylic). The bracket assembly should be level before being
screwed in.
*The vertical height you choose is optional (within the safe vertical zone), just
keep in mind how you will attach the spa cover straps and that the higher
you mount the bracket, the higher cover will sit in the open position.
Once you have conrmed the position, screw the bracket assemblies to
the spa cabinet using the #10 x 1” mounting screws (O) through the holes
provided around the perimetre of the mounting bracket.
Step #6 - Finishing Up
Snap the Small Black Dome Caps (Q) on the heads of all exposed #10
Mounting Screws. Push the 7/16” plug (R) into the unused hole on the
mounting bracket. Place the Large Black Dome Caps (P) onto the exposed
Hex Cap Bolt head.
If using the TowelMate (I), install onto the side of the Pivot Arm by
replacing the self-tapping screws where required (see ‘Figure 5’).
Step #5 - Set the Positioning of Centre Coupler
& Support Arms
Lay the lifter bar down on the spa cover. Adjust the Center Coupler (C)
piece and Support Arms (A) so that the Center Coupler is laying parallel to
the spa cover’s hinge about 1cm away (see ‘Figure 4’).
Using the #10 self tapping screws (N), fasten the support arms to the
pivot arms and the center coupler piece.
Note: Before screwing in screws, be sure to rotate the center coupler so that
the screws are screwed in at a horizontal angle (parallel with the spa cover).
This way when the cover folds over the lifter bar, the screw heads will not rub
on the cover.
Step #4 - Setup the Support Arms & Center
Coupler
Insert the long end of the Support Arms (A) into the Center Coupler (C)
then slide the short ends of the Support Arms into the Pivot Arms (D) (see
‘Figure 3’). We will refer to connected Support Arms and Center Coupler
bar as the ‘lifter bar’ for the next step.
D
K
H
F
F
M
M
L
Mounting Bracket
Acrylic Shell
Cabinet
Mounting Bracket
300mm
Vertical Slat
Bushing
Pivot Arm
Washer
Washer
Locknut
Assemble each mounting bracket (H) as per ‘gure 1’.
Place a washer (M) on the hex cap bolt (K) and insert through the
pivot arm (D) surrounded by both support clips (A & B).
Continue to feed the hex cap bolt (K) through the mounting bracket (H),
using the lower hole as per ‘gure 1’. Thread a washer (M) and locknut (L)
onto the hex cap bolt end and tighten gently. Adjust locknut so pivot
arm (D) moves freely on the mounting bracket and is not too sti.
The bracket (and pivot arm) assembly needs to be screwed into each opposite
side of the cabinet in the right position for the lifter to work correctly.
To Find the Horizontal Positioning:
Take a bracket assembly and press it against the spa cabinet.
Gently slide the bracket assembly to the left as far as possible until the locknut
rests up against the vertical slat (see vertical slat marked in gure 2).
To Find the Vertical Positioning:
While keeping the horizontal position (pressed up against vertical slat)
gently slide the bracket up or down to your desired position while staying
between the marked red line in gure 2). The height in which you choose to
install is optional, as long as you match on resting position on both sides.
Choose a vertical position between the indicated
red space shown in gure 2 (between the top of the acrylic and the
second cabinet indentation down)
Step #1
Step #2
Pivot Arm
D
Pivot Arm
D
Pivot Arm
H
Mounting Bracket
D
K
H
F
F
M
M
L
Mounting Bracket
Acrylic Shell
Cabinet
Mounting Bracket
300mm
Vertical Slat
Bushing
Pivot Arm
Washer
Washer
Locknut
Assemble each mounting bracket (H) as per ‘gure 1’.
Place a washer (M) on the hex cap bolt (K) and insert through the
pivot arm (D) surrounded by both support clips (A & B).
Continue to feed the hex cap bolt (K) through the mounting bracket (H),
using the lower hole as per ‘gure 1’. Thread a washer (M) and locknut (L)
onto the hex cap bolt end and tighten gently. Adjust locknut so pivot
arm (D) moves freely on the mounting bracket and is not too sti.
The bracket (and pivot arm) assembly needs to be screwed into each opposite
side of the cabinet in the right position for the lifter to work correctly.
To Find the Horizontal Positioning:
Take a bracket assembly and press it against the spa cabinet.
Gently slide the bracket assembly to the left as far as possible until the locknut
rests up against the vertical slat (see vertical slat marked in gure 2).
To Find the Vertical Positioning:
While keeping the horizontal position (pressed up against vertical slat)
gently slide the bracket up or down to your desired position while staying
between the marked red line in gure 2). The height in which you choose to
install is optional, as long as you match on resting position on both sides.
Choose a vertical position between the indicated
red space shown in gure 2 (between the top of the acrylic and the
second cabinet indentation down)
Step #1
Step #2
Pivot Arm
D
Pivot Arm
D
Pivot Arm
H
Mounting Bracket
Figure 2
Safe Vertical Zone
Figure 3
Covermate I Plastic
Installation Instructions - Updated as of 08/30/12
Step #1
Position the spa cover (in closed position) on the spa, making sure that all four corners
are properly positioned and square on the spa.
CMI-PLAST 120830
Step #2
Using the #10 x 1” mounting screws, attach the left and right Mounting Brackets to the
appropriate sides of the spa. Caution: to prevent splitting of wood cabinet, pre-drill
holes with a 1/16” drill bit. Mounting height is optional (see Fig. 1). By positioning the
Brackets 8” down from the top of the spa shell, approx. 9” of clearance behind the spa
will be needed. Mounted at this position approximately 75% of the spa cover will be
standing above the spa surface in the o position. By positioning the Brackets 12”
down from the top of the spa shell, approx. 15” clearance behind the spa will be
needed. Mounted at this position, approximately 50% of the spa cover will be standing
above the spa surface in the o position.
Step #3
Connect the Pivot Arms to the Mounting Brackets (see Fig. 2). After the Pivot Arms are
connected, tilt them back into the upright position.
Step #4
Insert the long end of the Support Arms into the Center Coupler piece. Then slide the
Support Arms into the Pivot Arms (see Fig. 3).
Step #5
Lay the Covermate on the spa cover. Adjust the Center Coupler piece and Support
Arms so that the Center Coupler is laying parallel to the spa cover’s hinge about 1/2”
away (see Fig. 4). Using the #10 self tapping screws, fasten the Support Arms to the
Pivot Arms and the Center Coupler piece. Note: Be sure to rotate the Center Coupler
so that the inserted screws are at a horizontal angle with the heads facing the back
Step #6
Slip the black hand grips to the edge of the spa cover and snap the Small Black Dome
Caps on the heads of all exposed #10 screw heads. Push the 7/16” plug into the
unused bracket (H) hole.
CAUTION!
Do not use the Covermate in high wind condition. Injury from the spa cover being
blown over and impacting the spa user can occur.
ITEM PART# DESCRIPTION QTY
A 100001 SUPPORT ARM 2
B 100002 FOAM GRIP 2
C 100003 CENTER COUPLER 1
D 100004 PIVOT ARM 2
E 100007 PIVOT ARM CAP 2
F 100344 BUSHING 4
H 100021 MOUNTING BRACKET 2
I 100008 TOWELMATE 1
K 100010 3/8 X 3" HEX CAP BOLT 2
L 100011 3/8 NYLON LOCKNUT 2
M 100012 3/8 FLAT WASHER 4
N 100013 #10 X 5/8" SELF TAPPING SCREWS 12
O 100014 #10 X 1" MOUNTING SCREWS 24
P 100015 LARGE BLACK DOME CAP 2
Q 100016 SMALL BLACK DOME CAP 36
R 100347 7/16" PLUG 2
Step #7
Attach the provided 3 hook TowelMate on the preferred side of your Covermate by
simply snapping it into place and inserting the middle self tapping screw (see Fig. 5).
Pivot Arm
Support Arm
Center Coupler
Cover Hinge
Figure 4 Figure 5
Figure 3
A
C
D
I
TowelMate
Figure 1
Figure 2
D
K
H
Figure 1
Mounting Bracket
H
M
M
L
N
Self-
Tapping
Screw
Mounting Bracket
Pivot Arm
Washer
Washer
Locknut
Figure 4 Figure 5
Covermate I Plastic
Installation Instructions - Updated as of 08/30/12
Step #1
Position the spa cover (in closed position) on the spa, making sure that all four corners
are properly positioned and square on the spa.
CMI-PLAST 120830
Step #2
Using the #10 x 1” mounting screws, attach the left and right Mounting Brackets to the
appropriate sides of the spa. Caution: to prevent splitting of wood cabinet, pre-drill
holes with a 1/16” drill bit. Mounting height is optional (see Fig. 1). By positioning the
Brackets 8” down from the top of the spa shell, approx. 9” of clearance behind the spa
will be needed. Mounted at this position approximately 75% of the spa cover will be
standing above the spa surface in the o position. By positioning the Brackets 12”
down from the top of the spa shell, approx. 15” clearance behind the spa will be
needed. Mounted at this position, approximately 50% of the spa cover will be standing
above the spa surface in the o position.
Step #3
Connect the Pivot Arms to the Mounting Brackets (see Fig. 2). After the Pivot Arms are
connected, tilt them back into the upright position.
Step #4
Insert the long end of the Support Arms into the Center Coupler piece. Then slide the
Support Arms into the Pivot Arms (see Fig. 3).
Step #5
Lay the Covermate on the spa cover. Adjust the Center Coupler piece and Support
Arms so that the Center Coupler is laying parallel to the spa cover’s hinge about 1/2”
away (see Fig. 4). Using the #10 self tapping screws, fasten the Support Arms to the
Pivot Arms and the Center Coupler piece. Note: Be sure to rotate the Center Coupler
so that the inserted screws are at a horizontal angle with the heads facing the back
Step #6
Slip the black hand grips to the edge of the spa cover and snap the Small Black Dome
Caps on the heads of all exposed #10 screw heads. Push the 7/16” plug into the
unused bracket (H) hole.
CAUTION!
Do not use the Covermate in high wind condition. Injury from the spa cover being
blown over and impacting the spa user can occur.
ITEM PART# DESCRIPTION QTY
A 100001 SUPPORT ARM 2
B 100002 FOAM GRIP 2
C 100003 CENTER COUPLER 1
D 100004 PIVOT ARM 2
E 100007 PIVOT ARM CAP 2
F 100344 BUSHING 4
H 100021 MOUNTING BRACKET 2
I 100008 TOWELMATE 1
K 100010 3/8 X 3" HEX CAP BOLT 2
L 100011 3/8 NYLON LOCKNUT 2
M 100012 3/8 FLAT WASHER 4
N 100013 #10 X 5/8" SELF TAPPING SCREWS 12
O 100014 #10 X 1" MOUNTING SCREWS 24
P 100015 LARGE BLACK DOME CAP 2
Q 100016 SMALL BLACK DOME CAP 36
R 100347 7/16" PLUG 2
Step #7
Attach the provided 3 hook TowelMate on the preferred side of your Covermate by
simply snapping it into place and inserting the middle self tapping screw (see Fig. 5).
Pivot Arm
Support Arm
Center Coupler
Cover Hinge
Figure 4 Figure 5
Figure 3
A
C
D
I
TowelMate
Figure 1
Figure 2
D
K
H
Figure 1
Mounting Bracket
H
M
M
L
N
Self-
Tapping
Screw
INSTRUCTIONS FOR ALPINE SPAS MODELS - 2/2
4

Step #2 - Attach the Pivot Arms to the
Mounting Brackets
Two opposite ‘bracket assemblies’ (a mounting bracket & pivot arm piece
connected) should rst be made up as per ‘Figure 1b’
To make up each bracket assembly, use ‘Figure 1a’ as a reference. Place a
washer (M) on the hex cap bolt (K) and insert through the pivot arm (D)
surrounded by both bushings (F). Continue to feed the hex cap bolt (K)
through the mounting bracket (H), using the lower hole as per ‘Figure 1a’.
Thread a washer (M) and locknut (L) onto the hex cap bolt and tighten
gently, enough so that the pivot arm (D) moves freely on the mounting
bracket and is secure, but not too sti. Rotate the pivot arm into the upright
position as seen in ‘Figure 2’ if it is not already.
Step #1 - Position the Spa Cover
Position the spa cover in the closed position on the spa. Make sure that the
four corners are evenly positioned and sitting correctly.
Note the positions of the hanging cover locking straps. It is likely that the
mounting brackets of the cover lifter will restrict the installation of two of
your spa cover clips, so you will need to nd a way to secure these to the
cabinet, either by attaching them an angle or by shortening/lengthening
the cover straps.
MASTER SPAS INSTRUCTIONS:
D
K
H
F
F
M
M
L
Mounting Bracket
Acrylic Shell
Cabinet
Mounting Bracket
300mm
Vertical Slat
Bushing
Pivot Arm
Washer
Washer
Locknut
Assemble each mounting bracket (H) as per ‘gure 1’.
Place a washer (M) on the hex cap bolt (K) and insert through the
pivot arm (D) surrounded by both support clips (A & B).
Continue to feed the hex cap bolt (K) through the mounting bracket (H),
using the lower hole as per ‘gure 1’. Thread a washer (M) and locknut (L)
onto the hex cap bolt end and tighten gently. Adjust locknut so pivot
arm (D) moves freely on the mounting bracket and is not too sti.
The bracket (and pivot arm) assembly needs to be screwed into each opposite
side of the cabinet in the right position for the lifter to work correctly.
To Find the Horizontal Positioning:
Take a bracket assembly and press it against the spa cabinet.
Gently slide the bracket assembly to the left as far as possible until the locknut
rests up against the vertical slat (see vertical slat marked in gure 2).
To Find the Vertical Positioning:
While keeping the horizontal position (pressed up against vertical slat)
gently slide the bracket up or down to your desired position while staying
between the marked red line in gure 2). The height in which you choose to
install is optional, as long as you match on resting position on both sides.
Choose a vertical position between the indicated
red space shown in gure 2 (between the top of the acrylic and the
second cabinet indentation down)
Step #1
Step #2
Pivot Arm
D
Pivot Arm
D
Pivot Arm
H
Mounting Bracket
Figure 1a
D
K
H
F
F
M
M
L
Mounting Bracket
Acrylic Shell
Cabinet
Mounting Bracket
300mm
Vertical Slat
Bushing
Pivot Arm
Washer
Washer
Locknut
Assemble each mounting bracket (H) as per ‘gure 1’.
Place a washer (M) on the hex cap bolt (K) and insert through the
pivot arm (D) surrounded by both support clips (A & B).
Continue to feed the hex cap bolt (K) through the mounting bracket (H),
using the lower hole as per ‘gure 1’. Thread a washer (M) and locknut (L)
onto the hex cap bolt end and tighten gently. Adjust locknut so pivot
arm (D) moves freely on the mounting bracket and is not too sti.
The bracket (and pivot arm) assembly needs to be screwed into each opposite
side of the cabinet in the right position for the lifter to work correctly.
To Find the Horizontal Positioning:
Take a bracket assembly and press it against the spa cabinet.
Gently slide the bracket assembly to the left as far as possible until the locknut
rests up against the vertical slat (see vertical slat marked in gure 2).
To Find the Vertical Positioning:
While keeping the horizontal position (pressed up against vertical slat)
gently slide the bracket up or down to your desired position while staying
between the marked red line in gure 2). The height in which you choose to
install is optional, as long as you match on resting position on both sides.
Choose a vertical position between the indicated
red space shown in gure 2 (between the top of the acrylic and the
second cabinet indentation down)
Step #1
Step #2
Pivot Arm
D
Pivot Arm
D
Pivot Arm
H
Mounting Bracket
Figure 1b
TO ENSURE CORRECT INSTALLATION, READ THE ‘BEFORE GETTING STARTED’
SECTION ON PAGE 1 BEFORE PROCEEDING.
INSTRUCTIONS FOR MASTER SPAS MODELS - 1/2
5

Step #3 - Find the Correct Positioning for the
Bracket Assemblies
The bracket assembly needs to be screwed into the spa cabinet on
opposite sides of the spa pool for the mechanism to work correctly.
Remember to check for obstructions (see page 1) before
installing into the cabinet.
To Find the Horizontal Positioning:
Take a bracket assembly (rounded end of the bracket pointing towards
the back of the spa pool) and press it against the spa cabinet. Gently slide
the bracket assembly to the left or right so that the pivot point (hex bolt)
lines up to be centered over top of the black indentation on the cabinet
(see indentation marked in ‘Figure 2’).
To Find the Vertical Positioning:
While keeping the horizontal position (pivot point centered over top
of the indentation) gently slide the bracket up or down to your desired
position* while staying between the green ‘safe vertical zone’ shown in
‘Figure 2’ (300mm from under the acrylic). The bracket assembly should
be level before being screwed in.
*The vertical height you choose is optional (within the safe vertical zone), just
keep in mind how you will attach the spa cover straps and that the higher
you mount the bracket, the higher cover will sit in the open position.
Once you have conrmed the position, screw the bracket assemblies to
the spa cabinet using the #10 x 1” mounting screws (O) through the holes
provided around the perimetre of the mounting bracket.
Step #6 - Finishing Up
Snap the Small Black Dome Caps (Q) on the heads of all exposed #10
Mounting Screws. Push the 7/16” plug (R) into the unused hole on the
mounting bracket. Place the Large Black Dome Caps (P) onto the exposed
Hex Cap Bolt head.
If using the TowelMate (I), install onto the side of the Pivot Arm by
replacing the self-tapping screws where required (see ‘Figure 5’).
Step #5 - Set the Positioning of Centre Coupler
& Support Arms
Lay the lifter bar down on the spa cover. Adjust the Center Coupler (C)
piece and Support Arms (A) so that the Center Coupler is laying parallel to
the spa cover’s hinge about 1cm away (see ‘Figure 4’).
Using the #10 self tapping screws (N), fasten the support arms to the
pivot arms and the center coupler piece.
Note: Before screwing in screws, be sure to rotate the center coupler so that
the screws are screwed in at a horizontal angle (parallel with the spa cover).
This way when the cover folds over the lifter bar, the screw heads will not rub
on the cover.
Step #4 - Setup the Support Arms & Center
Coupler
Insert the long end of the Support Arms (A) into the Center Coupler (C)
then slide the short ends of the Support Arms into the Pivot Arms (D) (see
‘Figure 3’). We will refer to connected Support Arms and Center Coupler
bar as the ‘lifter bar’ for the next step.
D
K
H
F
F
M
M
L
Mounting Bracket
Acrylic Shell
Cabinet
Mounting Bracket
300mm
Vertical Slat
Bushing
Pivot Arm
Washer
Washer
Locknut
Assemble each mounting bracket (H) as per ‘gure 1’.
Place a washer (M) on the hex cap bolt (K) and insert through the
pivot arm (D) surrounded by both support clips (A & B).
Continue to feed the hex cap bolt (K) through the mounting bracket (H),
using the lower hole as per ‘gure 1’. Thread a washer (M) and locknut (L)
onto the hex cap bolt end and tighten gently. Adjust locknut so pivot
arm (D) moves freely on the mounting bracket and is not too sti.
The bracket (and pivot arm) assembly needs to be screwed into each opposite
side of the cabinet in the right position for the lifter to work correctly.
To Find the Horizontal Positioning:
Take a bracket assembly and press it against the spa cabinet.
Gently slide the bracket assembly to the left as far as possible until the locknut
rests up against the vertical slat (see vertical slat marked in gure 2).
To Find the Vertical Positioning:
While keeping the horizontal position (pressed up against vertical slat)
gently slide the bracket up or down to your desired position while staying
between the marked red line in gure 2). The height in which you choose to
install is optional, as long as you match on resting position on both sides.
Choose a vertical position between the indicated
red space shown in gure 2 (between the top of the acrylic and the
second cabinet indentation down)
Step #1
Step #2
Pivot Arm
D
Pivot Arm
D
Pivot Arm
H
Mounting Bracket
D
K
H
F
F
M
M
L
Mounting Bracket
Acrylic Shell
Cabinet
Mounting Bracket
300mm
Vertical Slat
Bushing
Pivot Arm
Washer
Washer
Locknut
Assemble each mounting bracket (H) as per ‘gure 1’.
Place a washer (M) on the hex cap bolt (K) and insert through the
pivot arm (D) surrounded by both support clips (A & B).
Continue to feed the hex cap bolt (K) through the mounting bracket (H),
using the lower hole as per ‘gure 1’. Thread a washer (M) and locknut (L)
onto the hex cap bolt end and tighten gently. Adjust locknut so pivot
arm (D) moves freely on the mounting bracket and is not too sti.
The bracket (and pivot arm) assembly needs to be screwed into each opposite
side of the cabinet in the right position for the lifter to work correctly.
To Find the Horizontal Positioning:
Take a bracket assembly and press it against the spa cabinet.
Gently slide the bracket assembly to the left as far as possible until the locknut
rests up against the vertical slat (see vertical slat marked in gure 2).
To Find the Vertical Positioning:
While keeping the horizontal position (pressed up against vertical slat)
gently slide the bracket up or down to your desired position while staying
between the marked red line in gure 2). The height in which you choose to
install is optional, as long as you match on resting position on both sides.
Choose a vertical position between the indicated
red space shown in gure 2 (between the top of the acrylic and the
second cabinet indentation down)
Step #1
Step #2
Pivot Arm
D
Pivot Arm
D
Pivot Arm
H
Mounting Bracket
Figure 2
Safe Vertical Zone
Figure 3
Covermate I Plastic
Installation Instructions - Updated as of 08/30/12
Step #1
Position the spa cover (in closed position) on the spa, making sure that all four corners
are properly positioned and square on the spa.
CMI-PLAST 120830
Step #2
Using the #10 x 1” mounting screws, attach the left and right Mounting Brackets to the
appropriate sides of the spa. Caution: to prevent splitting of wood cabinet, pre-drill
holes with a 1/16” drill bit. Mounting height is optional (see Fig. 1). By positioning the
Brackets 8” down from the top of the spa shell, approx. 9” of clearance behind the spa
will be needed. Mounted at this position approximately 75% of the spa cover will be
standing above the spa surface in the o position. By positioning the Brackets 12”
down from the top of the spa shell, approx. 15” clearance behind the spa will be
needed. Mounted at this position, approximately 50% of the spa cover will be standing
above the spa surface in the o position.
Step #3
Connect the Pivot Arms to the Mounting Brackets (see Fig. 2). After the Pivot Arms are
connected, tilt them back into the upright position.
Step #4
Insert the long end of the Support Arms into the Center Coupler piece. Then slide the
Support Arms into the Pivot Arms (see Fig. 3).
Step #5
Lay the Covermate on the spa cover. Adjust the Center Coupler piece and Support
Arms so that the Center Coupler is laying parallel to the spa cover’s hinge about 1/2”
away (see Fig. 4). Using the #10 self tapping screws, fasten the Support Arms to the
Pivot Arms and the Center Coupler piece. Note: Be sure to rotate the Center Coupler
so that the inserted screws are at a horizontal angle with the heads facing the back
Step #6
Slip the black hand grips to the edge of the spa cover and snap the Small Black Dome
Caps on the heads of all exposed #10 screw heads. Push the 7/16” plug into the
unused bracket (H) hole.
CAUTION!
Do not use the Covermate in high wind condition. Injury from the spa cover being
blown over and impacting the spa user can occur.
ITEM PART# DESCRIPTION QTY
A 100001 SUPPORT ARM 2
B 100002 FOAM GRIP 2
C 100003 CENTER COUPLER 1
D 100004 PIVOT ARM 2
E 100007 PIVOT ARM CAP 2
F 100344 BUSHING 4
H 100021 MOUNTING BRACKET 2
I 100008 TOWELMATE 1
K 100010 3/8 X 3" HEX CAP BOLT 2
L 100011 3/8 NYLON LOCKNUT 2
M 100012 3/8 FLAT WASHER 4
N 100013 #10 X 5/8" SELF TAPPING SCREWS 12
O 100014 #10 X 1" MOUNTING SCREWS 24
P 100015 LARGE BLACK DOME CAP 2
Q 100016 SMALL BLACK DOME CAP 36
R 100347 7/16" PLUG 2
Step #7
Attach the provided 3 hook TowelMate on the preferred side of your Covermate by
simply snapping it into place and inserting the middle self tapping screw (see Fig. 5).
Pivot Arm
Support Arm
Center Coupler
Cover Hinge
Figure 4 Figure 5
Figure 3
A
C
D
I
TowelMate
Figure 1
Figure 2
D
K
H
Figure 1
Mounting Bracket
H
M
M
L
N
Self-
Tapping
Screw
Mounting Bracket
Pivot Arm
Washer
Washer
Locknut
Figure 4 Figure 5
Covermate I Plastic
Installation Instructions - Updated as of 08/30/12
Step #1
Position the spa cover (in closed position) on the spa, making sure that all four corners
are properly positioned and square on the spa.
CMI-PLAST 120830
Step #2
Using the #10 x 1” mounting screws, attach the left and right Mounting Brackets to the
appropriate sides of the spa. Caution: to prevent splitting of wood cabinet, pre-drill
holes with a 1/16” drill bit. Mounting height is optional (see Fig. 1). By positioning the
Brackets 8” down from the top of the spa shell, approx. 9” of clearance behind the spa
will be needed. Mounted at this position approximately 75% of the spa cover will be
standing above the spa surface in the o position. By positioning the Brackets 12”
down from the top of the spa shell, approx. 15” clearance behind the spa will be
needed. Mounted at this position, approximately 50% of the spa cover will be standing
above the spa surface in the o position.
Step #3
Connect the Pivot Arms to the Mounting Brackets (see Fig. 2). After the Pivot Arms are
connected, tilt them back into the upright position.
Step #4
Insert the long end of the Support Arms into the Center Coupler piece. Then slide the
Support Arms into the Pivot Arms (see Fig. 3).
Step #5
Lay the Covermate on the spa cover. Adjust the Center Coupler piece and Support
Arms so that the Center Coupler is laying parallel to the spa cover’s hinge about 1/2”
away (see Fig. 4). Using the #10 self tapping screws, fasten the Support Arms to the
Pivot Arms and the Center Coupler piece. Note: Be sure to rotate the Center Coupler
so that the inserted screws are at a horizontal angle with the heads facing the back
Step #6
Slip the black hand grips to the edge of the spa cover and snap the Small Black Dome
Caps on the heads of all exposed #10 screw heads. Push the 7/16” plug into the
unused bracket (H) hole.
CAUTION!
Do not use the Covermate in high wind condition. Injury from the spa cover being
blown over and impacting the spa user can occur.
ITEM PART# DESCRIPTION QTY
A 100001 SUPPORT ARM 2
B 100002 FOAM GRIP 2
C 100003 CENTER COUPLER 1
D 100004 PIVOT ARM 2
E 100007 PIVOT ARM CAP 2
F 100344 BUSHING 4
H 100021 MOUNTING BRACKET 2
I 100008 TOWELMATE 1
K 100010 3/8 X 3" HEX CAP BOLT 2
L 100011 3/8 NYLON LOCKNUT 2
M 100012 3/8 FLAT WASHER 4
N 100013 #10 X 5/8" SELF TAPPING SCREWS 12
O 100014 #10 X 1" MOUNTING SCREWS 24
P 100015 LARGE BLACK DOME CAP 2
Q 100016 SMALL BLACK DOME CAP 36
R 100347 7/16" PLUG 2
Step #7
Attach the provided 3 hook TowelMate on the preferred side of your Covermate by
simply snapping it into place and inserting the middle self tapping screw (see Fig. 5).
Pivot Arm
Support Arm
Center Coupler
Cover Hinge
Figure 4 Figure 5
Figure 3
A
C
D
I
TowelMate
Figure 1
Figure 2
D
K
H
Figure 1
Mounting Bracket
H
M
M
L
N
Self-
Tapping
Screw
INSTRUCTIONS FOR MASTER SPAS MODELS - 2/2
Pivot point
Pivot arm
6

Step #2 - Attach the Pivot Arms to the
Mounting Brackets
Two opposite ‘bracket assemblies’ (a mounting bracket & pivot arm piece
connected) should rst be made up as per ‘Figure 2’
To make up each bracket assembly, use ‘Figure 1’ as a reference. Place a
washer (M) on the hex cap bolt (K) and insert through the pivot arm (D)
surrounded by both bushings (F). Continue to feed the hex cap bolt (K)
through the mounting bracket (H), using the lower hole as per ‘Figure 1’.
Thread a washer (M) and locknut (L) onto the hex cap bolt and tighten
gently, enough so that the pivot arm (D) moves freely on the mounting
bracket and is secure, but not too sti. Rotate the pivot arm into the upright
position as seen in ‘Figure 2’ if it is not already.
Step #1 - Position the Spa Cover
Place the spa cover in the closed position on top of the spa. Make sure that
the four corners are evenly positioned and sitting correctly.
Note the positions of the hanging cover locking straps. There is potential
that where you mount the cover lifter will restrict the installation of two of
your spa cover clips, so you may need to nd a way to secure these to the
cabinet, either by attaching them an angle or by shortening/lengthening
the cover straps.
INSTRUCTIONS FOR PURE SPAS MODELS - 1/4
PURE SPAS INSTRUCTIONS:
D
K
H
F
F
M
M
L
Mounting Bracket
Acrylic Shell
Cabinet
Mounting Bracket
300mm
Vertical Slat
Bushing
Pivot Arm
Washer
Washer
Locknut
Assemble each mounting bracket (H) as per ‘gure 1’.
Place a washer (M) on the hex cap bolt (K) and insert through the
pivot arm (D) surrounded by both support clips (A & B).
Continue to feed the hex cap bolt (K) through the mounting bracket (H),
using the lower hole as per ‘gure 1’. Thread a washer (M) and locknut (L)
onto the hex cap bolt end and tighten gently. Adjust locknut so pivot
arm (D) moves freely on the mounting bracket and is not too sti.
The bracket (and pivot arm) assembly needs to be screwed into each opposite
side of the cabinet in the right position for the lifter to work correctly.
To Find the Horizontal Positioning:
Take a bracket assembly and press it against the spa cabinet.
Gently slide the bracket assembly to the left as far as possible until the locknut
rests up against the vertical slat (see vertical slat marked in gure 2).
To Find the Vertical Positioning:
While keeping the horizontal position (pressed up against vertical slat)
gently slide the bracket up or down to your desired position while staying
between the marked red line in gure 2). The height in which you choose to
install is optional, as long as you match on resting position on both sides.
Choose a vertical position between the indicated
red space shown in gure 2 (between the top of the acrylic and the
second cabinet indentation down)
Step #1
Step #2
Pivot Arm
D
Pivot Arm
D
Pivot Arm
H
Mounting Bracket
D
K
H
F
F
M
M
L
Mounting Bracket
Acrylic Shell
Cabinet
Mounting Bracket
300mm
Vertical Slat
Bushing
Pivot Arm
Washer
Washer
Locknut
Assemble each mounting bracket (H) as per ‘gure 1’.
Place a washer (M) on the hex cap bolt (K) and insert through the
pivot arm (D) surrounded by both support clips (A & B).
Continue to feed the hex cap bolt (K) through the mounting bracket (H),
using the lower hole as per ‘gure 1’. Thread a washer (M) and locknut (L)
onto the hex cap bolt end and tighten gently. Adjust locknut so pivot
arm (D) moves freely on the mounting bracket and is not too sti.
The bracket (and pivot arm) assembly needs to be screwed into each opposite
side of the cabinet in the right position for the lifter to work correctly.
To Find the Horizontal Positioning:
Take a bracket assembly and press it against the spa cabinet.
Gently slide the bracket assembly to the left as far as possible until the locknut
rests up against the vertical slat (see vertical slat marked in gure 2).
To Find the Vertical Positioning:
While keeping the horizontal position (pressed up against vertical slat)
gently slide the bracket up or down to your desired position while staying
between the marked red line in gure 2). The height in which you choose to
install is optional, as long as you match on resting position on both sides.
Choose a vertical position between the indicated
red space shown in gure 2 (between the top of the acrylic and the
second cabinet indentation down)
Step #1
Step #2
Pivot Arm
D
Pivot Arm
D
Pivot Arm
H
Mounting Bracket
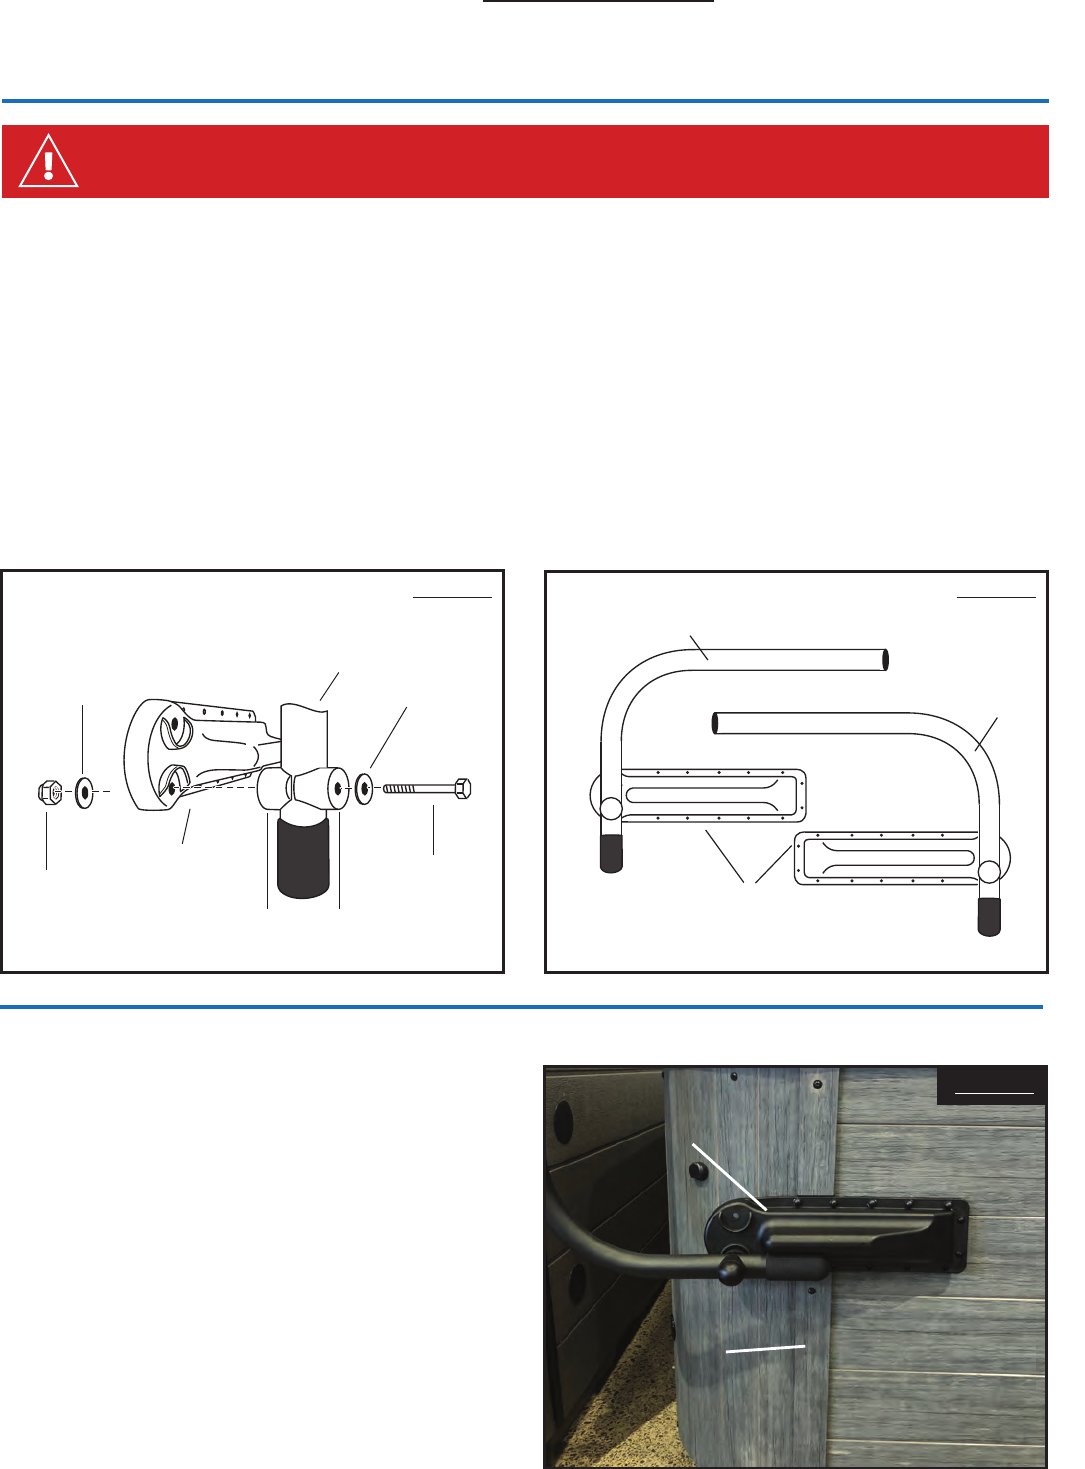
Step #3 - Preparing to Attach
For the cover lifter to be installed on a PureSpas model, two of the spa
pool’s vertical slats must be removed and altered (cut) as they sit in the way
of the mounting brackets (H) - see ‘Figure 3’ for nished install example.
Only two of the vertical slats need to be altered on the spa pool - these
correspond to the two mounting bracket (H) positions on your chosen sides
of the spa pool.
Mounting Bracket
Spa Pool
Vertical Slat
H
TO ENSURE CORRECT INSTALLATION, READ THE ‘BEFORE GETTING STARTED’
SECTION ON PAGE 1 BEFORE PROCEEDING
Figure 3
Figure 1 Figure 2
7

INSTRUCTIONS FOR PURE SPAS MODELS - 2/4
Step #5 - Find the Correct Positioning for the
Bracket Assemblies
Ensure the rounded end of the mounting bracket points towards the
back of the spa pool and the pivot arm is connected to the lower pivot
point as per ‘Figure 4a’.
To Find the Vertical Positioning for the Mounting Bracket (Figure 4a):
Take the bracket assembly and press it against the spa cabinet. Align
the top edge of the mounting bracket with the bottom edge of the ‘rst
horizontal cabinet indentation’ from under neath the spa pool acrylic as
per ‘Figure 4a’ (The rst indentation height will vary between the models).
To Find the Horizontal Positioning (Figure 4b):
While keeping the vertical position, move the bracket assembly left/right
so that the ‘fourth mounting bracket screw hole’ (in from the straight
edge of the bracket) along the top edge of the bracket is centered in-
between the vertical slat indentation as per ‘Figure 4b’.
With the bracket held in the correct position, mark the mounting bracket
holes so you can proceed to pre-drill pilot holes for the screws. Screw the
bracket assemblies to the spa cabinet using the #10 x 1” mounting screws
(O) through the holes provided around the perimetre of the mounting
bracket as per ‘Figure 4c’
Step #4 - Remove the Vertical Slats
Remove the 3x plastic screw caps on the vertical slat using a at head
screwdriver. Simply wedge underneath the cap and pop them outwards.
Proceed to remove each slat by undoing the 3x philips screws holding the
slat to the spa pool using a screwdriver or power drill.
TIP: Before removing the slat from the spa pool, take note of the orientation of
the vertical slat by marking the top and bottom of the slat, and also note which
side of the spa pool it belongs to.
Figure 4a
First Horizontal
Cabinet Indentation
Vertical Slat
Indentation
1
2
3
4
Mounting Bracket
Top Edge
Lower Pivot Point
Fourth Mounting
Bracket Screw Hole
Centered
Straight Edge
of Bracket
Spa Pool Acrylic
Figure 4b Figure 4c
8

Step #6 - Cutting the Vertical Slat
Each vertical slat should be cut into two separates pieces to t back onto
the cabinet panel and sit ush around the mounting bracket for a tidy
appearance as per ‘Figure 5a’.
Top Piece
Using a tape-measure, measure the space on the cabinet in-between the
underside of the spa pool acrylic and the top edge of the mounting bracket
as per ‘Figure 5b’.
Apply this measurement to the top section of the corresponding vertical
slat as per ‘Figure 5c’ and cut across the slat with a hack-saw.
Bottom Piece
Using a tape-measure, measure the space in-between the bottom edge of
the mounting bracket and the bottom edge of the spa pool cabinet as per
‘Figure 5d’.
Apply this measurement to the bottom section of the corresponding
vertical slat as per ‘Figure 5e’ and cut across the slat with a hack-saw.
INSTRUCTIONS FOR PURE SPAS MODELS - 3/4
Spa Pool Acrylic
Top edge of
Mounting Bracket
Bottom edge of
Mounting Bracket
Bottom edge of
Spa Pool Cabinet
Top Piece
Cut line
Bottom Piece
Cut line
Top Piece Reattached
Bottom Piece Reattached
Figure 5a
Figure 5cFigure 5b
Figure 5d Figure 5e
9

Step #10 - Finishing Up
Snap the Small Black Dome Caps (Q) on the heads of all exposed #10
Mounting Screws. Push the 7/16” plug (R) into the unused hole on the
mounting bracket. Place the Large Black Dome Caps (P) onto the exposed
Hex Cap Bolt head.
If using the TowelMate (I), install onto the side of the Pivot Arm by
replacing the self-tapping screws where required (see ‘Figure 8’).
Step #9 - Set the Positioning of Centre Coupler
& Support Arms
Lay the lifter bar down on the spa cover. Adjust the Center Coupler (C)
piece and Support Arms (A) so that the Center Coupler is laying parallel to
the spa cover’s hinge about 1cm away (see ‘Figure 7’).
Using the #10 self tapping screws (N), fasten the support arms to the
pivot arms and the center coupler piece.
Note: Before screwing in screws, be sure to rotate the center coupler so that
the screws are screwed in at a horizontal angle (parallel with the spa cover).
This way when the cover folds over the lifter bar, the screw heads will not rub
on the cover. Consider placing a piece of cardboard underneath where you
are screwing into the center coupler to catch the metal shavings.
Step #8 - Setup the Support Arms & Center
Coupler
Insert the long end of the Support Arms (A) into the Center Coupler (C)
then slide the short ends of the Support Arms into the Pivot Arms (D) (see
‘Figure 6’). We will refer to connected Support Arms and Center Coupler
bar as the ‘lifter bar’ for the next step.
Step #7 - Replacing the Slat Pieces
Replace the freshly cut top and bottom slat pieces into their correct
positions either side of the mounting bracket. Simply screw back in and
replace the plastic screw covers.
Figure 6
Covermate I Plastic
Installation Instructions - Updated as of 08/30/12
Step #1
Position the spa cover (in closed position) on the spa, making sure that all four corners
are properly positioned and square on the spa.
CMI-PLAST 120830
Step #2
Using the #10 x 1” mounting screws, attach the left and right Mounting Brackets to the
appropriate sides of the spa. Caution: to prevent splitting of wood cabinet, pre-drill
holes with a 1/16” drill bit. Mounting height is optional (see Fig. 1). By positioning the
Brackets 8” down from the top of the spa shell, approx. 9” of clearance behind the spa
will be needed. Mounted at this position approximately 75% of the spa cover will be
standing above the spa surface in the o position. By positioning the Brackets 12”
down from the top of the spa shell, approx. 15” clearance behind the spa will be
needed. Mounted at this position, approximately 50% of the spa cover will be standing
above the spa surface in the o position.
Step #3
Connect the Pivot Arms to the Mounting Brackets (see Fig. 2). After the Pivot Arms are
connected, tilt them back into the upright position.
Step #4
Insert the long end of the Support Arms into the Center Coupler piece. Then slide the
Support Arms into the Pivot Arms (see Fig. 3).
Step #5
Lay the Covermate on the spa cover. Adjust the Center Coupler piece and Support
Arms so that the Center Coupler is laying parallel to the spa cover’s hinge about 1/2”
away (see Fig. 4). Using the #10 self tapping screws, fasten the Support Arms to the
Pivot Arms and the Center Coupler piece. Note: Be sure to rotate the Center Coupler
so that the inserted screws are at a horizontal angle with the heads facing the back
Step #6
Slip the black hand grips to the edge of the spa cover and snap the Small Black Dome
Caps on the heads of all exposed #10 screw heads. Push the 7/16” plug into the
unused bracket (H) hole.
CAUTION!
Do not use the Covermate in high wind condition. Injury from the spa cover being
blown over and impacting the spa user can occur.
ITEM PART# DESCRIPTION QTY
A 100001 SUPPORT ARM 2
B 100002 FOAM GRIP 2
C 100003 CENTER COUPLER 1
D 100004 PIVOT ARM 2
E 100007 PIVOT ARM CAP 2
F 100344 BUSHING 4
H 100021 MOUNTING BRACKET 2
I 100008 TOWELMATE 1
K 100010 3/8 X 3" HEX CAP BOLT 2
L 100011 3/8 NYLON LOCKNUT 2
M 100012 3/8 FLAT WASHER 4
N 100013 #10 X 5/8" SELF TAPPING SCREWS 12
O 100014 #10 X 1" MOUNTING SCREWS 24
P 100015 LARGE BLACK DOME CAP 2
Q 100016 SMALL BLACK DOME CAP 36
R 100347 7/16" PLUG 2
Step #7
Attach the provided 3 hook TowelMate on the preferred side of your Covermate by
simply snapping it into place and inserting the middle self tapping screw (see Fig. 5).
Pivot Arm
Support Arm
Center Coupler
Cover Hinge
Figure 4 Figure 5
Figure 3
A
C
D
I
TowelMate
Figure 1
Figure 2
D
K
H
Figure 1
Mounting Bracket
H
M
M
L
N
Self-
Tapping
Screw
Mounting Bracket
Pivot Arm
Washer
Washer
Locknut
Figure 7 Figure 8
Covermate I Plastic
Installation Instructions - Updated as of 08/30/12
Step #1
Position the spa cover (in closed position) on the spa, making sure that all four corners
are properly positioned and square on the spa.
CMI-PLAST 120830
Step #2
Using the #10 x 1” mounting screws, attach the left and right Mounting Brackets to the
appropriate sides of the spa. Caution: to prevent splitting of wood cabinet, pre-drill
holes with a 1/16” drill bit. Mounting height is optional (see Fig. 1). By positioning the
Brackets 8” down from the top of the spa shell, approx. 9” of clearance behind the spa
will be needed. Mounted at this position approximately 75% of the spa cover will be
standing above the spa surface in the o position. By positioning the Brackets 12”
down from the top of the spa shell, approx. 15” clearance behind the spa will be
needed. Mounted at this position, approximately 50% of the spa cover will be standing
above the spa surface in the o position.
Step #3
Connect the Pivot Arms to the Mounting Brackets (see Fig. 2). After the Pivot Arms are
connected, tilt them back into the upright position.
Step #4
Insert the long end of the Support Arms into the Center Coupler piece. Then slide the
Support Arms into the Pivot Arms (see Fig. 3).
Step #5
Lay the Covermate on the spa cover. Adjust the Center Coupler piece and Support
Arms so that the Center Coupler is laying parallel to the spa cover’s hinge about 1/2”
away (see Fig. 4). Using the #10 self tapping screws, fasten the Support Arms to the
Pivot Arms and the Center Coupler piece. Note: Be sure to rotate the Center Coupler
so that the inserted screws are at a horizontal angle with the heads facing the back
Step #6
Slip the black hand grips to the edge of the spa cover and snap the Small Black Dome
Caps on the heads of all exposed #10 screw heads. Push the 7/16” plug into the
unused bracket (H) hole.
CAUTION!
Do not use the Covermate in high wind condition. Injury from the spa cover being
blown over and impacting the spa user can occur.
ITEM PART# DESCRIPTION QTY
A 100001 SUPPORT ARM 2
B 100002 FOAM GRIP 2
C 100003 CENTER COUPLER 1
D 100004 PIVOT ARM 2
E 100007 PIVOT ARM CAP 2
F 100344 BUSHING 4
H 100021 MOUNTING BRACKET 2
I 100008 TOWELMATE 1
K 100010 3/8 X 3" HEX CAP BOLT 2
L 100011 3/8 NYLON LOCKNUT 2
M 100012 3/8 FLAT WASHER 4
N 100013 #10 X 5/8" SELF TAPPING SCREWS 12
O 100014 #10 X 1" MOUNTING SCREWS 24
P 100015 LARGE BLACK DOME CAP 2
Q 100016 SMALL BLACK DOME CAP 36
R 100347 7/16" PLUG 2
Step #7
Attach the provided 3 hook TowelMate on the preferred side of your Covermate by
simply snapping it into place and inserting the middle self tapping screw (see Fig. 5).
Pivot Arm
Support Arm
Center Coupler
Cover Hinge
Figure 4 Figure 5
Figure 3
A
C
D
I
TowelMate
Figure 1
Figure 2
D
K
H
Figure 1
Mounting Bracket
H
M
M
L
N
Self-
Tapping
Screw
INSTRUCTIONS FOR PURE SPAS MODELS - 4/4
10
Step #2 - Attach the Pivot Arms to the
Mounting Brackets
Two opposite ‘bracket assemblies’ (a mounting bracket & pivot arm piece
connected) should rst be made up as per ‘Figure 2’
To make up each bracket assembly, use ‘Figure 1’ as a reference. Place a
washer (M) on the hex cap bolt (K) and insert through the pivot arm (D)
surrounded by both bushings (F). Continue to feed the hex cap bolt (K)
through the mounting bracket (H), using the lower hole as per ‘Figure 1’.
Thread a washer (M) and locknut (L) onto the hex cap bolt and tighten
gently, enough so that the pivot arm (D) moves freely on the mounting
bracket and is secure, but not too sti. Rotate the pivot arm into the upright
position as seen in ‘Figure 2’ if it is not already.
Step #1 - Position the Spa Cover
Place the spa cover in the closed position on top of the spa. Make sure that
the four corners are evenly positioned and sitting correctly.
Note the positions of the hanging cover locking straps. There is potential
that where you mount the cover lifter will restrict the installation of two of
your spa cover clips, so you may need to nd a way to secure these to the
cabinet, either by attaching them an angle or by shortening/lengthening
the cover straps.
INSTRUCTIONS FOR ARTESIAN MODELS - 1/4
ARTESIAN SPAS INSTRUCTIONS:
D
K
H
F
F
M
M
L
Mounting Bracket
Acrylic Shell
Cabinet
Mounting Bracket
300mm
Vertical Slat
Bushing
Pivot Arm
Washer
Washer
Locknut
Assemble each mounting bracket (H) as per ‘gure 1’.
Place a washer (M) on the hex cap bolt (K) and insert through the
pivot arm (D) surrounded by both support clips (A & B).
Continue to feed the hex cap bolt (K) through the mounting bracket (H),
using the lower hole as per ‘gure 1’. Thread a washer (M) and locknut (L)
onto the hex cap bolt end and tighten gently. Adjust locknut so pivot
arm (D) moves freely on the mounting bracket and is not too sti.
The bracket (and pivot arm) assembly needs to be screwed into each opposite
side of the cabinet in the right position for the lifter to work correctly.
To Find the Horizontal Positioning:
Take a bracket assembly and press it against the spa cabinet.
Gently slide the bracket assembly to the left as far as possible until the locknut
rests up against the vertical slat (see vertical slat marked in gure 2).
To Find the Vertical Positioning:
While keeping the horizontal position (pressed up against vertical slat)
gently slide the bracket up or down to your desired position while staying
between the marked red line in gure 2). The height in which you choose to
install is optional, as long as you match on resting position on both sides.
Choose a vertical position between the indicated
red space shown in gure 2 (between the top of the acrylic and the
second cabinet indentation down)
Step #1
Step #2
Pivot Arm
D
Pivot Arm
D
Pivot Arm
H
Mounting Bracket
D
K
H
F
F
M
M
L
Mounting Bracket
Acrylic Shell
Cabinet
Mounting Bracket
300mm
Vertical Slat
Bushing
Pivot Arm
Washer
Washer
Locknut
Assemble each mounting bracket (H) as per ‘gure 1’.
Place a washer (M) on the hex cap bolt (K) and insert through the
pivot arm (D) surrounded by both support clips (A & B).
Continue to feed the hex cap bolt (K) through the mounting bracket (H),
using the lower hole as per ‘gure 1’. Thread a washer (M) and locknut (L)
onto the hex cap bolt end and tighten gently. Adjust locknut so pivot
arm (D) moves freely on the mounting bracket and is not too sti.
The bracket (and pivot arm) assembly needs to be screwed into each opposite
side of the cabinet in the right position for the lifter to work correctly.
To Find the Horizontal Positioning:
Take a bracket assembly and press it against the spa cabinet.
Gently slide the bracket assembly to the left as far as possible until the locknut
rests up against the vertical slat (see vertical slat marked in gure 2).
To Find the Vertical Positioning:
While keeping the horizontal position (pressed up against vertical slat)
gently slide the bracket up or down to your desired position while staying
between the marked red line in gure 2). The height in which you choose to
install is optional, as long as you match on resting position on both sides.
Choose a vertical position between the indicated
red space shown in gure 2 (between the top of the acrylic and the
second cabinet indentation down)
Step #1
Step #2
Pivot Arm
D
Pivot Arm
D
Pivot Arm
H
Mounting Bracket
Step #3 - Preparing to Attach
For the cover lifter to be installed on an Artesian model, two of the spa
pool’s vertical slats must be removed and altered (cut) as they sit in the way
of the mounting brackets (H) - see ‘Figure 3’ for nished install example.
Only two of the vertical slats need to be altered on the spa pool - these
correspond to the two mounting bracket (H) positions on your chosen sides
of the spa pool.
Mounting Bracket
Spa Pool
Vertical Slat
H
TO ENSURE CORRECT INSTALLATION, READ THE ‘BEFORE GETTING STARTED’
SECTION ON PAGE 1 BEFORE PROCEEDING
Figure 3
Figure 1 Figure 2
11

INSTRUCTIONS FOR ARTESIAN MODELS - 2/4
Step #5 - Find the Correct Positioning for the
Bracket Assemblies
Ensure the rounded edge of the mounting bracket points towards the
back of the spa pool and the pivot arm is connected to the lower pivot
point as per ‘Figure 4a’.
To Find the Vertical Positioning for the Mounting Bracket (Figure 4a):
Take the bracket assembly and press it against the spa cabinet. Vertically
align the mounting bracket anywhere within the 300mm from the
underside of the spa pool acrylic (shown as the green zone) in ‘Figure 4a’.
To Find the Horizontal Positioning (Figure 4b):
While keeping your chosen vertical position, move the bracket assembly
left or right so that the you line up 1st and 2nd screw holes as per ‘Figure
4b’ to be centered over the cabinet gap.
Screw the bracket assemblies to the spa cabinet using the #10 x 1”
mounting screws (O) through the holes provided around the perimetre of
the mounting bracket as per ‘Figure 4c’
Step #4 - Remove the Vertical Slats
Remove each slat by undoing the 3x philips screws holding the slat to the
spa pool using a screwdriver or power drill. The removal of the slat will leave
a ‘gap in the cabinet’ between the cabinet panel and corner panel which is
used as a reference to line up the mounting bracket.
TIP: Before removing the slat from the spa pool, take note of the orientation of
the vertical slat by marking the top and bottom of the slat, and also note which
side of the spa pool it belongs to.
Figure 4a
Cabinet Gap
Centered
Between 1st and 2nd
Bracket Screw Holes
1 2
Rounded Edge
of Bracket
Spa Pool Acrylic
300mm
Figure 4b Figure 4c
Cabinet Gap
12

Step #6 - Cutting the Vertical Slat
Each vertical slat should be cut into two separates pieces to t back onto
the cabinet panel and sit ush around the mounting bracket for a tidy
appearance as per ‘Figure 5a’.
Top Piece
Using a tape-measure, measure the space on the cabinet in-between the
underside of the spa pool acrylic and the top edge of the mounting bracket
as per ‘Figure 5b’.
Apply this measurement to the top section of the corresponding vertical
slat as per ‘Figure 5c’ and cut across the slat with a hack-saw.
Bottom Piece
Using a tape-measure, measure the space in-between the bottom edge of
the mounting bracket and the bottom edge of the spa pool cabinet as per
‘Figure 5d’.
Apply this measurement to the bottom section of the corresponding
vertical slat as per ‘Figure 5e’ and cut across the slat with a hack-saw.
Spa Pool Acrylic
Top Edge of
Mounting Bracket
Bottom Edge of
Mounting Bracket
Bottom Edge of
Spa Pool Cabinet
Top Piece
Cut line
Bottom Piece
Cut line
Top Piece Reattached
Bottom Piece Reattached
Figure 5a
Figure 5cFigure 5b
Figure 5d Figure 5e
INSTRUCTIONS FOR ARTESIAN MODELS - 3/4
13

Step #10 - Finishing Up
Snap the Small Black Dome Caps (Q) on the heads of all exposed #10
Mounting Screws. Push the 7/16” plug (R) into the unused hole on the
mounting bracket. Place the Large Black Dome Caps (P) onto the exposed
Hex Cap Bolt head.
If using the TowelMate (I), install onto the side of the Pivot Arm by
replacing the self-tapping screws where required (see ‘Figure 8’).
Step #9 - Set the Positioning of Centre Coupler
& Support Arms
Lay the lifter bar down on the spa cover. Adjust the Center Coupler (C)
piece and Support Arms (A) so that the Center Coupler is laying parallel to
the spa cover’s hinge about 1cm away (see ‘Figure 7’).
Using the #10 self tapping screws (N), fasten the support arms to the
pivot arms and the center coupler piece.
Note: Before screwing in screws, be sure to rotate the center coupler so that
the screws are screwed in at a horizontal angle (parallel with the spa cover).
This way when the cover folds over the lifter bar, the screw heads will not rub
on the cover. Consider placing a piece of cardboard underneath where you
are screwing into the center coupler to catch the metal shavings.
Step #8 - Setup the Support Arms & Center
Coupler
Insert the long end of the Support Arms (A) into the Center Coupler (C)
then slide the short ends of the Support Arms into the Pivot Arms (D) (see
‘Figure 6’). We will refer to connected Support Arms and Center Coupler
bar as the ‘lifter bar’ for the next step.
Step #7 - Replacing the Slat Pieces
Replace the freshly cut top and bottom slat pieces into their correct
positions either side of the mounting bracket. Simply screw back in and
replace the plastic screw covers.
Figure 6
Covermate I Plastic
Installation Instructions - Updated as of 08/30/12
Step #1
Position the spa cover (in closed position) on the spa, making sure that all four corners
are properly positioned and square on the spa.
CMI-PLAST 120830
Step #2
Using the #10 x 1” mounting screws, attach the left and right Mounting Brackets to the
appropriate sides of the spa. Caution: to prevent splitting of wood cabinet, pre-drill
holes with a 1/16” drill bit. Mounting height is optional (see Fig. 1). By positioning the
Brackets 8” down from the top of the spa shell, approx. 9” of clearance behind the spa
will be needed. Mounted at this position approximately 75% of the spa cover will be
standing above the spa surface in the o position. By positioning the Brackets 12”
down from the top of the spa shell, approx. 15” clearance behind the spa will be
needed. Mounted at this position, approximately 50% of the spa cover will be standing
above the spa surface in the o position.
Step #3
Connect the Pivot Arms to the Mounting Brackets (see Fig. 2). After the Pivot Arms are
connected, tilt them back into the upright position.
Step #4
Insert the long end of the Support Arms into the Center Coupler piece. Then slide the
Support Arms into the Pivot Arms (see Fig. 3).
Step #5
Lay the Covermate on the spa cover. Adjust the Center Coupler piece and Support
Arms so that the Center Coupler is laying parallel to the spa cover’s hinge about 1/2”
away (see Fig. 4). Using the #10 self tapping screws, fasten the Support Arms to the
Pivot Arms and the Center Coupler piece. Note: Be sure to rotate the Center Coupler
so that the inserted screws are at a horizontal angle with the heads facing the back
Step #6
Slip the black hand grips to the edge of the spa cover and snap the Small Black Dome
Caps on the heads of all exposed #10 screw heads. Push the 7/16” plug into the
unused bracket (H) hole.
CAUTION!
Do not use the Covermate in high wind condition. Injury from the spa cover being
blown over and impacting the spa user can occur.
ITEM PART# DESCRIPTION QTY
A 100001 SUPPORT ARM 2
B 100002 FOAM GRIP 2
C 100003 CENTER COUPLER 1
D 100004 PIVOT ARM 2
E 100007 PIVOT ARM CAP 2
F 100344 BUSHING 4
H 100021 MOUNTING BRACKET 2
I 100008 TOWELMATE 1
K 100010 3/8 X 3" HEX CAP BOLT 2
L 100011 3/8 NYLON LOCKNUT 2
M 100012 3/8 FLAT WASHER 4
N 100013 #10 X 5/8" SELF TAPPING SCREWS 12
O 100014 #10 X 1" MOUNTING SCREWS 24
P 100015 LARGE BLACK DOME CAP 2
Q 100016 SMALL BLACK DOME CAP 36
R 100347 7/16" PLUG 2
Step #7
Attach the provided 3 hook TowelMate on the preferred side of your Covermate by
simply snapping it into place and inserting the middle self tapping screw (see Fig. 5).
Pivot Arm
Support Arm
Center Coupler
Cover Hinge
Figure 4 Figure 5
Figure 3
A
C
D
I
TowelMate
Figure 1
Figure 2
D
K
H
Figure 1
Mounting Bracket
H
M
M
L
N
Self-
Tapping
Screw
Mounting Bracket
Pivot Arm
Washer
Washer
Locknut
Figure 7 Figure 8
Covermate I Plastic
Installation Instructions - Updated as of 08/30/12
Step #1
Position the spa cover (in closed position) on the spa, making sure that all four corners
are properly positioned and square on the spa.
CMI-PLAST 120830
Step #2
Using the #10 x 1” mounting screws, attach the left and right Mounting Brackets to the
appropriate sides of the spa. Caution: to prevent splitting of wood cabinet, pre-drill
holes with a 1/16” drill bit. Mounting height is optional (see Fig. 1). By positioning the
Brackets 8” down from the top of the spa shell, approx. 9” of clearance behind the spa
will be needed. Mounted at this position approximately 75% of the spa cover will be
standing above the spa surface in the o position. By positioning the Brackets 12”
down from the top of the spa shell, approx. 15” clearance behind the spa will be
needed. Mounted at this position, approximately 50% of the spa cover will be standing
above the spa surface in the o position.
Step #3
Connect the Pivot Arms to the Mounting Brackets (see Fig. 2). After the Pivot Arms are
connected, tilt them back into the upright position.
Step #4
Insert the long end of the Support Arms into the Center Coupler piece. Then slide the
Support Arms into the Pivot Arms (see Fig. 3).
Step #5
Lay the Covermate on the spa cover. Adjust the Center Coupler piece and Support
Arms so that the Center Coupler is laying parallel to the spa cover’s hinge about 1/2”
away (see Fig. 4). Using the #10 self tapping screws, fasten the Support Arms to the
Pivot Arms and the Center Coupler piece. Note: Be sure to rotate the Center Coupler
so that the inserted screws are at a horizontal angle with the heads facing the back
Step #6
Slip the black hand grips to the edge of the spa cover and snap the Small Black Dome
Caps on the heads of all exposed #10 screw heads. Push the 7/16” plug into the
unused bracket (H) hole.
CAUTION!
Do not use the Covermate in high wind condition. Injury from the spa cover being
blown over and impacting the spa user can occur.
ITEM PART# DESCRIPTION QTY
A 100001 SUPPORT ARM 2
B 100002 FOAM GRIP 2
C 100003 CENTER COUPLER 1
D 100004 PIVOT ARM 2
E 100007 PIVOT ARM CAP 2
F 100344 BUSHING 4
H 100021 MOUNTING BRACKET 2
I 100008 TOWELMATE 1
K 100010 3/8 X 3" HEX CAP BOLT 2
L 100011 3/8 NYLON LOCKNUT 2
M 100012 3/8 FLAT WASHER 4
N 100013 #10 X 5/8" SELF TAPPING SCREWS 12
O 100014 #10 X 1" MOUNTING SCREWS 24
P 100015 LARGE BLACK DOME CAP 2
Q 100016 SMALL BLACK DOME CAP 36
R 100347 7/16" PLUG 2
Step #7
Attach the provided 3 hook TowelMate on the preferred side of your Covermate by
simply snapping it into place and inserting the middle self tapping screw (see Fig. 5).
Pivot Arm
Support Arm
Center Coupler
Cover Hinge
Figure 4 Figure 5
Figure 3
A
C
D
I
TowelMate
Figure 1
Figure 2
D
K
H
Figure 1
Mounting Bracket
H
M
M
L
N
Self-
Tapping
Screw
INSTRUCTIONS FOR ARTESIAN MODELS - 4/4
14
