
© 2018 HI-POD INC. (PAGE 1)
© 2018 HI-POD INC.
HI-POD LR15-25 Setup Manual

© 2018 HI-POD INC. (PAGE 2)
© 2018 HI-POD INC.
Manual Index:
3 - Introduction
4 - Inventory Checklist
6 - Take Tower Out Of Case
7 - Set Legs, Safety Locks, and Sandbags
11 - Attaching the Robotic Motor
11 - Attaching Camera to Robotic Motor
12 - LCD Bracket
13 - LCD Battery
15 - Securing the Hi-Pod Cabling
15 - Connecting the Cables
18 - Cameras / Cables / Remotes
27 - Strain Relief Plate
31 - Text (REC) On Screen
34 - Camera Settings
37 - Elevating Tubes
38 - Lowering Tubes
39 - Putting The Tower Away
41 - Contact Information

© 2018 HI-POD INC. (PAGE 3)
© 2018 HI-POD INC.
Congratulations on Your New Hi-Pod LR!
Now you can begin to elevate your game.
~
LX - The HI-POD LR series combines the professional control features
of the Hi-Pod PRO units, with the ease of use and transport of a 35 lb
tower. Once you are familiar with the setup procedures it should take
10-15 mins to fully configure a unit.
*Note: Within 2 weeks of delivery, product must be checked and
confirmed by the client to have arrived in good order and in its entirety.
After that time, clients will be responsible for any and all lost parts
(which are not covered under the warranty).
*Confirm your inventory with the sheet on the following page.

© 2018 HI-POD INC. (PAGE 4)
© 2018 HI-POD INC.
LR-25 CHECKLIST
Monitor Bracket
Monitor Tip
3 Piece Rain Gear
3 Sandbags
Robot Head with Quick Release Spud
Robot Remote
AA Batteries with Charger
LCD
LCD Visor
LCD Battery
LCD Battery Charger
Camera Remote
Camera
16GB SD Card
Camera Power Bank
Gold Screw for Power Bank
Cable Stress Relief Plate
Extension Screw for Rain Gear
Cable Bundle
Hi-Pod Manual Instructions

© 2018 HI-POD INC. (PAGE 5)
© 2018 HI-POD INC.
3 IMPORTANT THINGS:
• ALWAYS use the Strain Relief Plate
for your cables
• ALWAYS use your sandbags
• Take note of the 'Text on Screen'
instructions to display record status
...and other camera settings - (page 31)

© 2018 HI-POD INC. (PAGE 6)
© 2018 HI-POD INC.
Take Tower Out Of Case
Take the tower out of your case, and place it on the ground. If you
have an LR from before 2018, there are two black twist knobs on the
base of the tower, and three yellow safety collars. Lock all 5 to secure
the unit in place. If you have an LR from April 2018 or after, you will
only have two black knobs in the base. Lock those down.

© 2018 HI-POD INC. (PAGE 7)
© 2018 HI-POD INC.
Set Legs, Safety Locks, and Sandbags
You will want to setup the base of the tower with the black slats
between the yellow legs as even/level with the ground as possible. This
will give you the maximum stability during operation.
Once the black slats are level, hold them in position with the three
yellow safety collars (see below). Once in place, turn the ratchets on
the yellow collars to lock in place (they can pop out, adjust, and
continue turning to lock more tightly), and the two black knobs should
be completely closed. (Below: yellow collars only apply before 2018).

© 2018 HI-POD INC. (PAGE 8)
© 2018 HI-POD INC.
USE
YOUR
SANDBAGS!

© 2018 HI-POD INC. (PAGE 9)
© 2018 HI-POD INC.
Sandbags continued....
The included sandbags are NOT optional. You must apply them every
time you use the tower. This is intended to provide your safety weight.
With a tower of 35 lbs, and an approximate extra 35 lbs in the
sandbags, this gets you to ~ 70 lbs in total. This is the approach which
works in the vast majority of situations.
You are welcome to go beyond the three bags should you want to.
Add cables through the legs which then connect to stakes (if not on a
turf field), add more sandbags, whatever you'd like! The three bags we
include are sufficient, but there is no harm in going beyond them if you
prefer, and also if you are dealing with extreme conditions.

© 2018 HI-POD INC. (PAGE 10)
© 2018 HI-POD INC.
NEVER WALK AWAY
FROM AN ELEVATED
TOWER.
NEVER EVER!
Don't do it - seriously!
When a tower is elevated you must manage it at all times. Anything
can happen at any time - unexpected winds can pop up, rain can
surprise you, someone could mess with your setup, or there could be
lightning - who knows?!
• If you ever need to walk away from the unit, bring it completely
down so the tubes are fully compressed. Then you can take a break.

© 2018 HI-POD INC. (PAGE 11)
© 2018 HI-POD INC.
Attaching the Robotic Motor
Simply attach the mounting pedestal that is underneath of
the motor into the top of the Hi-Pod tubes. Then lock the
mounting pedestal into the top tube spud by turning the
ratchet (which you can pop out, reposition, and continue
turning) until the motor is tightly held into the tubes.
Attaching Camera to Robotic Motor
Once the strain releif plate in in place (see page 27), simply attach the camera to the top of the
robotic motor and tighten the screw into place. Make sure the camera window is flipped open in
order for your camera to stay on while filming. However you can flip the camera window
forward and push it back to close. You will be using an HDMI cable so close the window as far
as you can.

© 2018 HI-POD INC. (PAGE 12)
© 2018 HI-POD INC.
LCD Bracket
The LCD Mounting Bracket holds the
screen on the tubes.
You will find a metal item with a black
tip on one end (for the LCD), and a black
clamp with silver connecting screw on
the other (connects to tubes).
Open the collar, size to the tube, and
close the silver screw to lock on.

© 2018 HI-POD INC. (PAGE 13)
© 2018 HI-POD INC.
<- - - see 2017 LCD battery on left
There are two LCD battery styles that have shipped. The
current 2017 model LCD and battery will be described first.
On the back of the screen take note of the velcro strap,
and two ports: 'HDMI IN 1' for video and 'DC' for power.
Attach the LCD battery as shown.
<- - Use the adapter on
the left to plug into the
USB end of the
battery, and then
connect the DC tip into
the LCD.

© 2018 HI-POD INC. (PAGE 14)
© 2018 HI-POD INC.
LCDs Pre-2017: Clients before 2017 will have a different battery system
Connect the battery by lining up the metal pins on the LCD battery
plate, and sliding them into the holes on the battery. Be careful not to
misalign and bend the pins.

© 2018 HI-POD INC. (PAGE 15)
© 2018 HI-POD INC.
Securing the HI-POD Cabling
It is important to minimize the strain on the connectors for the camera. Make sure the top
of the cables pictured to the left is at the top of the tubes and the bottom (pictured to the right) is
at the bottom of the unit.
There will be a yellow line at the top end of the chord. You will then find the strain relief
for the cables hanging down from the top of the tubes. Attach the clip below the yellow line or T-
bar attached to the cable. This keeps the cord for tugging on the connectors for the camera and
robotic motor, ensuring your equipment will last longer.
Connecting the Cables
1. Plug the cable pictured below into the back of the robotic motor. This cable controls the
motor. Set the robot to 'M' for manual, and set to 90 or 360 degrees.

© 2018 HI-POD INC. (PAGE 16)
© 2018 HI-POD INC.
2. Connect the HDMI cable into the HDMI Out port on the left side of the camera
pictured below.
Then find your long lanc cable which sends
remote control signal between the remote
and the camera. The WHITE end of the
cable goes into the remote. The BLACK end
goes into the camera. DO NOT REVERSE
THIS as if you do it does not function.
Plug in the HDMI cable into the HDMI IN source on your monitor pictured below.

© 2018 HI-POD INC. (PAGE 17)
© 2018 HI-POD INC.
In the cable bundle you'll find a slightly thicker cable with
pins inside at the bottom. You will connect this cable to the
directional remote to enable control over pan/tilt.
Notice the speed slider that is near the
bottom of the remote. For best
performance you will want to push that
slider all the way to the right.

© 2018 HI-POD INC. (PAGE 18)
© 2018 HI-POD INC.
Cameras / Cables / Remotes
There are also two categories of cameras, which have different setups:
(1) - Cameras with a fixed shell w/USB external battery (2016 forward)
(2) - Cameras with a battery that connects in the back (ended 2015)

© 2018 HI-POD INC. (PAGE 19)
© 2018 HI-POD INC.
• Cameras w/USB Power Pack (2016 forward)•
Sample Cameras: Sony CX240, CX405, etc...
The newest Hi-Pods ship with cameras that use an external USB power
pack. We have shipped white and grey batteries (they setup the same).
Find the USB power pack (exact style may vary), and attach to the
tower where there is a hook at the top of the tubes. Use the brass
screw (shown in the image) to sandwich the battery to the tower.
Connect the battery pack to the
camera with a USB female to male
extension cable (included in your
case). Note the shorter USB cable in
the hand-strap of the camera, and use
the longer extension to connect the
camera/battery.

© 2018 HI-POD INC. (PAGE 20)
© 2018 HI-POD INC.
Some versions of the battery
will have more than one
power port. The higher of the
voltage options is what you'll
plug into. On the current grey
battery (not pictured) the
plug is 2.4A
Now it's time to connect the camera to the remote which controls
zoom and record functions. The cable/remote are pictured below:

© 2018 HI-POD INC. (PAGE 21)
© 2018 HI-POD INC.
*NOTE IMAGE BELOW: If reversed, the system will not function.
* 2018: Note: The White Cable tip is now Red (edit for image below)
• Find the plastic cradle, insert remote, and attach to the LCD bracket.

© 2018 HI-POD INC. (PAGE 22)
© 2018 HI-POD INC.
*NOTE the Red (2018) or White (pre 2018) end plugs into the remote.
**NOTE the black end of the cable plugs into the camera 'Multi' port.

© 2018 HI-POD INC. (PAGE 23)
© 2018 HI-POD INC.
• Cameras w/battery in the back (ended 2015)•
For cameras that have
a battery which
connects in the back of
the unit, there are a
few more steps. We'll
work from the top
down in this setup.
*Note the 'Multi' port
under the hand strap
on the camera.
4 Cables In Total
• (1) Find the 'Multi-Adapter cable
(pictured right), and plug it into the
'Multi' port.

© 2018 HI-POD INC. (PAGE 24)
© 2018 HI-POD INC.
• (2) The 'Sony D-Cable' will plug into the D-
shaped port on the 'Multi-Cable'. In the vast
majority of cases, the only cable involved is the
black cable with the stereo tip. The RCA cables are
only involved if not using HDMI. Just ignore them.
(3) You'll find a really long
skinny 'Lanc Cable' (pictured
right), which links the 'D-
Cable' down to the remote.
This cable runs the length of the
entire unit (top to bottom).

© 2018 HI-POD INC. (PAGE 25)
© 2018 HI-POD INC.
(4) Over the years, three different remotes have shipped with this lanc
system. See images below (left to right: Silver Sony, Vivitar, VariZoom):
All of these remotes have a 4-6" cable
which ends in a silver connector with
three pins. This will connect to the
long 'lanc' cable on the end which has
ports to receive these three pins. Just
connect the ends, and they will snap
into place. You can release by
pressing the small black button when
disassembling.

© 2018 HI-POD INC. (PAGE 26)
© 2018 HI-POD INC.
Connecting HDMI:
For all HD cameras (regardless of what battery system you have) you
will plug the long HDMI cable into the mini/micro port on your camera
(found under the camera's LCD window), and run it down to the
standard HDMI port in the large LCD at the base.
(Camera)
(Back of LCD)

© 2018 HI-POD INC. (PAGE 27)
© 2018 HI-POD INC.
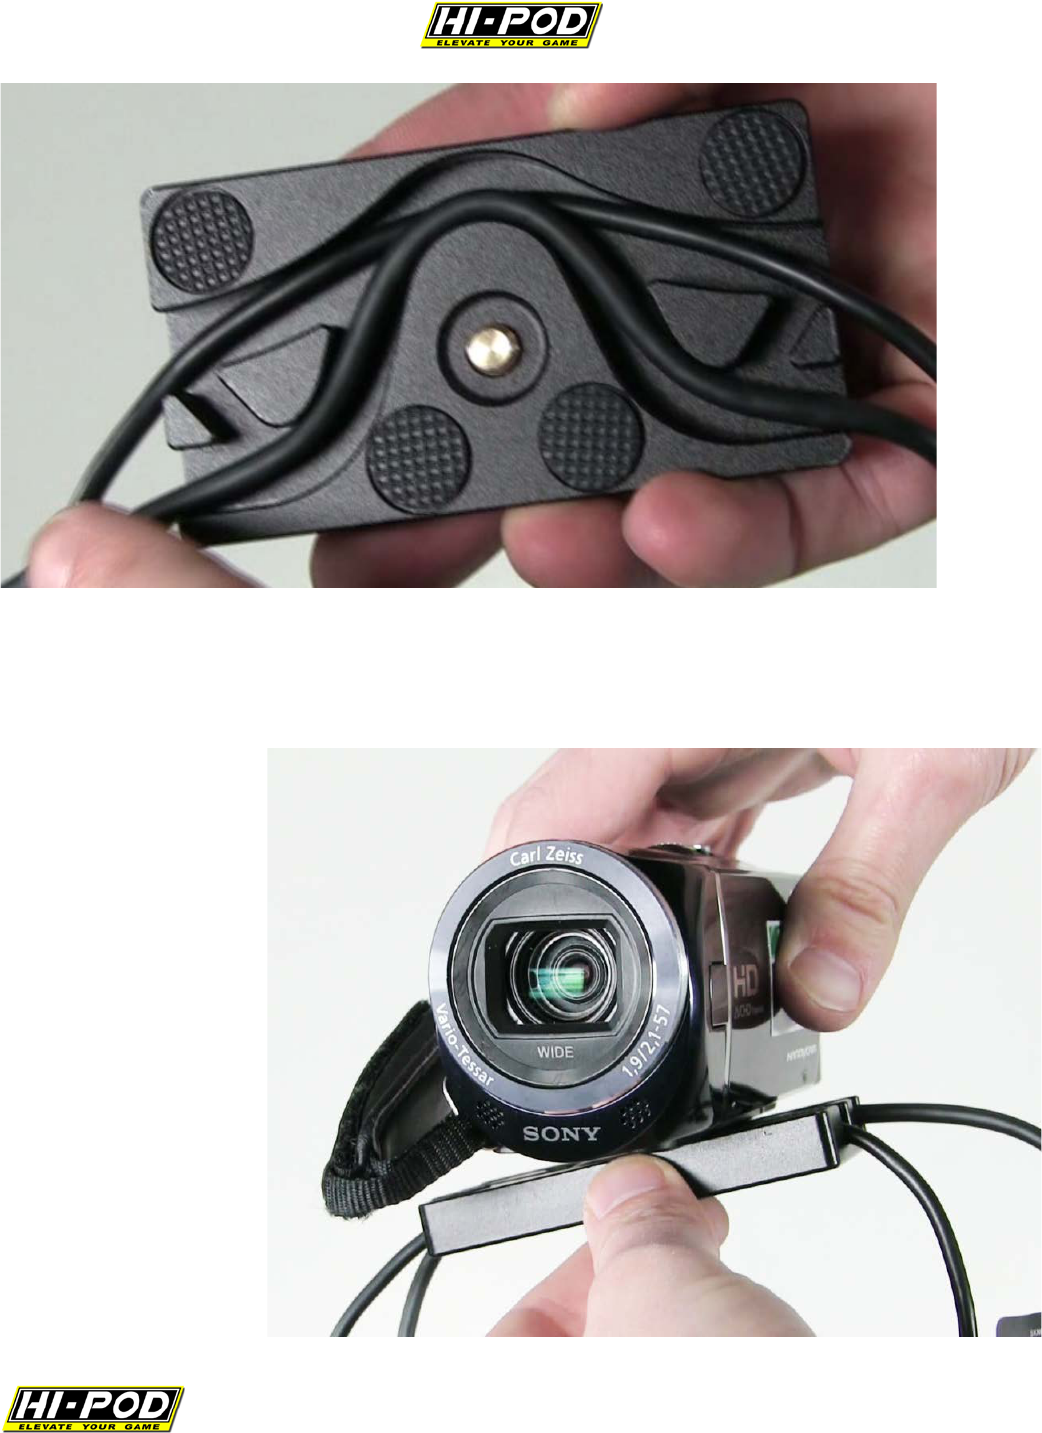
Strain Relief Plate
*This is one of the most important steps during setup for any camera.
Failure to use this plate can void your electronics warranty. See the
cable Strain Relief Plate below:
NOTE: Cameras shipped in 2018 will snap into a quick release plate
-
no need to re-thread cables every time. Before 2018, follow the steps
below.
The Strain Relief Plate locks the video and lanc cables firmly under the
camera. When the unit is fully elevated, it prevents gravity from pulling
down on the delicate cable tips/camera ports, which can cause the tips
to break or ports to widen. If damage occurs your control/video signal
will drop - so USE THIS ITEM EVERY TIME. *Damage to the system can
occur as quickly as a single use if not applied.
© 2018 HI-POD INC. (PAGE 28)
© 2018 HI-POD INC.
You use this plate by threading your video and lanc cables through it (in
opposite directions to come out on the appropriate sides of the
camera).
Attach your
camera with the
brass screw in the
middle of the
plate.

© 2018 HI-POD INC. (PAGE 29)
© 2018 HI-POD INC.
The brass screw is
flushed against the
bottom of the black
plate, so you'll need to
use a coin (or whatever
is available) to securely
connect.

© 2018 HI-POD INC. (PAGE 30)
© 2018 HI-POD INC.
After the Strain Relief Plate is attached, to mount to the Hi-Pod
wheeled head, find the smaller of the two holes next to the bottom of
the brass screw. This will connect with the camera mounting screw.

© 2018 HI-POD INC. (PAGE 31)
© 2018 HI-POD INC.
Text (REC) On Screen
In general, cameras under $1,000 do not have the ability to save a
setting to push out text (record/battery status) from the camera down
to the LCD. There is a way to achieve this on less expensive cameras,
but it's applied every time the camera is turned on. Once memorized it
takes about 5 secs.
• First, click on the 'Menu' button in the top left corner:
• Select
'Camera/Mic'

© 2018 HI-POD INC. (PAGE 32)
© 2018 HI-POD INC.
• Scroll down until you find 'Scene Selection' and click on it
Your screen will change to look like this. Click on the bottom right
arrow to continue.

© 2018 HI-POD INC. (PAGE 33)
© 2018 HI-POD INC.
At this point, your screen will clear up leaving the middle unobstructed.
DO NOT CLICK ANYTHING. Just leave the screen here. The text
displayed will push down to your LCD - notice the 'STBY' in green. This
will change to a red 'REC' indicator when you're recording. This way
you'll always know when you are or aren't recording.
This text overlay will not be on your final video files. It is only seen by
the Hi-Pod operator when they are filming.
*Note: If you have a remote which has a 'Photo' button option - DO
NOT HIT IT. If you do it will bounce you out of this view back into the
menu where you chose 'Scene Selection.' If you do this while the
camera is in the air, you will have to bring it all the way down to setup
on the camera again.

© 2018 HI-POD INC. (PAGE 34)
© 2018 HI-POD INC.
Camera Settings Continued: Dual Video REC
On new cameras for 2017 (example CX405), they appear to default ship
with a setting called 'Dual Video REC'
enabled in the camera settings.
When this feature is active the camera saves two copies of the same
clip in different quality settings (one is higher def, one is for online
sharing). What this means is that the camera is taking double the
storage space that it needs to. Whether you want to leave this setting
on is up to the preference of the user, but if you want to turn it off..
• First go to 'Menu'
• Then 'Image Quality/Size' • Then look for 'Dual Video REC'
• Turn this feature 'Off'

© 2018 HI-POD INC. (PAGE 35)
© 2018 HI-POD INC.
Camera Settings Continued: Confirming Camera Battery
For those clients using either the grey or
white USB batteries, you need to confirm
that the battery is turned on and is set as
the main power source before elevating.
Without doing this, it's possible to leave
the small internal camera battery active
which will die quickly.
If you have your camera
connected to the LCD (with
text on screen applied as
explained earlier in this
manual) you will see the
battery icon in the top left.
This means the small
internal battery is active.
This is not what you want.
First, mount the battery to the tower at the
hook on the side of the tubes. Connect the
battery to the camera with the female-to-
male USB cable extension. The female end
will connect to the USB cable found in the
camera hand strap.

© 2018 HI-POD INC. (PAGE 36)
© 2018 HI-POD INC.
Click the button on the side of the battery
to turn it on.
You will see the buttons on the battery light up blue.
When connected correctly and
turned on, the battery button in
the top right of the LCD will
disappear. This is what you want
,
and (when charged) will allow the
camera to record for at least 5 hrs.

© 2018 HI-POD INC. (PAGE 37)
© 2018 HI-POD INC.
Elevating Tubes
At this point in the setup, your unit is set to elevate.
Grab a pole above a collar, unlock, raise to your desired height, and lock
again.

© 2018 HI-POD INC. (PAGE 38)
© 2018 HI-POD INC.
Lowering Tubes
When lowering the tubes, always grab the pole above a collar before
opening that collar. If you do not grab the pole first, it will shoot down.
Velcro Cables to Tubes
We include a strap of velcro above
every collar. Use this to attach your
video/lanc cables to the tower. This
keeps your cables out of the way, and
acts and an additional strain relief.

© 2018 HI-POD INC. (PAGE 39)
© 2018 HI-POD INC.
Putting The Tower Away
When it's time for you to put away the unit, most of the setup can just
be done in reverse.
Two key things to point out:
(1) When attempting to fold the tower, unlock all knobs and push your
foot lightly down on the black slats between the legs, and pull up on
the silver ring. The legs will fold in.

© 2018 HI-POD INC. (PAGE 40)
© 2018 HI-POD INC.
• For the tower to fit back into the case, you must line up of all of the
knobs on the unit - both top (tubes) and bottom (base). If this is not
done, the tower will not fit into the case correctly.
*Note: Cases are provided to protect the tower during shipment, and to
facilitate easier transport on and off the field. Cases have a fabric
exterior, so be aware of this when putting other gear around/on top of
it, and also when moving in and out of a vehicle - make sure not to
catch on anything that could rip the case. This is up to the user.

