Lutron Electronics Co., Inc.
Coopersburg, PA 18036-1299, U.S.A.
P/N 368-4025 Rev. D 03/2023 |
Lutron and the Lutron logo are trademarks of Lutron Electronics Co., Inc., registered in the US and other countries
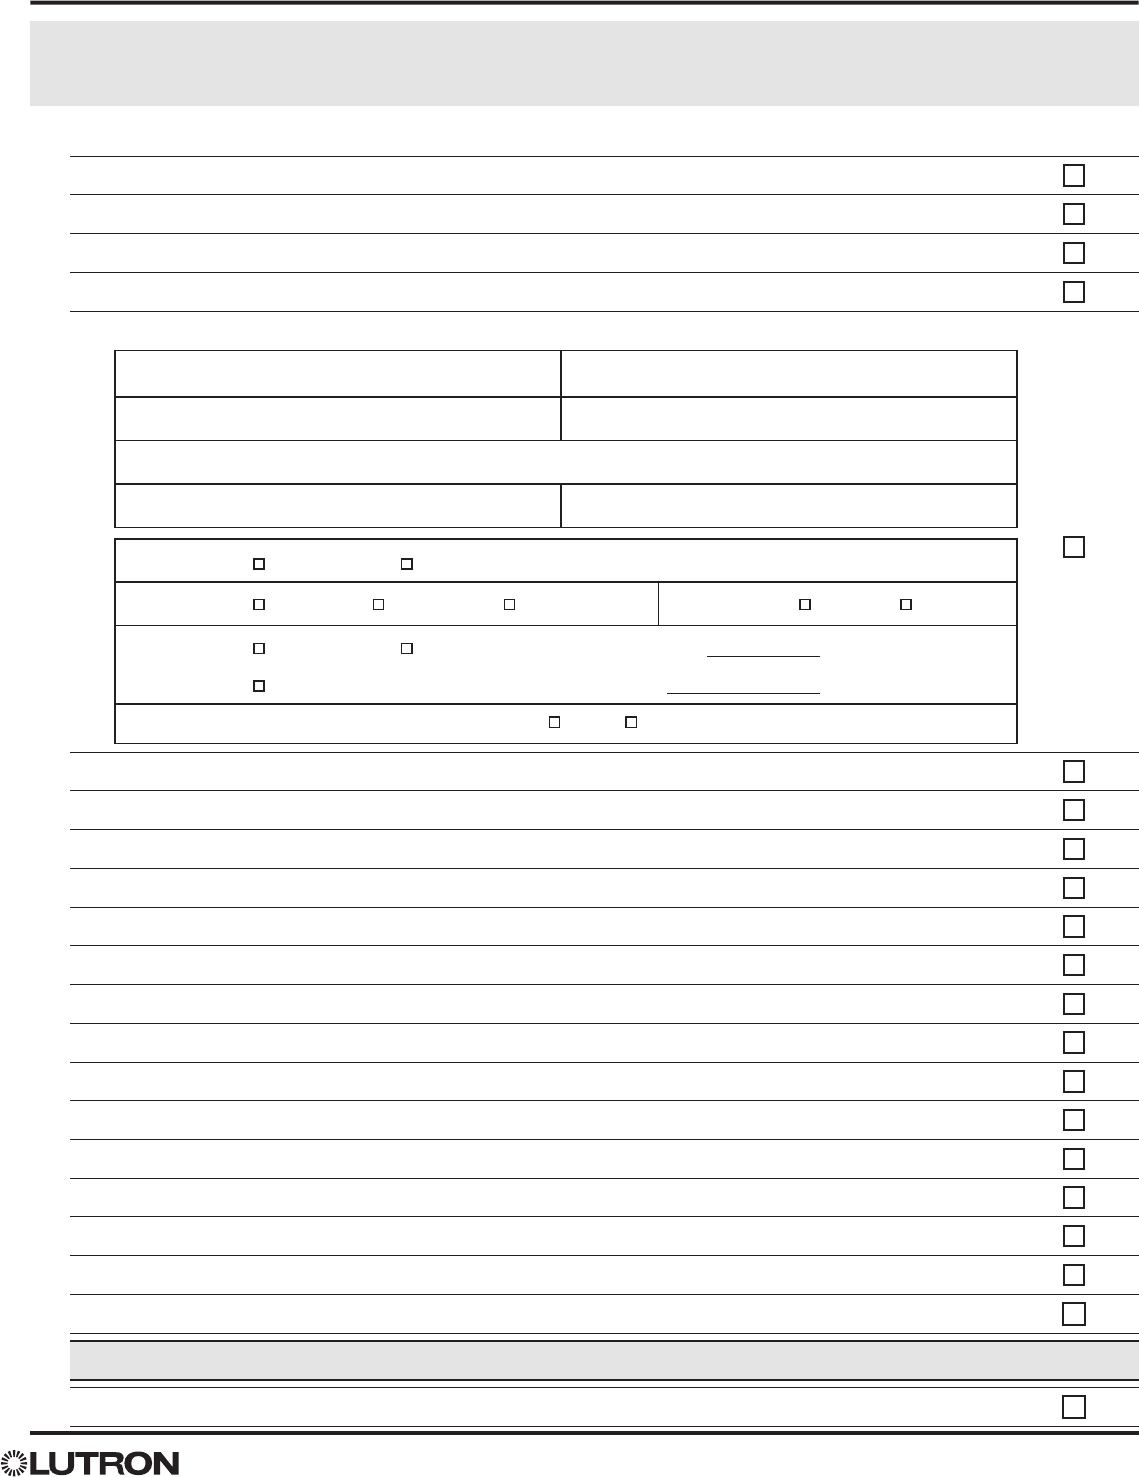
Lutron Custom Curved Drapery Track Worksheet
IMPORTANT: All steps must be complete prior to sending in your template. Failure to complete any of the noted
steps in this document will result in your template being rejected. Templates that are rejected will be sent back to the
dealer for correction and must be resubmitted successfully before the quoted lead time begins.
INSTRUCTIONS
COMPLETE
1. Determine and confirm whether a custom order is needed
Page 1, Sec 1
2. Review the general guidelines and limitations for custom curved drapery tracks
Page 1, Sec 2.1
3. Verify, if necessary, that the required curve radius is at least 20 in (508 mm)
Appendix (Page 5)
4. Submit your quote to obtain a COM number and coded shipping label
Page 1, Sec 2.2
5. After completing step 4, enter details below:
COM Number: Quote Number:
Dealer Name: Job Name:
Dealer Address:
Phone Number: Email Address:
Choose one: Single Track Dual Track Spacing between tracks: _______ in mm (circle one)
Choose one:
Left Draw Right Draw Center Draw Choose one: Splice No Splice
Choose one:
Pocket Mount Pocket Width: _________________ in mm (circle one)
Choose one: Drive side (viewed facing window)
Left Right
6. Construct the custom curve template according to the attached instructions
Page 2, Sec 3
7. Mark the correct orientation (A or B) on the template
Page 2, Sec 3.2
8. Verify clearance to the wall and other obstacles is 3½ in (89 mm) or more
Page 3, Sec 3.3
9. Write or affix your contact info on the template
Page 3, Sec 3.4
10. Mark the drapery track centerline on the template
Page 3, Sec 3.4
11. Mark drive location(s) on the template
Page 3, Sec 3.4
12. Mark the ends of the track(s) on the template
Page 3, Sec 3.4
13. Mark the extents of the pocket, if applicable, on the template
Page 3, Sec 3.4
14. For a tandem or center-draw system, mark the track center on the template
Page 3, Sec 3.4
15. Mark the wall or pocket position on the template
Page 3, Sec 3.4
16. Mark the splice location, if applicable, on the template
Page 3, Sec 3.4
17. Write the COM number directly on the template
Page 4, Sec 4.1
18. Complete this page and affix a copy of it to the template
Page 4, Sec 4.1
19. Verify the track length on the template matches the track length listed on the quote
Page 4, Sec 4.1
20. Make a photo record of the finished template in place, on site
Page 4, Sec 4.2
21. IMPORTANT: Process your custom curved drapery track quote as an order in MyProjects before submitting the template
22. Pack and mail the template
Page 5, Sec 5

Customer Service & Ordering
USA & Canada; 08.00 - 19.00 EST: 1.800.446.1503
U.K.; 09.00 - 18.00 GMT: +44.(0)20.7702.0657
commercialshadeest@lutron.com (commercial)
[email protected] (residential)
Technical Support & Services
USA and Canada; 24 hrs / 7 days: 1.800.523.9466
U.K.; 08.00 - 18.00 GMT: +44.(0)20.7680.4481
forums.lutron.com
Lutron Electronics Co., Inc.
Coopersburg, PA 18036-1299, U.S.A.
P/N 368-4025 Rev. D 03/2023 |
Lutron and the Lutron logo are trademarks of Lutron Electronics Co., Inc., registered in the US and other countries
Please complete all steps of this procedure before submitting your order
Making the Custom Curved Drapery Track Template
Page 1
1
About Standard Curved Drapery Tracks
Lutron provides standard curved drapery tracks to fit inside or outside a 90 degree
corner. These tracks have a bend radius of 20 inches. This solution does not require the
creation of a template (you do not need this document), and can be found as a drapery
track option in myProjects. To specify in myProjects, select Add Product, then choose
Drapery. In the Product Details field, select Standard Curved Track. (Drive and
communication selections vary depending on need.) Standard curved drapery tracks are
available in single and tandem configurations only. All dual curved drapery tracks are
custom, and require a template.
If you need a Custom Curved Drapery Track, proceed to section 2.
2
Before You Begin the Template
2 .1 General guidelines and limitations
a. Lutron drapery track can be custom-curved to fit a curved wall, bay window, and many
other special applications. Constant radius is recommended.
b. A paper template is the only way to ensure accurate curving of the drapery track.
c. The finished track may vary ±3/4 in (19 mm) from the template.
d. Allow 1 in (25 mm) clearance between ends of drapery tracks and walls.
e. Curves must have a minimum radius of 20 inches. If you are unsure whether your curved
wall or window meets this requirement, see the Appendix on page 5.
f. 90° is the tightest inside angle possible. Smaller angles are not allowed. See figure 2.1F
g. “S” bends and other multiple-bend shapes can only be achieved by splicing two curved
tracks together.
h. Splices can only be made in straight sections of drapery track. Splice must occur on a
straight length of track at least 16 in (406 mm) long. See figure 2.1G/H
i. Maximum 1-piece track length is 216 in (548.6 cm)
j. Maximum 2-piece (spliced) track length is 360 in (914.4 cm)
k. Minimum spacing for dual tracks is 5½ in (140 mm) center-to-center. See figure 2.2K
l. Pockets must allow ample space for the track(s) and drapery stackback.
See table 2.1L for minimum pocket dimension.
Minimum
Dimension
Wall or Ceiling
Mount
Dual Track
P 6 in (152 mm) 11.5 in (292 mm)
Tabl e 2.1L
2.2 Submit your quote to obtain a COM number and coded shipping label
Before making your curved track template, you must submit a drapery track quote* to
the Lutron Shading Quotes Department. Upon receipt of your quote, the Shading Quotes
team will send you a COM number to identify materials associated with your order, along
with a bar-coded address label you’ll use to ship your template. If you submit a template
without a COM number and Lutron-issued shipping label, it will be rejected.
*Your quote must be calculated based on the straight-length equivalent of the curved
track(s) to be ordered, and must be submitted via email to [email protected].
Please be sure to include all relevant measurements and curved track details, including
constant/variable radius, single/dual/tandem configuration, and splice/no-splice. These
details will be used by the Shading Quotes team to finalize the Lutron quote.
Min. 16 in (406 mm)
Splice
Splice
Figure 2.1G/H
LESS
THAN 90°
MORE
THAN 90°
90°
Figure 2.1F
Min. 5.5 in (140 mm)
Figure 2.1K
Contents
1 About Standard Curved Drapery Tracks ........ 1
2 Before You Begin the Template ..................... 1
2.1 General guidelines and limitations ......1
2.2 Submit your quote .............................1
3 Making the Template ..................................... 2
3.1 Tools and materials ............................2
3.2 Build the paper layout ........................2
3.3 Trace the curvature ............................3
3.4 Add vital information ..........................3
4 Finishing the Template .................................. 4
4.1 Final preparations for submittal ..........4
4.2 Make a photo record ..........................4
5 Pack and Ship the Completed Template ....... 5
APPENDIX: Qualifying the Minimum Radius ...... 5

Lutron Electronics Co., Inc.
Coopersburg, PA 18036-1299, U.S.A.
P/N 368-4025 Rev. D 03/2023 |
Lutron and the Lutron logo are trademarks of Lutron Electronics Co., Inc., registered in the US and other countries
Please complete all steps of this procedure before submitting your order
Making the Custom Curved Drapery Track Template
Page 2
3
Constructing the Template
3.1 Tools and materials for constructing a durable template and submitting it to Lutron
3.2 Build the paper layout
a. Begin by taping contractor paper together close to wall. Use the ceiling or the floor (floor shown), whichever follows the curvature best.
Contractor Paper* Mailing Tube
Compass
(optional; recommended)
*NOTE: Anything other than contractor paper or poster paper may be rejected.
Please use the most durable material available.
Figure 3.2a
b. If making the template on the ceiling, mark the template “Orientation A.”
If making the template on the floor, mark the template “Orientation B.”
Figure 3.2b
Digital Camera
or Camera-Equipped
Smartphone
Masking Tape (2-inch or wider;
please do not use painter’s tape)
Black Marker Scissors Tape Measure
Minimum
12 in (305 mm)
Tape all edges securely
Contractor Paper
Ceiling
Floor
Orientation
A
Orientation
B

Lutron Electronics Co., Inc.
Coopersburg, PA 18036-1299, U.S.A.
P/N 368-4025 Rev. D 03/2023 |
Lutron and the Lutron logo are trademarks of Lutron Electronics Co., Inc., registered in the US and other countries
Please complete all steps of this procedure before submitting your order
Making the Custom Curved Drapery Track Template
Page 3
Paper
Drapery Track
Centerline
Wall
3
Making the Template (continued)
3.3 Trace the curvature
a. Using a compass or similar tool to maintain a constant spacing to the wall, follow the wall profile to trace the track centerline onto paper.
b. After completing the trace, darken the pencil line with the black marker.
The typical distance for wall
mounted track is 3½ in (89 mm)
from the wall, however, your
distance may be greater for the
curtain to clear items like handles,
window sills, columns, vents, etc.
Figure 3.3
3.4 Add vital information
Figure 3.4
Mark the
Drapery Track
Centerline
Mark ends of track
(and extents of pocket if applicable)
Mark drive
location(s)
Mark wall
location
(if applicable)
Mark contact info
or attach business card
Mark center draw location
(if applicable)
Mark template
orientation
A = Ceiling
B = Floor
Orientation
B
SPLICE
CENTER
DRAW
CENTERLINE
WALL
DRIVE
END OF
TRACK
END OF
TRACK

Lutron Electronics Co., Inc.
Coopersburg, PA 18036-1299, U.S.A.
P/N 368-4025 Rev. D 03/2023 |
Lutron and the Lutron logo are trademarks of Lutron Electronics Co., Inc., registered in the US and other countries
Please complete all steps of this procedure before submitting your order
Making the Custom Curved Drapery Track Template
Page 4
IMPORTANT: All steps must be complete prior to sending in your template. Failure to complete any of the noted
steps in this document will result in your template being rejected. Templates that are rejected will be sent back
to the dealer for correction and must be resubmitted successfully before the quoted lead time begins.
4
Finishing the Template
4.1 Final preparations for submittal
a. Complete the form and checklist on the Custom Curved Drapery Track Worksheet, then attach a copy of that page to the template as
shown below.
b. Verify the length of the track centerline on the template matches the track length listed on the quote.
NOTE: The length of the track centerline and the track length listed on the quote must match.
c. Be sure that the template is taped together in one piece. Mark an “X” over each taped seam so the Lutron Manufacturing team will have a
reference as to where to rejoin those pieces in the event they become separated.
NOTE: Templates shipped on separate sheets will be rejected. Each curved track must have its own template. The only exception is dual
tracks, which can be on the same template.
4.2 Make a photo record
a. Take a digital photo of the finished template in place.
b. Take several photos of the surface where the drapery track will be mounted, and the surroundings.
NOTE: Lutron may request copies of your photos if clarification of installation site features is needed.
Attach a
completed
copy of the
Custom Curved
Drapery Track Worksheet
Mark an “X” across each seam
Write the COM
number directly
on the template
Orientation
B
WALL
CENTER
DRAW
COM #
123456789
END OF
TRACK
END OF
TRACK
DRIVE
INSTRUCTIONS
COMPLETE
1. Determine and confirm whether a custom order is needed
Page 1, Sec 1
2. Review the general guidelines and limitations for custom curved drapery tracks
Page 1, Sec 2.1
3. Verify, if necessary, that the required curve radius is at least 20 in (508 mm)
Appendix (Page 5)
4. Submit your quote to obtain a COM number and coded shipping label
Page 1, Sec 2.2
5. After completing step 4, enter details below:
COM Number:
123587469
Quote Number:
Q776F
Dealer Name:
Smith & Doe
Job Name:
Lillian House
Dealer Address:
2121 Fieldhouse Road, Taylor, OH 44711
Phone Number:
302-897-5551
Email Address:
Choose one:
Single Track
Dual Track Spacing between tracks: _______ in mm (circle one)
Left Draw
Right Draw
Center Draw
Splice
No Splice
Choose one:
Ceiling Mount
Wall Mount
Distance from wall: ____________ in mm (circle one)
Pocket Mount
Pocket Width: _________________ in mm (circle one)
Choose one: Drive side (viewed facing window)
Left
Right
6. Construct the custom curve template according to the attached instructions
Page 2, Sec 3
7. Mark the correct orientation (A or B) on the template
Page 2, Sec 3.2
8. Verify clearance to the wall and other obstacles is 3½ in (89 mm) or more
Page 3, Sec 3.3
9. Write or affix your contact info on the template
Page 3, Sec 3.4
10. Mark the drapery track centerline on the template
Page 3, Sec 3.4
11. Mark drive location(s) on the template
Page 3, Sec 3.4
12. Mark the ends of the track(s) on the template
Page 3, Sec 3.4
13. Mark the extents of the pocket, if applicable, on the template
Page 3, Sec 3.4
14. For a tandem or center-draw system, mark the track center on the template
Page 3, Sec 3.4
15. Mark the wall or pocket position on the template
Page 3, Sec 3.4
16. Mark the splice location, if applicable, on the template
Page 3, Sec 3.4
17. Write the COM number directly on the template
Page 4, Sec 4.1
18. Complete this page and affix a copy of it to the template
Page 4, Sec 4.1
19. Make a photo record of the finished template in place, on site
Page 4, Sec 4.2
20. IMPORTANT: Process your custom curved drapery track quote as an order in MyProjects before submitting the template
21. Pack and mail the template
Page 5, Sec 5
TO ENSURE A SUCCESSFUL CUSTOM CURVED DRAPERY TRACK ORDER,
FOLLOW THESE STEPS (detailed instructions attached):
Lutron Electronics Co., Inc.
Coopersburg, PA 18036-1299, U.S.A.
P/N 368-4025 Rev. C 11/2021
|
Lutron and the Lutron logo are trademarks of Lutron Electronics Co., Inc., registered in the US and other countries
Lutron Custom Curved Drapery Track Worksheet
CENTERLINE
CENTERLINE

Lutron Electronics Co., Inc.
Coopersburg, PA 18036-1299, U.S.A.
P/N 368-4025 Rev. D 03/2023 |
Lutron and the Lutron logo are trademarks of Lutron Electronics Co., Inc., registered in the US and other countries
Making the Custom Curved Drapery Track Template
Page 5
IMPORTANT: ALL INSTRUCTIONS MUST BE FOLLOWED. A Production Engineer will review your template and will
determine if it is approved or if additional information is required. If the template meets the necessary requirements,
your curved track layout will be approved for manufacture. Failure to complete any of the noted steps in this document
will result in your template being rejected. Templates that are rejected will be sent back to the dealer for correction
and must be resubmitted successfully before the quoted lead time begins.
5
Pack and Ship the Completed Template
APPENDIX:
Qualifying the Minimum Radius (optional; see page 1, section 2.1, item d.)
a. Carefully roll the template and slide it into a sturdy mailing tube.
NOTE: Do not fold the template. Folding makes it difficult to lay flat, which may distort the true size and shape of curve.
b. Apply the addressed COM label supplied with your quote to the outside of the tube and ship via the carrier of your choice.
COM Label
Mailing Tube
Template
(rolled up)
Use the method shown here to
determine whether the curvature
of your installation site meets the
20-inch minimum radius requirement.
a. Using a chalk line or string, mark a
reference line (a.) connecting the two
ends of the curved wall section.
b. Find the midpoint of reference line a.,
and mark a second reference line (b.)
at a 90° angle to the first, extending
to the curved wall. See figure A.1
c. Measuring from the wall along
reference line b., make a reference
mark (c.) 20 inches from the wall.
d. Anchor a piece of string at reference
mark c., then extend it along
reference line b., to the curved wall.
Cut the string where it reaches
the curved wall (a 20-inch length).
See figure A.2
e. Swing the end of the string in an arc
to establish a 20-inch radius and
observe its proximity to the curved
wall. See figure A.3
If the string’s arc is smaller than the
curvature of the wall, the wall’s radius
is larger than 20 inches, and the site
qualifies for a curved drapery track.
Midpoint of Line a.
a.
b.
90°
Figure A.1
20 in
radius
c.
Larger than
20 in radius
20 in
string
Figure A.3
c.
b.
Wall
String
Figure A.2
